Welcome back!
In our last lesson, you created the basic containers for your future systems by learning the difference between inline and full-page databases. You now have a "Master Content Hub" and a "Creator Dashboard" ready to be built out.
Today, we're going to start filling those containers with structured information. A database is only as powerful as the data it holds, and properties are how we define and organize that data. This lesson is your next step in transforming a simple list of pages into a dynamic, intelligent system. We will focus on three fundamental property types that form the bedrock of almost every Notion database.
By the end of this lesson, you will be able to add and configure the basic property types: Text, Number, and Checkbox.
1. What Are Database Properties?
If a database is a filing cabinet and each entry is a folder, then properties are the labels on the outside of each folder. They are the columns in your database that hold specific, structured pieces of information about each item, such as a name, a date, a status, or a URL.

Using the correct property type is crucial. For example, if you put a date in a Text property, Notion just sees it as a word. But if you put it in a Date property (which we'll cover later), you can then view that item on a calendar, sort by due date, and set reminders.
Let's start by exploring the three most basic, yet essential, property types.
2. The Core Property Types
To see these properties in action, let's watch a few short, focused clips from the video "All Notion Databases Explained in Under 30 Minutes!" by Creative Cove. This will give you a clear visual of how to add and use each one.
All Notion Databases Explained in Under 30 Minutes! (Full Guide)
This video provides a fantastic, step-by-step demonstration of adding different properties. We'll jump to the specific sections for Text, Number, and Checkbox.
Watch the following three short segments: Text Property: Watch from 06:11 to 06:44. Number Property: Watch from 06:44 to 08:17. Checkbox Property: Watch from 12:22 to 12:47. Focus on how each property is added and what kind of information it's designed to hold.
Now, let's break down what you just saw and discuss the strategy behind using each one.
A. Text Property
The Text property is your go-to for free-form writing. It's flexible and can hold almost anything, from a short note to a long paragraph.
-
Primary Use Cases:
- Names/Titles: The default "Name" property is a special, required Text property.
- Descriptions: Brief summaries or descriptions of an item.
- Notes: Quick, unstructured thoughts or comments.
-
Strategic Advice:
The biggest beginner mistake is using the Text property for everything. If the data has a specific structure—like a date, a status, or a category—it should not be in a Text field. Using the correct property type from the start is key to building templates that are easy to filter and sort.
B. Number Property
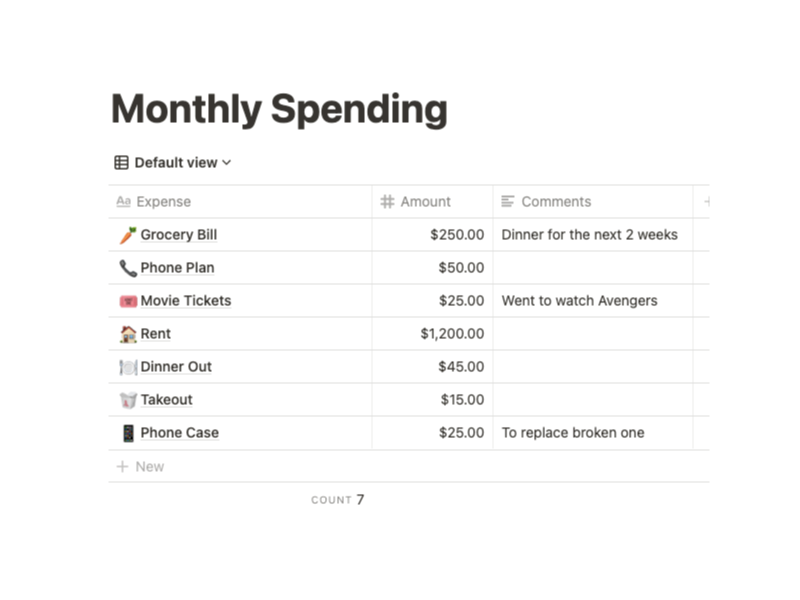
The Number property is for any data you might want to count, measure, or perform calculations on.
-
Primary Use Cases:
- Quantities: Word count, number of ingredients, inventory count.
- Financials: Price, budget, expenses.
- Ratings or Scores: A rating out of 5 or 10.
-
Key Features:
- Formatting: As you saw in the video, you can format numbers as currency, percentages, or even display them as progress bars or rings—a great feature for visual dashboards.
- Calculations: At the bottom of a number column in a table, you can automatically calculate the
Sum,Average,Median,Min,Max, and more. This is incredibly useful for summary views.
C. Checkbox Property
The Checkbox property is the simplest of all: a binary true/false toggle.
-
Primary Use Cases:
- Task Completion: The classic "Done?" checkbox.
- Tracking: "Published?", "Archived?", "Reviewed?".
- Filtering: Use a checkbox to mark items you want to hide from your main view (e.g., an "Archive" checkbox).
-
Strategic Advice:
A checkbox is perfect for any question with a simple "yes" or "no" answer. Its simplicity is its strength, providing a clear visual indicator of status.
For a deeper dive into the strategic thinking behind choosing properties, this article is an excellent resource.
Notion Database Properties Explained: A Complete Guide (2025)
The article 'Notion Database Properties Explained' from NotionApps offers great advice on not just what properties do, but why you should choose one over another.
Read the following sections: Start with 'Understanding Database Properties (Why They Matter)'. Then, in the 'Choosing the Right Property for the Right Job' section, read points 1 ('Use Text for Flexible Notes...'), 3 ('Use Dates...'), and 4 ('Use Numbers...'). Finally, read the 'Common Mistakes When Building Databases' section, paying close attention to the point 'Using text for everything'. This will solidify your understanding of the strategic importance of what we've covered today.
Test your understanding!
You're designing a database for a "Reading List" template. For each book, you want to track the following three pieces of information. Which property type would you use for each?
- The title of the book.
- The total number of pages in the book.
- Whether you have finished reading it.
Show answer
- Book Title:
Text(or the defaultNameproperty). This is unique, free-form text. - Number of Pages:
Number. This is a measurable quantity. - Finished Reading:
Checkbox. This is a simple yes/no state.
✍️ Exercise: Add Properties to Your Content Hub
It's time to apply this to the "Master Content Hub" you created in the last lesson. This will be the foundational structure for the content creation template you'll eventually design.
- Navigate to your "Master Content Hub" database.
- Rename the "Name" property. By default, Notion gives you a primary property called "Name" and a "Tags" property.
- Click on the "Name" column header, and rename it to "Content Idea". This is where you'll put the title of a blog post or video.
- Delete the default "Tags" property. We'll be adding our own structured properties.
- Click on the "Tags" column header, select "Delete property", and confirm.
- Add a
Textproperty.- Click the
+icon at the far right of the table. - Name the property "Brief Description".
- Set the
TypetoText.
- Click the
- Add a
Numberproperty.- Click the
+icon again. - Name the property "Target Word Count".
- Set the
TypetoNumber.
- Click the
- Add a
Checkboxproperty.- Click the
+icon one more time. - Name the property "Idea Approved".
- Set the
TypetoCheckbox.
- Click the
Your database should now have three new columns, ready to structure your content ideas! Feel free to add a few example entries to see how it works.
Lesson Summary and Next Steps
Fantastic work! You've moved beyond creating empty databases and have now taken the first, most critical step in structuring your data. By choosing the right property for the right job, you're building a solid foundation for the powerful systems you want to create.
Key Takeaways:
- Properties are the columns in a database that hold structured information.
- The Text property is for flexible, free-form notes and descriptions.
- The Number property is for any data you need to count, measure, or calculate.
- The Checkbox property provides a simple "yes/no" or "done/not done" toggle.
- Choosing the correct property type from the start is essential for creating clean, functional, and sellable templates.
You now know how to capture basic information. In our next lesson, we will explore properties that are designed for organization and categorization: Select and Multi-select. These will allow you to tag, group, and filter your database entries, bringing your project managers and content calendars to life.