Hello! Welcome back to our course on building professional Notion systems.
In the last lesson, we laid the groundwork by adding the most fundamental properties—Text, Number, and Checkbox—to your "Master Content Hub." You now have a basic structure for capturing raw information. Today, we'll give that information meaning and make it organizable by exploring Select and Multi-select properties. These are the tools that let you categorize, tag, and label your data, transforming a simple list into a powerful, sortable system.
This skill is absolutely essential for your goal of creating sellable templates. A project manager is useless without a "Status" property, and a content calendar needs a way to tag which "Platform" each piece is for. By the end of this lesson, you will be able to confidently configure and use Select and Multi-select properties to bring order to your databases.
1. Understanding Categorization: Select vs. Multi-select
At their core, both Select and Multi-select properties allow you to create a predefined list of options, or "tags," that you can apply to your database entries. The crucial difference lies in how many options you can choose.
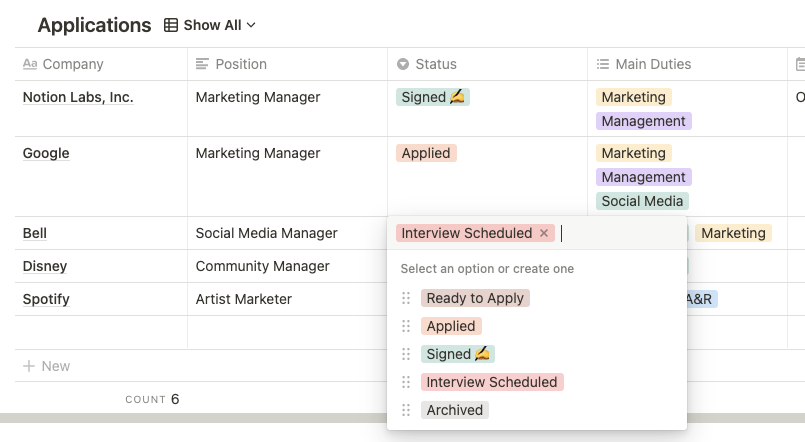
SelectProperty: Allows you to choose only one option from your list. This is perfect for categorizing an item into a single, mutually exclusive group.- Use Cases: Status (e.g., To Do, In Progress, Done), Priority (e.g., High, Medium, Low), Content Type (e.g., Blog Post, Video, Tweet). An item can only have one status or priority at a time.
Multi-selectProperty: Allows you to choose one or more options from your list. This is ideal for tagging an item with multiple, non-exclusive attributes.- Use Cases: Topic Tags (e.g., Productivity, Design, Marketing), Platforms (if content is cross-posted to Twitter and LinkedIn), Skills Needed (e.g., Writing, Research).
To see a clear demonstration of how these properties work and how they differ, the following video is an excellent resource.
All Notion Databases Explained in Under 30 Minutes! (Full Guide)
The video "All Notion Databases Explained in Under 30 Minutes!" from Creative Cove has a concise segment that explains and demonstrates both Select and Multi-select properties.
Please watch from 08:10 to 09:34. Pay close attention to the difference in how each property is used and how easy it is to switch a property from Select to Multi-select.
2. How to Add and Configure Selection Properties
Now that you understand the "what" and "why," let's cover the "how." Setting up these properties is straightforward.
Adding and Populating Options:
- Click the
+at the end of your database table to add a new property. - Give the property a name (e.g., "Status").
- Choose either
SelectorMulti-selectfrom theTypemenu. - To add options, simply click into the property's cell for any database entry. Type the name of your first option (e.g., "To Do") and press
Enter. Notion will create the tag. - Repeat this for all the options you need.

Managing Your Options:
Once your options are created, you have full control to edit them.
- Change Colors: Click on an option, then click the
...icon next to its name to change its color. This is great for visual cues (e.g., red for "High Priority," green for "Done"). - Rename or Delete: Use the same
...menu to rename or delete an option. - Reorder: Click the
⋮⋮handle to the left of an option's name and drag it up or down to reorder the list.
For a comprehensive text reference on managing properties, the official Notion Help Center is invaluable.
Database properties – Notion Help Center
The Notion Help Center article 'Database properties' provides detailed steps for managing property values. It's a useful resource to bookmark for future reference.
Please review the section titled 'Edit property values'. Focus on the first bullet point that specifically describes how to add, edit, and reorder tags for Select and Multi-select properties.
Test your understanding!
You are designing a template to manage a personal library. For each book, you want to track its genre and its format.
- For tracking the book's genre (e.g., Sci-Fi, Biography, Fantasy), would you use
SelectorMulti-select? Why? - For tracking the book's format (e.g., Hardcover, Paperback, Ebook, Audiobook), assuming you might own a book in multiple formats, which property would you use?
Show answer
- Genre: This is a great use case for
Multi-select. A book can often belong to multiple genres (e.g., a book could be both "Sci-Fi" and "Thriller"). - Format: Since you might own a book in more than one format,
Multi-selectis the correct choice here as well. If you were only ever going to track one format per book,Selectwould be the better option. This shows how the choice depends on the specific need of the system.
✍️ Exercise: Add Categories to Your Content Hub
Let's make your "Master Content Hub" significantly more useful. We will now add the properties needed to organize your content ideas by status and platform.
- Navigate to your "Master Content Hub" database.
- Add a
Selectproperty for Status:- Click the
+icon to add a new property. - Name it "Status".
- Set the
TypetoSelect. - Add the following options, assigning colors as you see fit (e.g., grey for Idea, yellow for Drafting, blue for Editing, green for Published):
IdeaDraftingEditingReady to PublishPublishedArchived
- Click the
- Add a
Multi-selectproperty for Platform:- Click the
+icon to add another new property. - Name it "Platform".
- Set the
TypetoMulti-select. - Add the options for the platforms you plan to create for. This is key for your content creator templates. Examples:
BlogYouTubeTwitterInstagramNewsletter
- Click the
- Populate your data: Go through the example content ideas you created in the last lesson and assign a
Statusand one or morePlatform(s) to each.
Your database is now starting to look like a real content management system!
Lesson Summary and Next Steps
Excellent work today. You've learned how to use Select and Multi-select properties to add a critical layer of organization to your databases. This is the difference between a simple list and a dynamic system that can be sorted, filtered, and visualized in meaningful ways.
Key Takeaways:
Selectis for single-choice, mutually exclusive categories like Status or Priority.Multi-selectis for applying multiple, non-exclusive tags like Topics or Platforms.- You can customize the color, order, and name of your tags to create intuitive and visually appealing systems.
- Mastering these properties is fundamental to building the project management and content creation templates you aim to sell.
In our next lesson, we'll continue building out our property toolkit by learning how to configure data-centric properties: Date, URL, and Email. These will enable you to schedule your content, link to resources, and manage contacts, adding even more power and interactivity to your Notion creations.