Hello! In our last lesson, you successfully installed Git and configured your identity. Your development environment now has all the essential tools, and you're ready to start using version control like a professional.
As you requested, we're doing a full refresher on Git, and this lesson tackles the absolute core of its workflow. We will focus on how to start tracking a project and save your progress locally. By the end of this lesson, you will be able to initialize a local Git repository, stage changes, and write clear commit messages following conventions.
This is the fundamental loop you will use every day when working with Git. Mastering this will set a strong foundation for everything that follows.
1. The Three-Stage Workflow
Before we type any commands, it's crucial to understand the mental model behind Git's local workflow. This directly addresses your goal of learning the "why" behind the tools you use. Unlike a simple "save" function in a word processor, Git uses a three-stage process to give you precise control over your project's history.
These three stages, or areas, all exist on your local machine:
- Working Directory: This is your project folder, where you create, edit, and delete files. It's your live, active workspace.
- Staging Area (or Index): This is an intermediate area. When you're happy with a set of changes, you add them to the staging area. Think of it as a draft of your next "save point" or a shopping cart where you gather items before checking out. It allows you to group related changes together, even if you made them at different times.
- Local Repository: This is where Git permanently stores your project's history. When you "commit," Git takes everything in the staging area, creates a permanent snapshot, and saves it to the repository. Each commit is a safe point you can return to.
To see this explained visually, please watch the first part of the following video.
How Git Works: Explained in 4 Minutes
The video 'How Git Works: Explained in 4 Minutes' from ByteByteGo gives a quick and clear animated overview of these core areas.
Watch from 00:35 to 01:20. Focus on understanding the distinct roles of the Working Directory, Staging Area, and Local Repository.
Here is a diagram that summarizes this local workflow. We'll touch on the "Remote Server" part in our next lesson.

2. Hands-On: Initializing Your First Repository
Now, let's put this theory into practice. We'll create a project folder and tell Git to start tracking it. For this hands-on section, the following video provides an excellent, detailed walkthrough. We'll go through it step-by-step.
Git Tutorial for Beginners: Learn Git in 1 Hour
The 'Git Tutorial for Beginners' by Programming with Mosh is a fantastic resource. We'll use clips from it throughout this module to guide our hands-on work.
First, watch the segment from 14:29 to 17:18 to see how to initialize a repository. Then, watch from 21:42 to 25:28 to see how to check the status of your files and add them to the staging area.
Let's follow those steps. Open your Fedora terminal.
Step 1: Create and Enter a Project Directory
First, let's make a new folder for our project and move into it.
mkdir my-git-project
cd my-git-project
Step 2: Initialize the Git Repository
Now, tell Git to start tracking this folder. This is the "initialization" step.
git init
You'll see a message like Initialized empty Git repository in .../.git/. This command creates a hidden sub-folder named .git. This folder contains all the information for your repository (its history, configuration, etc.). You should never manually edit files in this folder.
Step 3: Create Files and Check the Status
Let's create a couple of files in our working directory. The echo command is a simple way to create a text file with some content.
echo "Project Title" > README.md
echo "Initial content for file one" > file1.txt
Now, let's ask Git for the status of our project. This is one of the most common commands you'll use.
git status
Git will report that you have "untracked files" (README.md and file1.txt). This means Git sees the files in your working directory, but they are not yet part of the staging area or the repository history.
Step 4: Stage the Changes
Next, we need to add our new files to the staging area. This tells Git, "I'm preparing these changes for the next commit."
To add all new and modified files in the current directory, use a period (.).
git add .
Now, run git status again.
git status
You'll see that the files are now listed under "Changes to be committed." They are in the staging area.
3. Saving Your Work: The Commit
Once your changes are staged, the final step is to commit them to your local repository. This creates that permanent snapshot. Each commit must have a message that describes the changes you made.
Git Tutorial for Beginners: Learn Git in 1 Hour
Let's return to the Mosh tutorial to see how to commit our staged changes.
Watch the section from 25:28 to 27:41. Pay attention to the -m flag for writing a message directly in the command line.
Step 5: Commit the Staged Files
Let's commit our files with a descriptive message.
git commit -m "Initial commit"
The -m flag stands for "message." For this first commit, "Initial commit" is a common convention.
Congratulations! You have just completed the fundamental Git workflow: you initialized a repository, added files, staged them, and committed a snapshot to your project's history.
4. Writing Clear and Conventional Commit Messages
Just writing any commit message isn't enough. In a professional environment, commit messages are a crucial form of communication. They help your teammates (and your future self) understand the history of the project at a glance.
This is why Conventional Commits were created. It's a simple set of rules for creating explicit and structured commit messages. Adopting this convention from day one is a fantastic habit to build.
Mastering Conventional Git Commit Messages for Better Collaboration
This article, 'Mastering Conventional Git Commit Messages for Better Collaboration', provides a great introduction to the 'why' and 'how' of this standard.
Please read from the beginning of the article through the section 'Examples of Good vs Bad Commit Messages'. Focus on understanding the basic structure (type: description) and familiarize yourself with the common types like feat, fix, docs, and chore.
The core idea is to prefix your commit message with a type, followed by a short description:
type: short description of changes
Here is a handy reference table of the most common types:
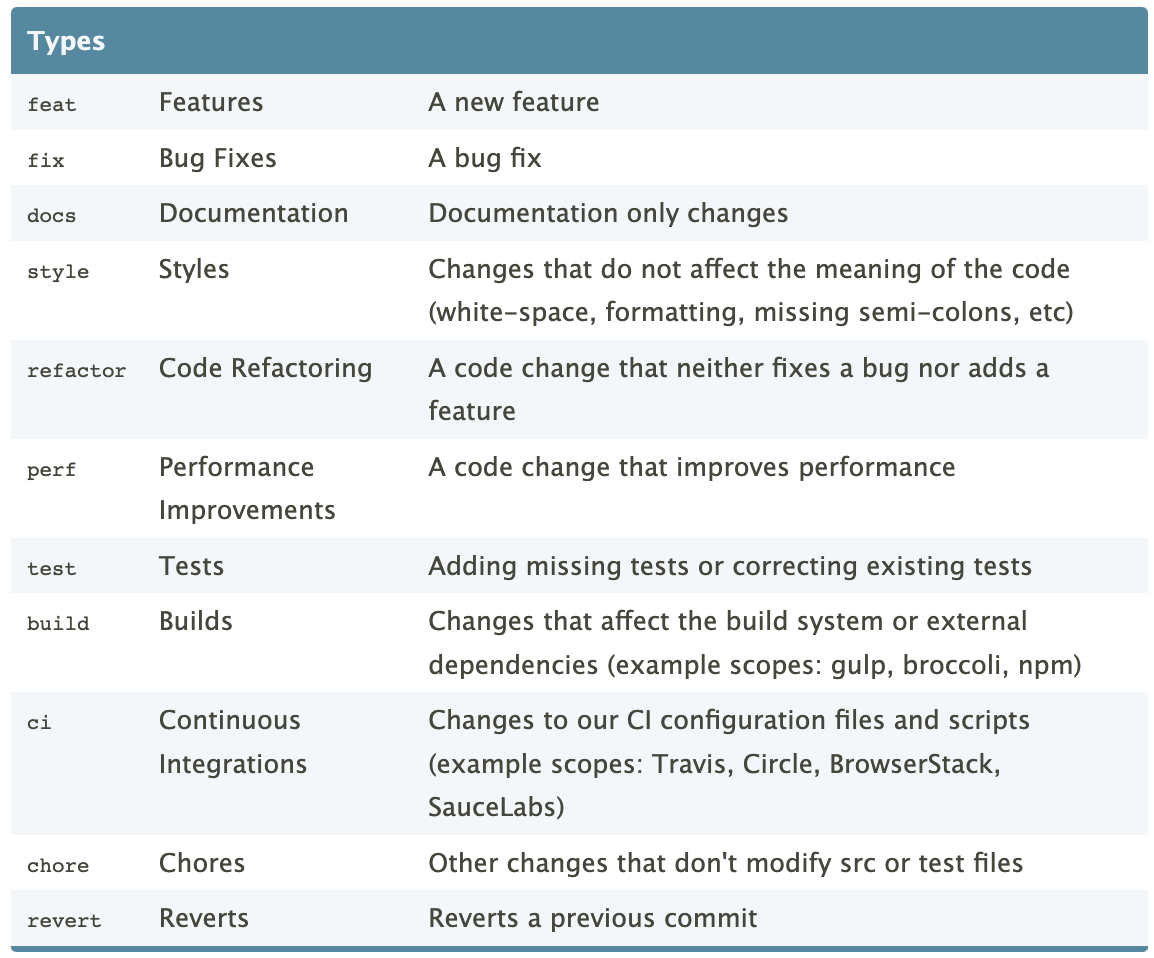
For example, if we were creating the README.md file for an existing project, a good conventional commit message would be:
docs: create initial README file
If you were fixing a bug in the login system, it might be:
fix: prevent crash when user enters invalid password
5. Practice the Full Workflow
Let's practice this entire loop one more time, this time using a conventional commit message.
-
Modify a file: Let's add more detail to our
README.md. The>>operator appends text to a file.echo "This is my first project using Git." >> README.md -
Check the status: See what Git recognizes.
git statusGit will tell you:
modified: README.md. -
Stage the change: Add the modified file to the staging area.
git add README.md -
Commit with a conventional message: Since we only changed documentation,
docsis the perfect type.git commit -m "docs: add project description to README"
You've now added a second, well-documented snapshot to your project's history. This clean, structured history is invaluable as projects grow in complexity.
Conclusion
In this lesson, you mastered the fundamental local workflow of Git. This add -> commit cycle is the heartbeat of any project under version control.
Your key takeaways are:
- Git's local workflow consists of three areas: the Working Directory, the Staging Area, and the Local Repository.
git initturns a regular folder into a Git repository.git statusis your go-to command to check the state of your files.git addmoves changes from your working directory to the staging area.git commit -m "message"saves a permanent snapshot of the staging area to your repository's history.- Conventional Commits provide a standardized, professional way to write messages, making your project history readable and easy to understand.
So far, all our work has been on our local machine. In the next lesson, we will learn how to share and back up our work by creating a remote repository on GitHub and pushing our local changes to it.