Hello! Welcome to the next step in building your professional web development environment.
In our last lesson, you successfully installed Node.js and its package manager, npm, using a version manager. This professional setup gives you the flexibility to handle different project requirements, a key skill in modern development.
Today, we will install and configure Git, the final core component of your toolkit. Git is the most widely used version control system in the world, and mastering it is non-negotiable for any developer. Since you requested a full refresher on Git, we'll start from the very beginning. This lesson focuses on the first crucial step: Install and configure Git on Fedora, setting your user name and email.
We will cover:
- How to install Git on your Fedora system.
- The critical step of configuring your "identity" in Git.
- Why this configuration is so important and how Git uses it.
1. What is Git and Why is it Essential?
Before we type any commands, let's address the "why." You've mentioned that understanding the reasoning behind practices helps you learn, and Git is a perfect example.
At its core, Git is a Version Control System (VCS). Imagine it as a "save" button for your entire project, but with superpowers. Instead of just saving the current state, Git allows you to:
- Track every change: It keeps a detailed history of who changed what, and when.
- Work on different features simultaneously: You can create separate "branches" to work on new ideas without affecting the main, stable version of your project.
- Collaborate with others: It provides a structured way for multiple developers to work on the same codebase without overwriting each other's work.
- Go back in time: If a new change breaks your project, you can easily revert to a previous, working version.
Using Git from the start of every project is a fundamental industry best practice.
2. Hands-On: Installing Git on Fedora
Let's get Git installed. The process is straightforward using Fedora's built-in package manager, dnf.
How to Install Git on Fedora Linux
This article, 'How to Install Git on Fedora Linux', provides the exact commands we'll need. We'll focus on the recommended DNF method.
Please review the section titled 'Install Git with DNF (Recommended)'. You only need to focus on the two commands shown there.
Now, open your Fedora terminal and follow these steps:
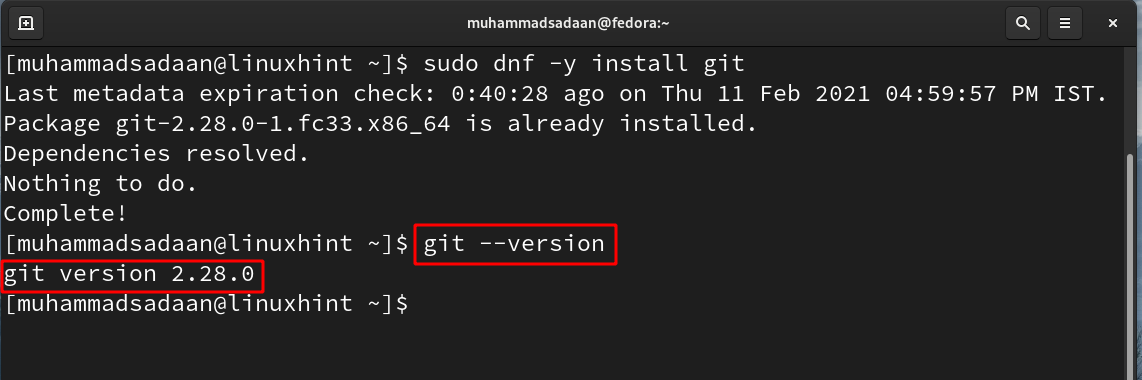
- Install Git: Run the installation command. The system will ask for your password to authorize the installation.
sudo dnf install git - Verify the Installation: Once the installation is complete, confirm that Git is ready to use by checking its version.
You should see an output likegit --versiongit version 2.44.0. The exact version number may differ, but seeing this confirms the installation was successful.
3. Configuring Your Git Identity
This is the most important first-time setup step. Every time you save a set of changes in Git (an action called a "commit"), Git bundles your name and email address with it. This acts as a permanent, unchangeable signature identifying you as the author.
Understanding Configuration Levels
Before setting your identity, it's useful to know where Git stores this information. You can configure Git at three different levels.
1.6 Getting Started - First-Time Git Setup
The official Git documentation provides the best explanation of this concept. Understanding these levels is key to knowing how your configuration is applied.
Please read the section 'First-Time Git Setup' until you reach the subsection 'Your Identity'. Focus on the descriptions of the three files where variables are stored: system, global, and local.
To summarize, the levels are:
- System (
--system): Applies to every user on the computer. (Rarely used). - Global (
--global): Applies to you, and all of your projects on this computer. This is what we will use. - Local (
--local): Applies only to a single, specific project. This overrides global settings.
For your identity, you want to set it once, globally.
Setting Your Name and Email
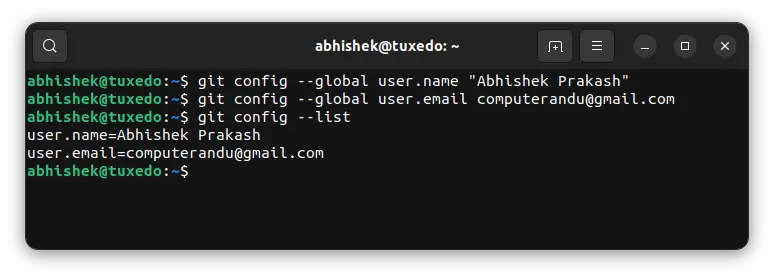
Run the following two commands in your terminal. Be sure to replace the placeholder text with your actual name and the email address you plan to use for services like GitHub.
- Set your user name:
git config --global user.name "Your Name" - Set your email address:
git config --global user.email "youremail@example.com"
4. Verifying Your Configuration
You've set your identity, but it's always good practice to verify that the settings were applied correctly.
The git config --list command will show you all the settings Git can find, including your newly added name and email.
git config --list
You should see user.name=Your Name and user.email=youremail@example.com listed in the output.
Since we used the --global flag, these settings were written to a configuration file in your home directory called .gitconfig. You can view the contents of this file directly:
cat ~/.gitconfig
You will see a simple text file containing the configuration you just set. Understanding that git config --global simply edits this text file demystifies the process.
Conclusion
Excellent work! You have now installed and configured Git, completing the setup of the core tools for your development environment. You have a text editor (VS Code), a JavaScript runtime (Node.js), a package manager (npm), and now, a version control system (Git).
Your key takeaways from this lesson are:
- Git is an essential version control system for tracking changes and collaborating on code.
- You can install Git on Fedora using the
sudo dnf install gitcommand. - It is crucial to configure your global
user.nameanduser.emailso Git can attribute your work to you. - Git settings are stored in configuration files, and the
--globalflag edits the~/.gitconfigfile.
In the next lesson, we will finally put Git to use. You will learn how to initialize your first repository, track changes to your files, and save them with clear, professional commit messages.