Hello! In our last lesson, you did an excellent job implementing task filtering by creating Pinia getters. Your to-do application now has a taskStore that acts as the single source of truth for the list of tasks and the current filter state.
This lesson is the mini-project for our Pinia module. The goal is to complete the process we started and refactor the entire application to use Pinia for all state management. Right now, actions like adding, deleting, or completing a task are likely still handled with a mix of local component logic, props, and events. We are going to move all of that logic into our store.
By the end of this lesson, your components will be much simpler. They will only be responsible for displaying data from the store and telling the store when a user performs an action. This architecture is the standard for building scalable and maintainable Vue applications.
Let's get started!
A Quick Recap: Props/Emits vs. The Store
Remember the problem of "prop drilling" and complex event chains? A state management library like Pinia solves this by creating a central hub for your data.
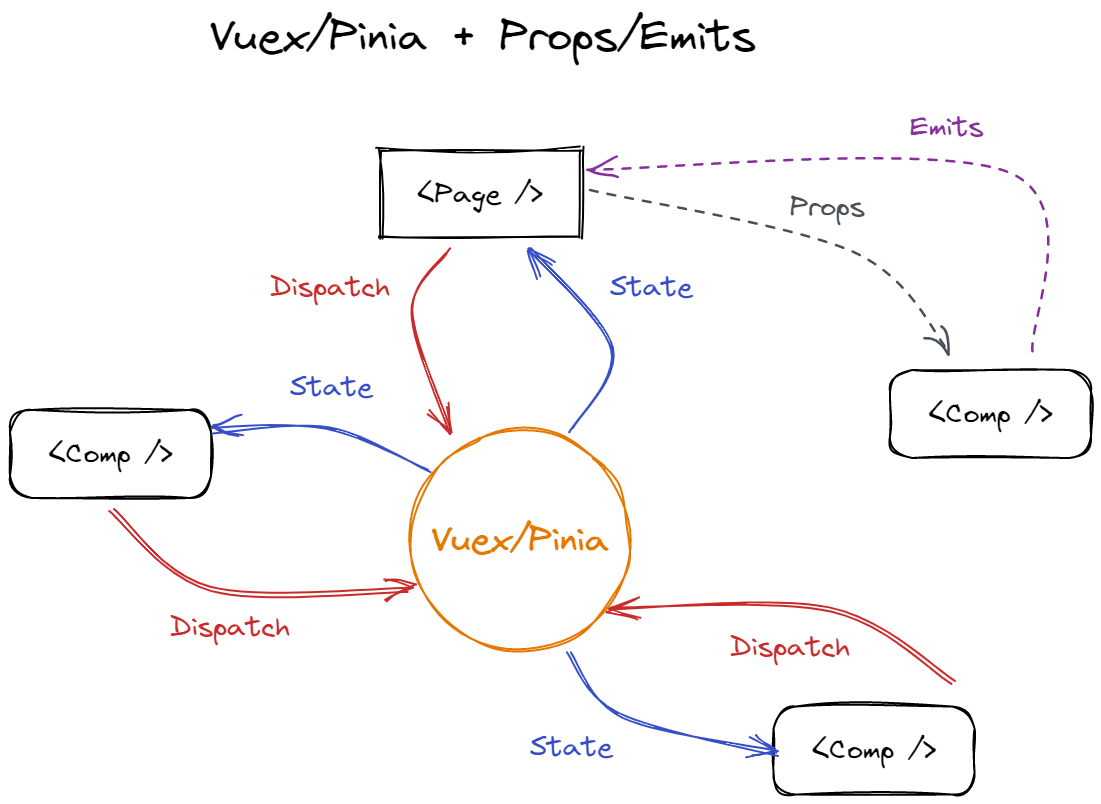
Our goal today is to make our application's data flow look exactly like the right side of that diagram.
Part 1: Planning the Refactor
First, let's take stock of our application's logic. Open your project in VS Code. Most of the logic we need to move will be in TodoItem.vue and TodoForm.vue, with corresponding event handlers in parent components like TodoList.vue or App.vue.
We need to centralize three key pieces of functionality:
- Adding a new task: The logic for creating a new task object and adding it to the list.
- Toggling a task's completion status: The logic to find a task by its ID and flip its
isCompletedproperty. - Deleting a task: The logic to find a task by its ID and remove it from the list.
Our plan is simple: we will create an action in taskStore.js for each of these functionalities.
Part 2: Creating the Store Actions
Let's start by equipping our store with the methods it needs to manage the to-do list.
The video tutorial below provides a complete walkthrough of moving application logic into a Pinia store. We'll follow its lead, focusing on creating the core actions.
Vue JS with Composition API & Pinia Full Tutorial
This video from Daweb Schools will guide us through the entire refactoring process. We'll start by watching the section on creating the store and moving the state and actions into it.
Watch from 01:00:15 to 01:13:26. The instructor is migrating a slightly different app, but the concepts are identical. Pay close attention to how they move state variables (like tasks), computed properties (getters like filteredTasks), and functions (actions like setFilter) into the new taskStore.js file. You will be doing the same for your add, delete, and toggle actions.
Your Task: Update taskStore.js
Based on the video and the code snippets below, let's add our new actions.
-
Open your
stores/taskStore.jsfile. -
You should already have your
tasksstate and filtering logic from the last lesson. Now, add the following three functions (actions) inside yourdefineStoresetup function.// stores/taskStore.js // ... imports and existing state (tasks, filter) // ACTION: Add a new task function addTask(title) { if (title.trim().length === 0) { return; // Don't add empty tasks } const newTask = { id: Date.now(), // Simple unique ID title: title, isCompleted: false, }; tasks.value.unshift(newTask); // unshift adds to the beginning of the array } // ACTION: Delete a task function deleteTask(id) { tasks.value = tasks.value.filter(task => task.id !== id); } // ACTION: Toggle completion status function toggleCompleted(id) { const task = tasks.value.find(task => task.id === id); if (task) { task.isCompleted = !task.isCompleted; } } // ... existing getters (filteredTasks, etc.) // EXPOSE EVERYTHING return { tasks, filter, filteredTasks, setFilter, // Add your new actions here! addTask, deleteTask, toggleCompleted, }; -
Carefully review the
returnstatement at the end of your setup function. Make sure you have addedaddTask,deleteTask, andtoggleCompletedso they are available to your components.
Part 3: Refactoring Components to Use the Store
With our store's logic complete, we can now simplify our components. This is the most satisfying part of the process! Instead of emitting events, components will now call the store's actions directly.
This text-based tutorial provides excellent, clear code examples for how to connect components to a to-do list store.
Build a To-do List App with Pinia and Vue 3
This DEV Community article by Sandra Rodgers shows how to build a to-do app with Pinia from scratch. We'll use it as a reference for refactoring our components.
First, read the section 'Input Form to Add an Item' to see how TodoForm.vue calls the store's addTodo action. Next, read the sections 'To-do List - Mark as Completed' and 'To-Do List - Delete Item' to see how the list item component calls the toggleCompleted and deleteTodo actions directly.
Your Task: Update Your Components
1. Refactor TodoForm.vue
- Import
useTaskStore. - Create an instance of the store:
const taskStore = useTaskStore();. - In your form submission method, instead of emitting an event, call the store's action directly:
taskStore.addTask(yourNewTaskTitle). - Clear the input field after adding the task.
2. Refactor TodoItem.vue
- This component will see the biggest change.
- Import
useTaskStoreand create a store instance. - Remove the
defineEmitscall. We no longer need to emit events from this component. - Find the button or element that triggers deletion. Change its
@clickhandler to calltaskStore.deleteTask(props.task.id). - Find the checkbox or element that toggles completion. Change its
@changeor@clickhandler to calltaskStore.toggleCompleted(props.task.id).
3. Clean up App.vue and/or TodoList.vue
- Go to the parent component that was listening for events from
TodoItem.vue. - Remove the event listeners from your
<TodoItem>component tag (e.g., remove@delete-task="..."and@toggle-complete="..."). - Delete the corresponding handler methods inside the parent component's
<script>block. These methods are now redundant because the logic lives in the store.
Your parent components should now be significantly cleaner, often doing little more than importing and displaying child components.
Part 4: Verify Your Work
The refactor is complete! Now, run your application and test every feature:
- Can you add a new task?
- Can you mark a task as completed?
- Can you delete a task?
- Does the filtering (
all,active,completed) still work correctly?
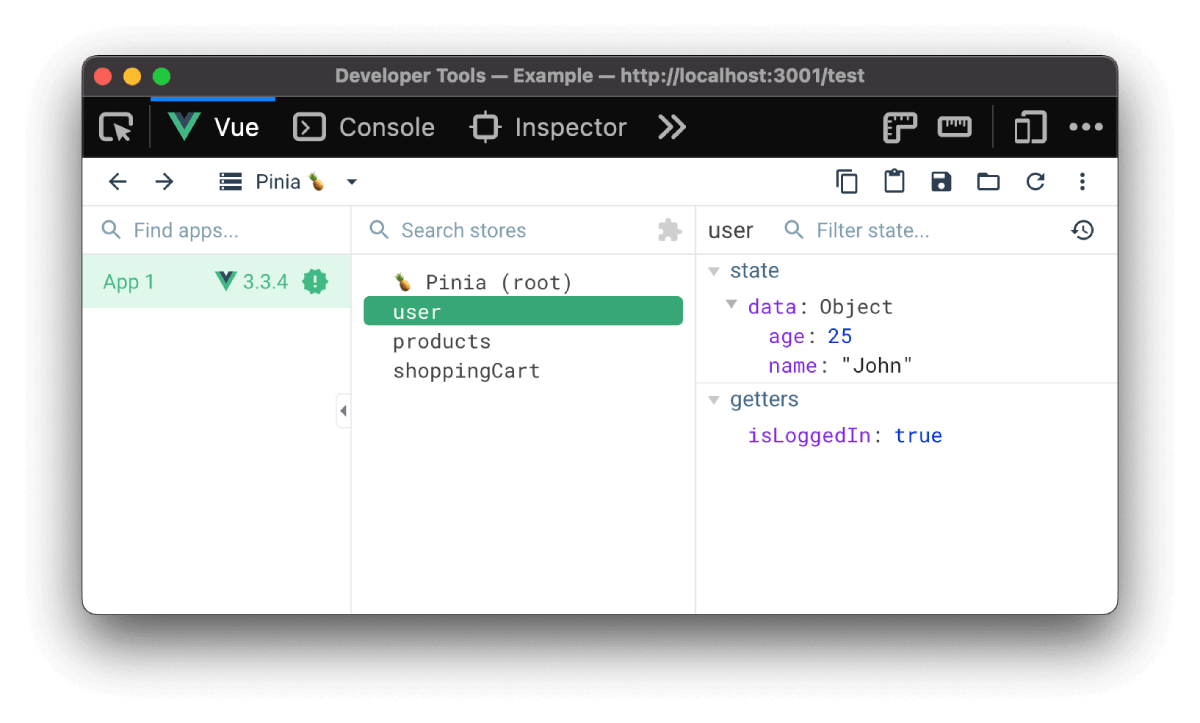
Open the Vue DevTools in your browser and select the Pinia tab. As you interact with your app, watch the state in your taskStore update in real-time. This is the ultimate proof that your centralized state management is working perfectly.
Conclusion
Fantastic work! You have successfully completed the mini-project and refactored your to-do app to a professional standard using Pinia.
Key Takeaways:
- Centralized Logic: All the "business logic" of your application (how to add, remove, and change tasks) now lives in one place:
taskStore.js. - Simplified Components: Your components are now "dumb." They receive data to display and simply tell the store when actions happen, without knowing the implementation details.
- Scalability: This pattern makes it incredibly easy to add new features or have new components interact with the task list without complex wiring.
In our next module, we'll dive into Vue Router. You'll learn how to create a Single-Page Application (SPA) with multiple pages and views, building upon the clean, state-managed foundation you've established here.