Hello! In our last module, you did a fantastic job refactoring your to-do application to use Pinia for state management. You now have a clean, scalable application where logic is centralized in a store, and components are focused on display and user interaction. This is a professional pattern used in real-world Vue development.
This lesson kicks off our new module on Vue Router. We'll shift our focus from managing data within a single view to building applications with multiple pages or views, like a real website.
Your goal for this lesson is to install and configure Vue Router to create a single-page application with multiple views. You will learn what a Single-Page Application (SPA) is, how to set up Vue Router in a new project, and how to define routes that map URLs to specific Vue components.
What is a Single-Page Application (SPA)?
Before we dive into the code, it's crucial to understand why we need a tool like Vue Router. Most modern web applications you use are Single-Page Applications (SPAs). This is different from a traditional website.
- Traditional (Multi-Page) App: When you click a link (e.g., from 'Home' to 'About'), your browser makes a full request to the server, which sends back an entirely new HTML page. This causes a noticeable white flash and a full page reload.
- Single-Page App (SPA): The server sends the entire application just once. When you click a link, JavaScript intercepts the click, and instead of fetching a new page, it just swaps out the visible components on the client-side. This is much faster and feels more like a native desktop or mobile app.
Vue Router is the official library that makes this client-side navigation possible in Vue.
To get a clearer picture of this concept, let's watch a short explanation.
Vue JS 3 Tutorial for Beginners #8 - The Vue Router
The Net Ninja provides a concise explanation of what an SPA is and how Vue Router works to create this experience without full page reloads.
Watch the first 2 minutes and 32 seconds of this video. Focus on understanding the difference between the initial page load and subsequent navigation clicks in an SPA.
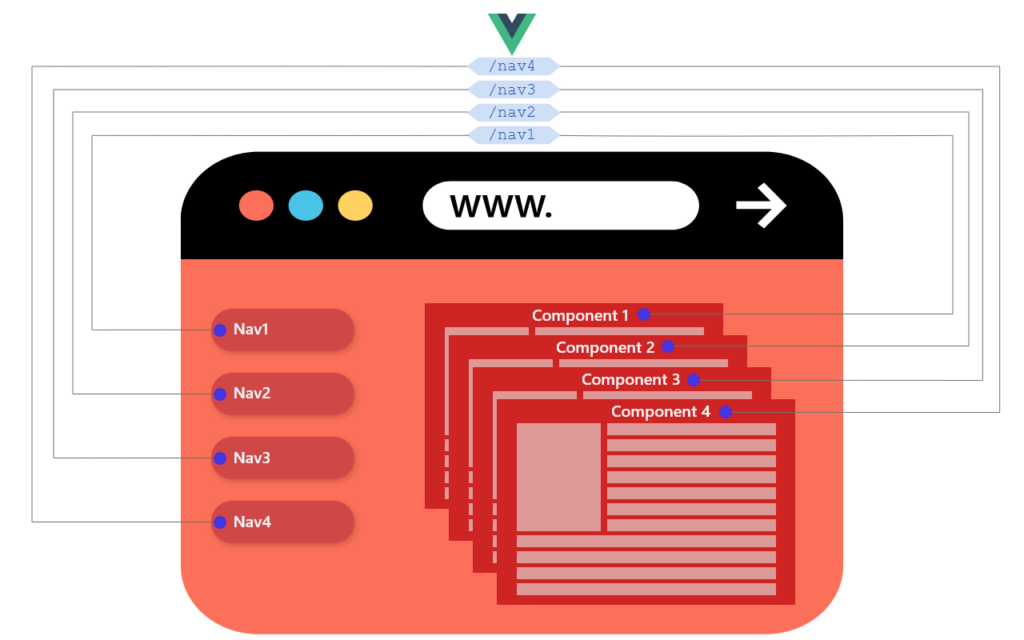
This diagram also illustrates the core idea. A navigation bar with links allows the user to switch between different components that are rendered in a designated area of the page.
Part 1: Setting Up a Project with Vue Router
The standard and easiest way to include Vue Router is during the project scaffolding process using create-vue (the command-line tool powered by Vite). For this module, let's create a new project to start fresh. This will be the foundation for the personal profile site you'll be building across the next few modules.
How to Use Vue Router 4 (with Vue.js 3): A Complete Tutorial
The official Vue School tutorial, 'How to Use Vue Router 4', provides the exact steps for creating a new Vue 3 project with Vite and including Vue Router from the start.
Read the section 'Vue Router Fundamentals'. Follow the instructions to run npm create vue@latest in your terminal. When prompted, name your project (e.g., personal-profile-site), and make sure to select 'Yes' for 'Add Vue Router for Single Page Application development?'. You can select 'No' for TypeScript and testing features for now.
After running the command and answering the prompts, follow the on-screen instructions:
cd your-project-namenpm installnpm run dev
When you open the provided localhost URL in your browser, you will see a default Vue application with "Home" and "About" links. Click them—notice how the content changes instantly without a full page reload? That's Vue Router in action!
Part 2: Understanding the Router Configuration
Now that you have a project with Vue Router installed, let's examine the files it created for us. The setup is very logical.
src/views/: A new directory containing page-level components likeHomeView.vueandAboutView.vue. It's a convention to separate these "page" components from your smaller, reusable "components".src/router/index.js: This is the main configuration file for Vue Router. It's where you define which URL paths should show which components.
Let's break down router/index.js. The video below walks through a modern router file created with Vite, explaining each part.
Let's learn VUE JS | Composition API - Script Setup, Vue Router & Pinia in 2023 (Web Developer Path)
In this video, 'Learn with Jon' explains the modern router/index.js file, which uses the Composition API and <script setup> syntax.
Watch from 42:05 to 44:11. Pay close attention to the explanation of createRouter, createWebHistory, and the routes array. This is the core of Vue Router's configuration.
As you saw in the video, the key parts of router/index.js are:
createRouter: A function you import fromvue-routerthat creates the router instance.createWebHistory: This function enables the standard "history mode" for routing. It gives you clean URLs (likemysite.com/about) without the old-style hash (#) in them.routes: An array of objects. Each object is a route record that maps a URL path to a component. A typical route object looks like this:{ path: '/about', // The URL path in the browser name: 'about', // A unique name for this route component: AboutView // The component to render for this path }
Part 3: Navigation (<RouterLink>) and Rendering (<RouterView>)
So, how does Vue use this configuration to actually show pages and let users navigate? It uses two special, globally available components: <RouterLink> and <RouterView>.
You'll find both of them in your App.vue file.
<RouterLink to="/path">: This is the correct way to create navigation links in a Vue SPA. It renders as an<a>tag but prevents the default browser behavior of a full page reload. Thetoprop specifies the destination path.<RouterView />: This component acts as a placeholder. It's where Vue Router will render the component that matches the current URL.
The following video explains how these two components work together to create the SPA experience.
Let's learn VUE JS | Composition API - Script Setup, Vue Router & Pinia in 2023 (Web Developer Path)
Let's return to the 'Learn with Jon' video to see a practical demonstration of how <RouterLink> and <RouterView> are used in App.vue.
Watch from 44:11 to 49:13. The video shows how a new <RouterLink> is added to the navigation and how the <RouterView> component renders the correct page component based on the URL.
Part 4: Your Turn - Creating a Multi-View Profile Site
Now it's time to apply what you've learned. You will configure the router for a three-page personal profile site.
Your Task:
-
Create the Views:
- In your
src/viewsfolder, delete the defaultAboutView.vueandHomeView.vue. - Create three new files:
HomeView.vueAboutView.vueContactView.vue
- In each file, create a basic component template. For now, a simple heading is enough:
// Example for AboutView.vue
<template>
  <div>
    <h1>About Me</h1>
  </div>
</template>
- In your
-
Define the Routes:
- Open
src/router/index.js. - Delete the default route objects inside the
routesarray. - Import your three new view components at the top of the file.
- Create three new route objects in the
routesarray, one for each page:- Path
/should map toHomeView. - Path
/aboutshould map toAboutView. - Path
/contactshould map toContactView.
- Path
- Your
routesarray should look something like this:import HomeView from '../views/HomeView.vue' import AboutView from '../views/AboutView.vue' import ContactView from '../views/ContactView.vue' const routes = [ { path: '/', name: 'home', component: HomeView }, { path: '/about', name: 'about', component: AboutView }, { path: '/contact', name: 'contact', component: ContactView } ]
- Open
-
Create the Navigation:
- Open
src/App.vue. - Clean up the template. Remove the default
headerandHelloWorldcomponent. - Create a
<nav>element. - Inside the
<nav>, add three<RouterLink>components, one for each route you defined. - Make sure you still have the
<RouterView />component somewhere in yourApp.vuetemplate, as this is where your pages will be rendered. - Your
App.vuemight look like this:<script setup> import { RouterLink, RouterView } from 'vue-router' </script> <template> <nav> <RouterLink to="/">Home</RouterLink> <RouterLink to="/about">About</RouterLink> <RouterLink to="/contact">Contact</RouterLink> </nav> <main> <RouterView /> </main> </template>
- Open
Once you've completed these steps, save all files and check your browser. You should see your simple navigation bar, and clicking each link should render the correct heading from your view components.
Conclusion
Excellent work! You have successfully configured Vue Router to create a basic single-page application with three distinct views.
Key Takeaways from this lesson:
- Single-Page Applications (SPAs) provide a faster, smoother user experience by avoiding full page reloads.
- Vue Router is the official library for handling client-side routing in Vue.
- Routes are defined in an array in
router/index.js, where each object maps apathto acomponent. <RouterLink to="...">is used for creating navigation links.<RouterView />is the placeholder where the component for the current route is rendered.
In our next lesson, we will make our application more powerful by learning how to work with dynamic routes. This will allow us to create pages for specific items, such as /blog/my-first-post or /products/42, which is a fundamental requirement for most real-world applications.