Hello! Welcome to the next stage of our Vue.js journey.
Introduction
In our last lesson, we successfully refactored our to-do app into a clean, multi-component architecture. We learned how to pass data down with props and communicate actions up with events. We also touched upon a challenge called "prop drilling," where we had to pass data and events through intermediate components that didn't use them, just to get them to their final destination.
This lesson directly addresses that challenge. We're going to introduce Pinia, the official state management library for Vue.js. Pinia provides a central "store" for your application's data, making it accessible from any component without the need for prop drilling.
By the end of this 60-minute lesson, you will be able to install Pinia into our to-do app project and set up a global store to manage our list of tasks.
Why Do We Need a State Management Library?
As applications grow, managing state (the data that your app relies on) becomes complex. In our to-do app, the "source of truth" is the tasks array, which currently lives in App.vue.
Imagine our app had many more features and deeply nested components. If a component far down the hierarchy needed access to the tasks array, we would have to pass it down through every single parent component. This is "prop drilling."
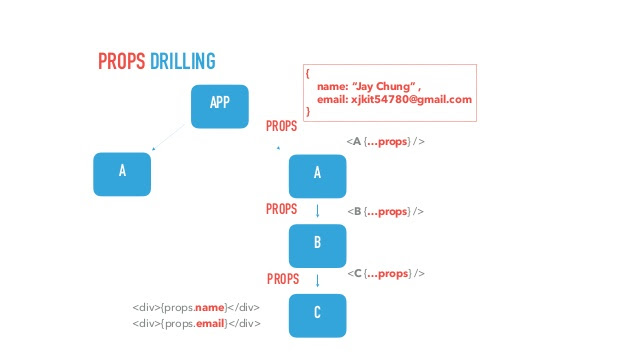
Pinia provides a centralized store that any component can connect to directly, eliminating the need to pass props and emit events through multiple layers.
To understand this concept better, the following video explains the problem that state management solves in a clear and practical way.
Learn Pinia Setup Stores in 30 MINUTES! (Vue JS 3)
Watch this section from 'Learn Pinia Setup Stores in 30 MINUTES!' by Make Apps with Danny. It provides an excellent explanation of why a centralized store is necessary as applications grow in complexity.
Watch from 11:51 to 14:45. Pay close attention to the explanation of how data would have to be passed around without a store, and how Pinia simplifies this.
The official Pinia documentation also gives a concise summary of what a store is and when it's appropriate to use one.
Take a quick look at the 'Getting Started' page of the official Pinia documentation. It defines what a store is and its core concepts.
Read the sections titled 'What is a Store?' and 'When should I use a Store'. This will solidify your understanding of the role Pinia plays in a Vue application.
Part 1: Installing and Configuring Pinia
Since we already have a Vue project for our to-do app, we will add Pinia to it manually. The process involves two simple steps: installing the package and telling our Vue app to use it.
-
Install Pinia: Open the terminal in your VS Code project and run the following command. This will download and add Pinia to your project's dependencies.
npm install pinia -
Configure
main.js: We need to create a Pinia instance and pass it to our Vue app as a plugin. Open yoursrc/main.jsfile and modify it to look like this:import { createApp } from 'vue' import { createPinia } from 'pinia' // 1. Import createPinia import App from './App.vue' const app = createApp(App) app.use(createPinia()) // 2. Tell Vue to use Pinia app.mount('#app')
The following video walks through this exact process.
This clip from 'Introduction To Pinia' by John Komarnicki demonstrates the manual installation process we just discussed.
Watch from 01:41 to 02:28. The video shows how to run npm i pinia and then edit the main.js file, exactly as described above.
With that, Pinia is now installed and ready to be used in our application!
Part 2: Creating Your First Store
In Pinia, a "store" is where you define a piece of related state and the logic to manage it. It's a convention to create a stores directory inside src to keep them organized.
Defining a Store
We will create a store to manage our tasks.
- Create a new folder named
storesinside yoursrcdirectory. - Inside
src/stores, create a new file namedtaskStore.js.
Inside taskStore.js, we will use the defineStore function from Pinia. This function takes two arguments:
- A unique ID for the store (e.g.,
'tasks'). - A setup function (similar to
<script setup>) where we define our state.
Since you're comfortable with the Composition API, we will use the "Setup Store" syntax. It feels very natural, as ref()s become state, computed()s become getters, and regular functions become actions.
Let's see how to set this up.
This next segment from the same video explains how to create a store file and use defineStore with the setup function syntax.
Watch from 02:28 to 04:45. Focus on the structure: creating the stores folder, defining the store with a unique ID, and using a ref to create a reactive state property.
Hands-On: Moving State to the taskStore
Now, let's apply this to our to-do app. We will move the tasks array from App.vue into our new taskStore.js.
-
In
src/stores/taskStore.js:- Import
reffromvueanddefineStorefrompinia. - Cut the
tasksref from yourApp.vue's<script setup>block. - Paste it inside the
defineStoresetup function. - Crucially, return the
tasksstate so that components can access it.
Your
src/stores/taskStore.jsfile should look like this:import { ref } from 'vue' import { defineStore } from 'pinia' export const useTaskStore = defineStore('tasks', () => { // The state from App.vue is now here const tasks = ref([ { id: 1, text: 'Clean the kitchen', isComplete: false }, { id: 2, text: 'Learn Vue.js', isComplete: true }, ]); // We must return the state we want to expose return { tasks } }) - Import
-
In
src/App.vue:- Now that the state is in the store, we can remove it from
App.vue. - Import your new store at the top of the
<script setup>block. - Call the store function to get access to it.
Your
<script setup>inApp.vuewill now look like this:// src/App.vue import { useTaskStore } from '@/stores/taskStore' // Import the store import TodoForm from './components/TodoForm.vue' import TodoList from './components/TodoList.vue' // Instantiate the store const taskStore = useTaskStore() // The functions below are now broken, but we will fix them in the next lesson! const addTask = (text) => { // ... logic will be moved later } const deleteTask = (id) => { // ... logic will be moved later } const toggleComplete = (id) => { // ... logic will be moved later }Notice the
@in the import path. This is a common alias in Vite-based Vue projects that points to thesrcdirectory. - Now that the state is in the store, we can remove it from
-
Update the Template in
App.vue:- Finally, update the
<TodoList>component in your template to get itstasksprop from the store.
<!-- src/App.vue --> <template> <h1>My To-Do List</h1> <TodoForm @add-task="addTask" /> <TodoList :tasks="taskStore.tasks" <!-- Use the store's state --> @delete-task="deleteTask" @toggle-complete="toggleComplete" /> </template> - Finally, update the
If you run your app now (npm run dev), you should see the list of tasks displayed correctly. The data is no longer coming from App.vue's local state but directly from our global Pinia store! The add, delete, and toggle functionality will be broken, as their logic still resides in App.vue. We'll fix that in the next lesson.
Conclusion
Great work! You have successfully integrated a state management library into your project, a significant step in building scalable web applications.
Key Takeaways:
- State Management: Solves the problem of "prop drilling" by providing a single, centralized source of truth for your application's data.
- Pinia Installation: You can add Pinia to an existing project with
npm install piniaand by updatingmain.js. - Defining a Store: You use
defineStorewith a unique ID and a setup function. - State in a Store: Reactive data, like
refs, are defined within the store's setup function and must be returned to be accessible. - Using a Store: Import the store into any component, instantiate it, and access its state properties (e.g.,
taskStore.tasks).
In our next lesson, we will complete the refactoring. We will move the addTask, deleteTask, and toggleComplete methods into the store as actions, and also explore getters for creating computed data from our state. This will fully centralize all logic related to our tasks.