Hello! Welcome to the second module of our course. In the last module, you did an excellent job setting up your development environment and creating the personal-profile-site project, complete with a professional Git and GitHub workflow.
This lesson marks our official dive into HTML. Our goal is to address the first learning outcome of this module: Write a well-structured HTML5 document with proper doctype, head, and body sections.
We will take the empty index.html file you created in the last mini-project and give it the fundamental skeleton that every modern webpage is built upon. Understanding this core structure is the first and most crucial step in building any website, and it lays the foundation for understanding the "why" behind web development best practices.
Let's begin by opening your personal-profile-site project in VS Code.
The Anatomy of an HTML Document
Every HTML document, regardless of its complexity, follows the same basic structure. Think of it like the chassis and frame of a car—before you can add the engine, seats, and paint, you need the fundamental structure in place.
This structure consists of four key parts:
<!DOCTYPE html>: A declaration that tells the browser which version of HTML to use.<html>: The root element that wraps all the content on the page.<head>: A section for metadata—data about the page, like its title and character set. This content is not visible to the user.<body>: The section that contains all the visible content of the page, such as text, images, and links.
The following diagram shows this hierarchical relationship clearly.
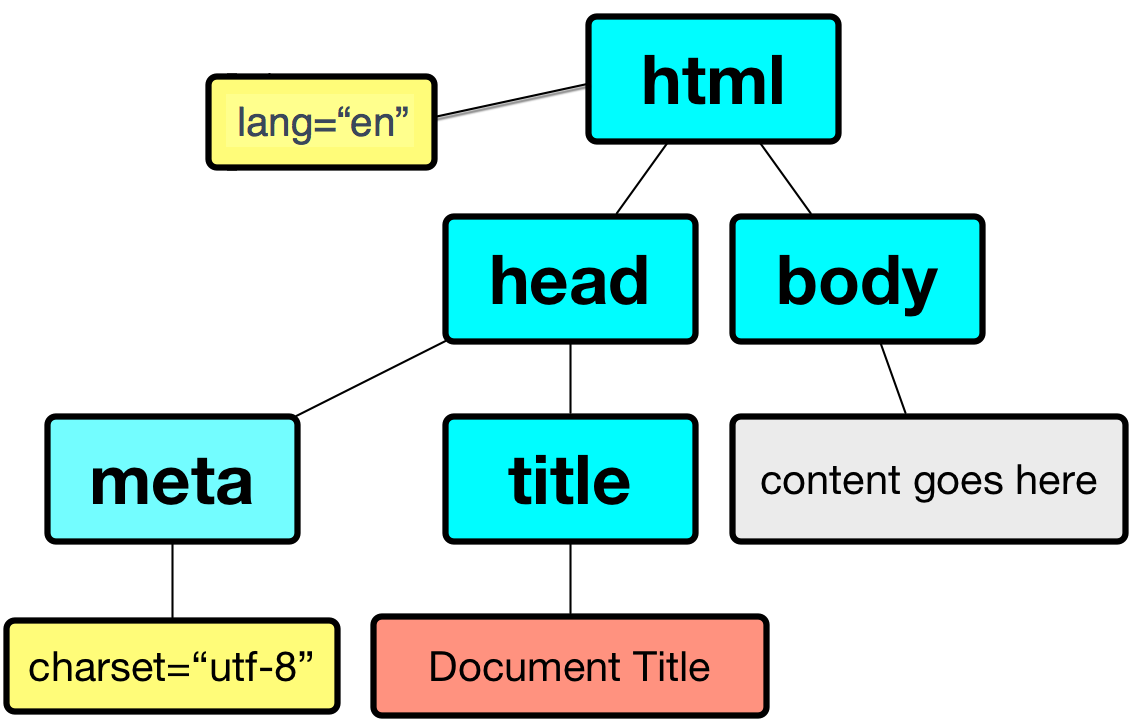
1. <!DOCTYPE html>: The First Line of Code
The very first line of any HTML file must be the DOCTYPE declaration. It might look like an HTML tag, but it's actually an instruction for the browser.
HTML & CSS for Absolute Beginners: DOCTYPE, head, and body
To understand why this single line is so important, watch this short explanation from instructor Kevin Powell. He does a great job explaining what 'quirks mode' is and why we need to avoid it.
Watch the segment from the beginning until 01:26.
In essence, <!DOCTYPE html> ensures the browser renders your page according to the latest HTML5 standards, which provides consistent and predictable behavior across different browsers. Without it, the browser might enter "quirks mode," an older rendering mode that can cause unexpected layout issues.
2. The Core Structure: <html>, <head>, and <body>
After the doctype, the entire document is wrapped in <html> tags. Inside, the document is split into the <head> and the <body>.
Kevin Powell uses a great analogy of a digital photograph to explain the difference between the <head> and <body>. The photo itself is the content (the <body>), while the data stored with it—like the date taken, shutter speed, and location—is the metadata (the <head>).
HTML & CSS for Absolute Beginners: DOCTYPE, head, and body
Watch this next segment from the same video, where Kevin Powell explains the roles of the <html>, <head>, and <body> tags.
Watch from timestamp 01:26 to 04:13. Pay close attention to the analogy he uses to describe the purpose of the <head> section.
The lang Attribute
One important piece of information we provide in the <html> tag itself is the primary language of the document using the lang attribute. For a page written in English, it looks like this:
<html lang="en">
This doesn't change how the page looks, but it's critical for accessibility and SEO. It allows screen readers to use the correct pronunciation and helps search engines provide language-specific search results.
3. Essential Information for the Browser: The <head>
The <head> section contains crucial metadata. While users don't see this information directly on the page, the browser uses it to render the page correctly and to provide information to search engines and other services.
Let's look at the two most essential elements you should always include in your <head>.
Document structure - HTML - web.dev
The article 'Document structure' on web.dev provides a concise written overview of the essential components within the <head>. This will reinforce what you've just seen in the video.
Read the section titled 'Required components inside the '. Focus on the explanations for 'Character encoding' and 'Document title'. You can skim the 'Viewport metadata' part for now; we'll cover it in detail when we discuss responsive design.
To summarize the key points from the reading:
- Character Encoding (
<meta charset="UTF-8">): This should be the very first element inside your<head>. It tells the browser to use the UTF-8 character set, a universal standard that can represent characters from virtually any human language. This prevents issues where special characters or symbols might appear garbled. - Document Title (
<title>): This defines the text that appears in the browser tab, in bookmarks, and in search engine results. It's important for both user experience and SEO. It's crucial not to confuse this with an<h1>heading, which is the main visible title within your page content.
This annotated image gives you a complete visual summary of the code we've discussed.
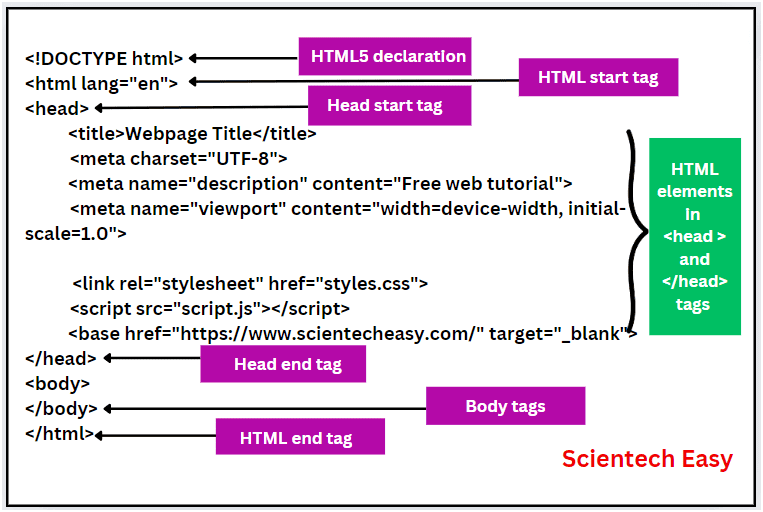
Hands-On Practice: Building Your First HTML Skeleton
Now it's time to apply what you've learned. We'll add this boilerplate structure to the index.html file in your personal-profile-site project.
Part 1: The Quick Way with Emmet
VS Code has a built-in tool called Emmet that provides shortcuts for writing code. For HTML, it's incredibly powerful.
- Open your
index.htmlfile. - Make sure the file is empty.
- Type a single exclamation mark:
! - Press the
TaborEnterkey.
Emmet will instantly generate the complete HTML5 boilerplate for you. This is the shortcut you will use in your day-to-day work.
Part 2: The Manual Way to Reinforce Learning
The shortcut is great, but to truly understand the structure, it's essential to write it yourself from scratch at least once.
The Structure of HTML Documents
This video will walk you through coding the basic HTML structure manually. It reinforces the purpose of each tag as you type it out.
First, delete the code Emmet generated. Then, follow along with the video from timestamp 09:53 to 12:56 to write the boilerplate yourself.
Follow the video and manually write the code in your index.html file. Your final code should look like this:
<!DOCTYPE html>
<html lang="en">
<head>
    <meta charset="UTF-8">
    <title>My Personal Profile</title>
</head>
<body>

</body>
</html>
Note: The Emmet shortcut adds a few extra <meta> tags, like viewport. These are important, but for this lesson's core outcome, the structure above is the essential minimum.
Part 3: See it in Action
- Save your
index.htmlfile. - Right-click anywhere in the file editor and select "Open with Live Server".
- Your default browser will open a new tab. The page will be blank, but look at the browser tab—it should say "My Personal Profile". You've successfully set the document title!
Part 4: Commit Your Changes
Now that you've added the basic structure, let's save this progress to your Git repository.
- Open the terminal in VS Code (
Ctrl+~). - Stage the changes:
git add index.html - Commit the changes with a clear, conventional message:
git commit -m "feat: add HTML boilerplate structure to index.html" - Push the commit to your GitHub repository:
git push
Conclusion
Excellent work! You have now created a well-structured HTML5 document from scratch, fulfilling a foundational requirement for all web development.
Key Takeaways:
- An HTML document always starts with the
<!DOCTYPE html>declaration. - The
<html>element is the root, containing the<head>and<body>. - The
<head>contains invisible metadata, with<meta charset="UTF-8">and<title>being the most critical first elements. - The
<body>is where all visible page content will eventually go. - VS Code's Emmet shortcut (
!) is a fast and reliable way to generate this boilerplate.
In our next lesson, we will begin to populate the <body> section. You will learn how to use semantic HTML elements like <header>, <main>, <nav>, and <footer> to create a meaningful and accessible structure for your personal profile page.