Hello! In our last lesson, you created the fundamental skeleton for an HTML document. We now have an index.html file with the correct <!DOCTYPE>, <html>, <head>, and <body> structure. It's like having a prepared canvas, ready for the artwork.
Today, we'll start painting the broad strokes of our webpage's structure. This lesson focuses on a core principle of modern web development: semantic HTML. We'll move inside the <body> tag and learn how to use elements like <header>, <nav>, <main>, and <footer> to create a meaningful and organized layout. Understanding this isn't just about syntax; it's about learning why we structure pages a certain way, a key goal you've set for this course. By the end of this lesson, you will be able to structure a webpage logically and understand its importance for accessibility and search engine optimization (SEO).
Let's get started by opening your personal-profile-site project in VS Code.
What is Semantic HTML and Why Does It Matter?
Before we write any code, let's clarify what "semantic" means. In HTML, a semantic element is one that clearly describes its meaning or purpose to both the browser and the developer. For example, <footer> is semantic because it tells you its content belongs at the end of a page or section. In contrast, a <div> tag is non-semantic; it's just a generic container that tells you nothing about its content.
Using semantic elements is a cornerstone of modern web development for three main reasons:
- Accessibility: Screen readers and other assistive technologies use these tags as signposts to help users navigate a page. A visually impaired user can instruct their screen reader to "jump to the main content" or "find the navigation," which is only possible if you use
<main>and<nav>tags. - SEO: Search engines like Google are getting smarter. They analyze the semantic structure of your page to understand the hierarchy and importance of your content. A well-structured page can lead to better search rankings and richer results (like featured snippets).
- Maintainability: Your code becomes much easier to read and understand. When you or another developer revisits the code, tags like
<article>and<aside>immediately explain the structure, making it faster to debug and update.
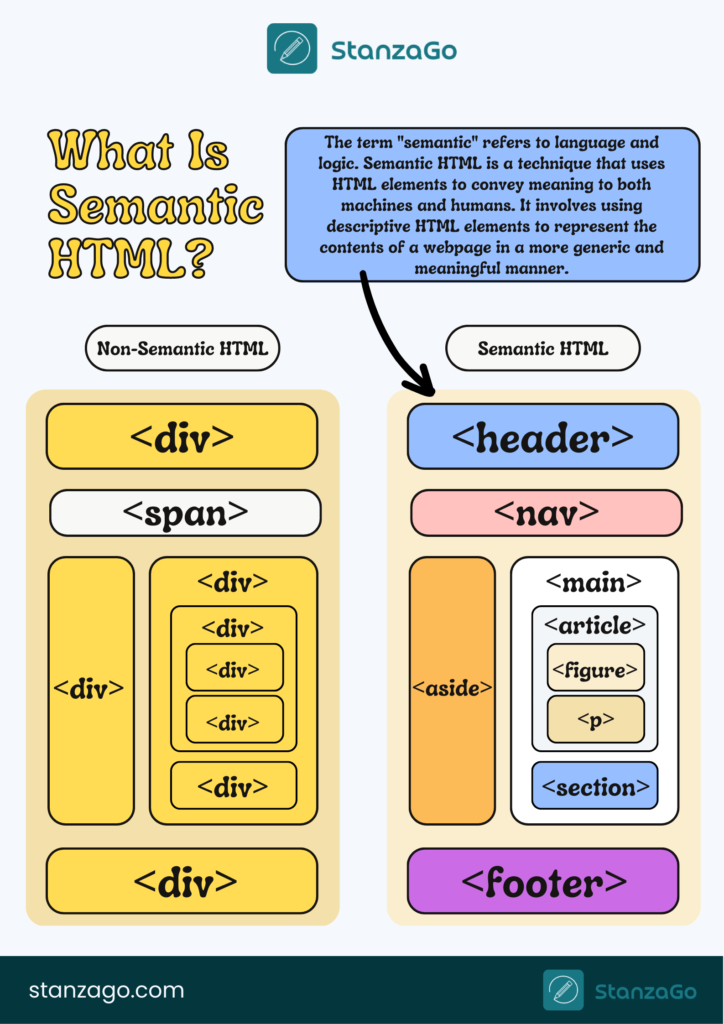
The following image provides a clear visual distinction between a page built with non-semantic <div>s and one built with meaningful semantic tags.
To get a modern perspective on why this is so crucial, please read the following article. It does an excellent job of connecting semantic HTML to today's landscape of AI, accessibility standards, and SEO.
Semantic HTML in 2025: The Bedrock of Accessible, SEO-Ready, and Future-Proof Web Experiences
The article 'Semantic HTML in 2025' explains why these principles are more relevant than ever. It will give you a solid understanding of the 'why' before we dive into the 'how'.
Please read the first two sections: '1. The Semantical Story-telling HTML Realm' and '2. What’s Changed Since the 2020s?'. Focus on the reasons semantic HTML is critical for accessibility, SEO, and even AI-powered search.
The Core Structural Elements of a Page
Most webpages can be broken down into a few common sections. HTML5 provides specific tags for these sections.
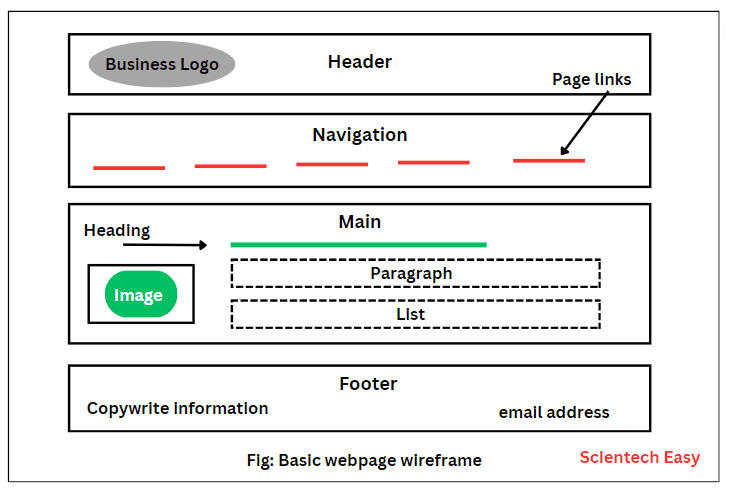
Let's explore the primary elements you'll use to define this structure:
<header>: Represents introductory content for the page or a section. It often contains a logo, the site title, and the main navigation.<nav>: Used to define a block of navigation links.<main>: This is for the main, unique content of your page. There should only be one<main>element per page.<footer>: Contains content for the end of a page or section, such as copyright information, contact details, or related links.<section>: Groups related content together, typically with its own heading. Think of it as a chapter in your document.<article>: Represents a self-contained piece of content that could, in theory, be distributed and make sense on its own (e.g., a blog post, a news story, a forum comment).
The following video provides an excellent, hands-on walkthrough of these elements.
Semantic HTML Tags | HTML5 Semantic Elements Tutorial
Instructor Dave Gray will guide you through adding these semantic elements to a document, explaining the purpose of each one as he goes.
Watch the video in three parts: From 03:58 to 07:34 to see how <header>, <main>, and <footer> are used to define the overall page layout. From 09:58 to 11:27 to understand the difference between <article> and <section>. From 11:27 to 13:11 to see how you can nest <section> elements inside an <article> to create a clear content hierarchy.
As the video demonstrates, the choice between <section> and <article> can sometimes be tricky. A good rule of thumb is: if the content could be syndicated as a standalone item in an RSS feed, use <article>. If it's just a thematic grouping of content on the current page, use <section>.
Hands-On: Structuring Your Personal Profile Page
Now, let's apply this to your index.html file. We will replace the blank <body> with a semantic structure for your future profile page.
-
Open
index.htmlin yourpersonal-profile-siteproject. -
Add the main layout elements. Inside the
<body>, add a<header>, a<main>, and a<footer>.<body> <header> <!-- Header content will go here --> </header> <main> <!-- Main page content will go here --> </main> <footer> <!-- Footer content will go here --> </footer> </body> -
Add content to the
<header>. Your header is a good place for your name (as the main heading of the site) and the main navigation. Let's add an<h1>and a<nav>element. For now, the navigation will just be a placeholder.<header> <h1>Your Name</h1> <nav> <!-- Navigation links will go here later --> </nav> </header> -
Add content to the
<main>section. Let's create a section for your "About Me" content. We'll use a<section>tag with an<h2>heading to introduce it.<main> <section> <h2>About Me</h2> <p>A brief paragraph about yourself will go here.</p> </section> </main> -
Add content to the
<footer>. The footer is perfect for copyright information. The©is an HTML entity that renders the © symbol.<footer> <p>© 2024 Your Name</p> </footer>
Your Complete Code
Your index.html file should now look like this. Check your code against this complete example:
<!DOCTYPE html>
<html lang="en">
<head>
<meta charset="UTF-8">
<title>My Personal Profile</title>
</head>
<body>
<header>
    <h1>Your Name</h1>
    <nav>
        <!-- Navigation links will go here later -->
    </nav>
</header>
<main>
    <section>
        <h2>About Me</h2>
        <p>A brief paragraph about yourself will go here.</p>
    </section>
</main>
<footer>
<p>© 2024 Your Name</p>
</footer>
</body>
</html>
Remember to replace "Your Name" with your actual name! Use Live Server to view your page. It won't look like much yet, but you've created a professional, accessible, and SEO-friendly structure that browsers and developers can understand.
Commit Your Progress
You've made significant structural changes. Let's commit them to Git.
- Open the terminal in VS Code (
Ctrl+~). - Stage your
index.htmlfile:git add index.html - Commit the changes with a descriptive message:
git commit -m "feat: add semantic HTML structure to the main page" - Push your commit to GitHub:
git push
Conclusion
Great job! You have successfully structured your webpage using the most important semantic HTML elements. This is a critical step away from just "making things appear on a page" and towards building professional, high-quality websites.
Key Takeaways:
- Semantic HTML uses tags that convey the meaning of their content, like
<header>,<nav>,<main>,<article>,<section>, and<footer>. - This practice is essential for accessibility, SEO, and code maintainability.
- There should only be one
<main>element per page, containing the unique content. - Always try to choose a semantic element before defaulting to a generic
<div>. This discipline will make you a better developer.
In the next lesson, we will continue building out your site by focusing on another key semantic element: <form>. You'll learn how to create a contact form with various input types and labels, making your site interactive.