Hello! In our previous lesson, you learned about list comprehensions, a concise and powerful way to create and manipulate collections of data. This was a big step towards writing more "Pythonic" code.
Today, we'll address a fundamental question: how do we organize our code when we need to represent more complex things than just a list of numbers or strings? In machine learning, we work with models, datasets, and transformations, each with its own data (attributes) and associated actions (behaviors). To manage this complexity, we need a way to bundle related data and functionality together.
This brings us to the core of Object-Oriented Programming (OOP) in Python: classes and objects. In this lesson, you will learn to define and use simple Python classes and objects. This is not just an abstract programming concept; it is the foundational paradigm for nearly every major machine learning library you will use, including scikit-learn and PyTorch. Understanding it will transform these libraries from black boxes into intuitive toolkits.
From C structs to Python classes
Given your background in C, you're already familiar with structs as a way to group related data. For example, to represent an employee, you might write:
struct Employee {
    char first_name[50];
    char last_name[50];
    int salary;
};
A Python class starts from this same idea but adds a crucial extension. A class bundles not only data (which we'll call attributes) but also the functions that operate on that data (which we'll call methods).
A C struct essentially encapsulates data. A Python class encapsulates both data and behavior. The following short discussion on Stack Overflow directly addresses this comparison.
Difference between class (Python) and struct (C) - Stack Overflow
These answers highlight the core conceptual leap from a C struct to a Python class.
Focus on the first two answers. The first one by George V. Reilly is a perfect one-sentence summary: "Structs encapsulate data. Classes encapsulate behavior and data." The second answer by Randolpho elaborates on this by explaining that class methods operate on an instance of the class, whereas in C, you'd pass a pointer to a struct into a separate function.
Another critical distinction, highlighted in the same Stack Overflow thread, is that C structs are value types, while Python objects are reference types. When you assign a struct to another variable in C, you create a full copy of the data. In Python, when you assign an object, you're making another variable point to the same object in memory, much like working with pointers in C. We'll see this in action shortly.
The Blueprint and the Instance
The two central concepts you need to grasp are the class and the object (or instance).
- A Class is a blueprint. It defines the structure and behavior for something, but it's not the thing itself. Think of it as an architectural drawing for a house.
- An Object (or Instance) is a concrete entity created from that blueprint. It's an actual house, built from the drawing, with specific properties like a street address and paint color.
You can create many objects from a single class, just as you can build many houses from one blueprint.
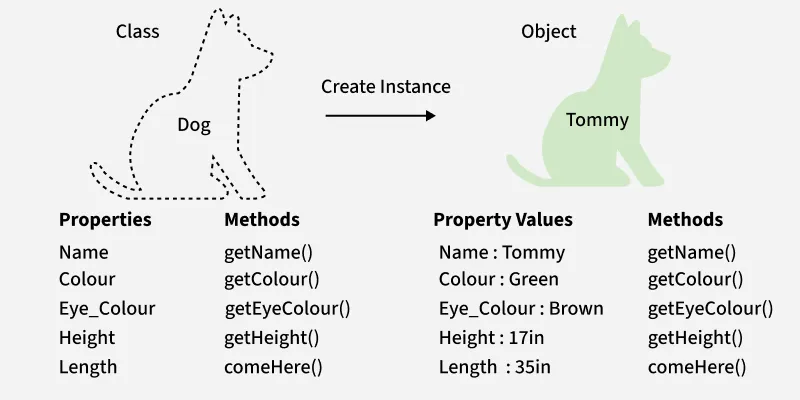
Let's dive into the Real Python guide, which provides a fantastic introduction to these ideas.
Object-Oriented Programming (OOP) in Python
This article will be our main guide. It clearly explains the "what" and "why" of OOP before showing the code.
Start by reading the introductory section, What Is Object-Oriented Programming? It provides the high-level definition. Then, read the section "How Do You Define a Class in Python?" which motivates the need for classes over simple lists or dictionaries. Finally, read the subsection "Classes vs Instances", which solidifies the blueprint analogy.
Defining and Initializing a Class
Now, let's translate these concepts into Python code. We'll use an Employee class as our example, as it's a very clear and practical use case.
To create a class, we use the class keyword. To ensure our objects are created with all the necessary attributes from the start, we define a special method called __init__. This method is the "initializer" or "constructor." It runs automatically every time we create a new instance of the class.
The first parameter of any method inside a class is conventionally named self. It's a reference to the instance itself, allowing you to access its attributes and other methods.
Corey Schafer's tutorial provides an exceptionally clear, step-by-step walkthrough of this process.
Python OOP Tutorial 1: Classes and Instances
This video by Corey Schafer is one of the best introductions to Python classes available. He explains the concepts with perfect clarity for a beginner.
Watch from the beginning to understand why classes are useful and how a class differs from an instance. Pay close attention to the section from where he introduces the __init__ method. He does a great job explaining how self works and how attributes are set automatically when you create an instance.
To summarize the syntax from the video, here is how you would define the Employee class and create two instances:
class Employee:


    # The __init__ method is the constructor.
    # It runs when we create a new Employee object.
    def __init__(self, first, last, pay):


        # self refers to the specific instance being created.
        # We assign the arguments to instance attributes.
        self.first = first
        self.last = last
        self.pay = pay
        self.email = f'{first}.{last}@company.com'


# Instantiating two objects (instances) of the Employee class
emp_1 = Employee('John', 'Doe', 60000)
emp_2 = Employee('Jane', 'Smith', 70000)


# Accessing attributes using dot notation
print(emp_1.email)
print(emp_2.email)
Output:
John.Doe@company.com
Jane.Smith@company.com
Adding Behavior with Methods
So far, our class only holds data (attributes). The real power of classes comes from bundling actions (methods) with that data. A method is simply a function defined inside a class. It always takes self as its first argument, giving it access to the instance's attributes.
Let's add a method to our Employee class to get the full name.
class Employee:
    def __init__(self, first, last, pay):
        self.first = first
        self.last = last
        self.pay = pay
        self.email = f'{first}.{last}@company.com'


    # This is an instance method
    def fullname(self):
        return f'{self.first} {self.last}'

emp_1 = Employee('John', 'Doe', 60000)


# Calling the method on the instance
print(emp_1.fullname())
Output:
John Doe
Notice that we call emp_1.fullname() with parentheses. If you omit them, you'll just be referencing the method itself, not executing it to get the result.
Let's return to Corey Schafer's video, where he explains this perfectly and also highlights a common error that new programmers make.
Python OOP Tutorial 1: Classes and Instances
This section covers adding methods to a class and explains the role of self in that context.
Watch from this section on instance methods. He demonstrates how to create the fullname method. Critically, he explains what happens when you forget self as a parameter—a very common mistake—and why the error message says "1 was given" when you passed zero arguments. This is a vital piece of understanding.
The "So What?" for Machine Learning
You might be wondering how this relates to your goal of learning ML. The connection is direct and immediate. The class/object paradigm is precisely how you will interact with machine learning models in libraries like scikit-learn.

Let's break down the code in the diagram:
model = EstimatorName(): Here,EstimatorNameis a class (e.g.,LinearRegression,LogisticRegression). You are instantiating an object of that class and assigning it to the variablemodel. Thismodelobject is now your own personal instance of that algorithm's blueprint.model.fit(X_train, y_train): You are calling thefitmethod on yourmodelobject. This method takes your training data, performs the learning process, and stores the results (like model coefficients) as attributes inside themodelobject itself.model.predict(X_test): You are calling thepredictmethod, which uses the internal attributes learned duringfitto make predictions on new data.model.score(X_test, y_test): You are calling thescoremethod to evaluate your model's performance.
By learning to define your own simple classes, you are demystifying this entire process. You now understand the fundamental structure of the tools you'll be using throughout your ML journey.
Practice: A Vector Class
To put this all together, let's create a class that should feel familiar from your mathematics and engineering studies: a 3D vector.
Your task: Create a Vector class that has the following features:
- The
__init__method should takex,y, andzcomponents as arguments and store them as attributes. - A method called
magnitude()that calculates and returns the Euclidean norm (magnitude) of the vector: . You can use the exponentiation operator**0.5to calculate the square root. - A
__str__method. This special "dunder" (double underscore) method defines what gets displayed when youprint()an object. Have it return a user-friendly string likeVector(x, y, z). TheReal Pythonarticle you read earlier briefly mentions this method.
Try to build this class and test it yourself. Create an instance and print its magnitude and the object itself.
Click to see the solution
class Vector:
    def __init__(self, x, y, z):
        self.x = x
        self.y = y
        self.z = z

    def __str__(self):
        return f'Vector({self.x}, {self.y}, {self.z})'

    def magnitude(self):
        return (self.x**2 + self.y**2 + self.z**2)**0.5


# --- Testing the class ---
v1 = Vector(3, 4, 0)


# This will call the __str__ method
print(v1)


# This will call the magnitude method
print(f'Magnitude: {v1.magnitude()}')

v2 = Vector(1, 1, 1)
print(v2)
print(f'Magnitude: {v2.magnitude()}')
Expected Output:
Vector(3, 4, 0)
Magnitude: 5.0
Vector(1, 1, 1)
Magnitude: 1.7320508103145533
Conclusion
In this lesson, we've made the leap from procedural to object-oriented thinking. You've seen how Python classes extend the concept of a C struct by bundling both data (attributes) and behavior (methods) into a single, reusable blueprint.
Here are the key takeaways:
- A class is a blueprint; an object (or instance) is a concrete creation from that blueprint.
- The
__init__method is a special constructor that initializes an object's attributes when it's created. - The
selfparameter in a method refers to the instance the method is being called on, giving you access to its data. - This class/object structure is the fundamental API design for major data science libraries like
scikit-learn.
You now have a solid mental model for how these powerful libraries work under the hood. In our next lesson, we will introduce NumPy, a library that provides the fundamental data structure for numerical computing in Python: the N-dimensional array. This will give us the efficient, high-performance arrays we need to hold the data that we'll eventually feed into our machine learning model objects.