Hello! Welcome back to our course on AI-powered SEO.
In our previous lesson, we built an automation engine to generate schema markup at scale, using both specialized AI tools and advanced scripting with Screaming Frog. Now, we'll focus on the critical final steps of that workflow: deployment and validation. Manually inserting thousands of unique scripts is not an option for an enterprise site, so we need a scalable solution.
Today, your learning outcome is to deploy and validate automatically generated schema markup at scale using methods like Google Tag Manager. You will learn how to use GTM to dynamically inject the correct schema onto thousands of pages and then build a robust process to ensure it's working correctly.
1. Why Google Tag Manager for Scalable Schema Deployment?
While you could ask a developer to hard-code the schema scripts you generated, using Google Tag Manager (GTM) offers significant advantages, especially in a large-scale or enterprise environment:
- Independence & Speed: It allows you, the SEO specialist, to deploy and update schema without waiting for a developer's release cycle.
- Flexibility: You can create complex rules (triggers) to fire schema on very specific page types.
- Centralized Management: All your marketing and SEO tags are in one place, with version control and easy rollback capabilities.
- Dynamic Implementation: GTM can pull information directly from the page (like a headline or price) to populate your schema templates dynamically.
However, it's important to understand the context. GTM injects schema using client-side JavaScript. For critical schema like Product, some systems (like Google Merchant Center) and crawlers have a stronger preference for schema that is rendered on the server-side (part of the initial HTML).
LLM schema optimisation: What Still Matters
The article 'LLM schema optimisation: What Still Matters' briefly discusses the pros and cons of different delivery methods. This context is important for making informed decisions.
Please read the section titled 'Markup delivery that works: server vs client vs tag manager trade‑offs'. Focus on the 'Discovery and crawlability trade-offs' for Tag Manager injection. Note the caveats mentioned, such as potential blocking by consent rules.
The takeaway is that while server-side rendering is the gold standard for reliability, GTM is a powerful and widely-supported method for deploying schema at scale, especially when direct developer access is limited or slow.
2. The GTM Deployment Workflow: From Static to Dynamic
Deploying schema with GTM involves creating a Custom HTML Tag containing your JSON-LD script and a Trigger to tell it when and where to fire.
Let's start with a simple, static example. Imagine you want to deploy Organization schema on your homepage. You would paste the complete JSON-LD script into a Custom HTML tag and set the trigger to fire on the homepage URL.
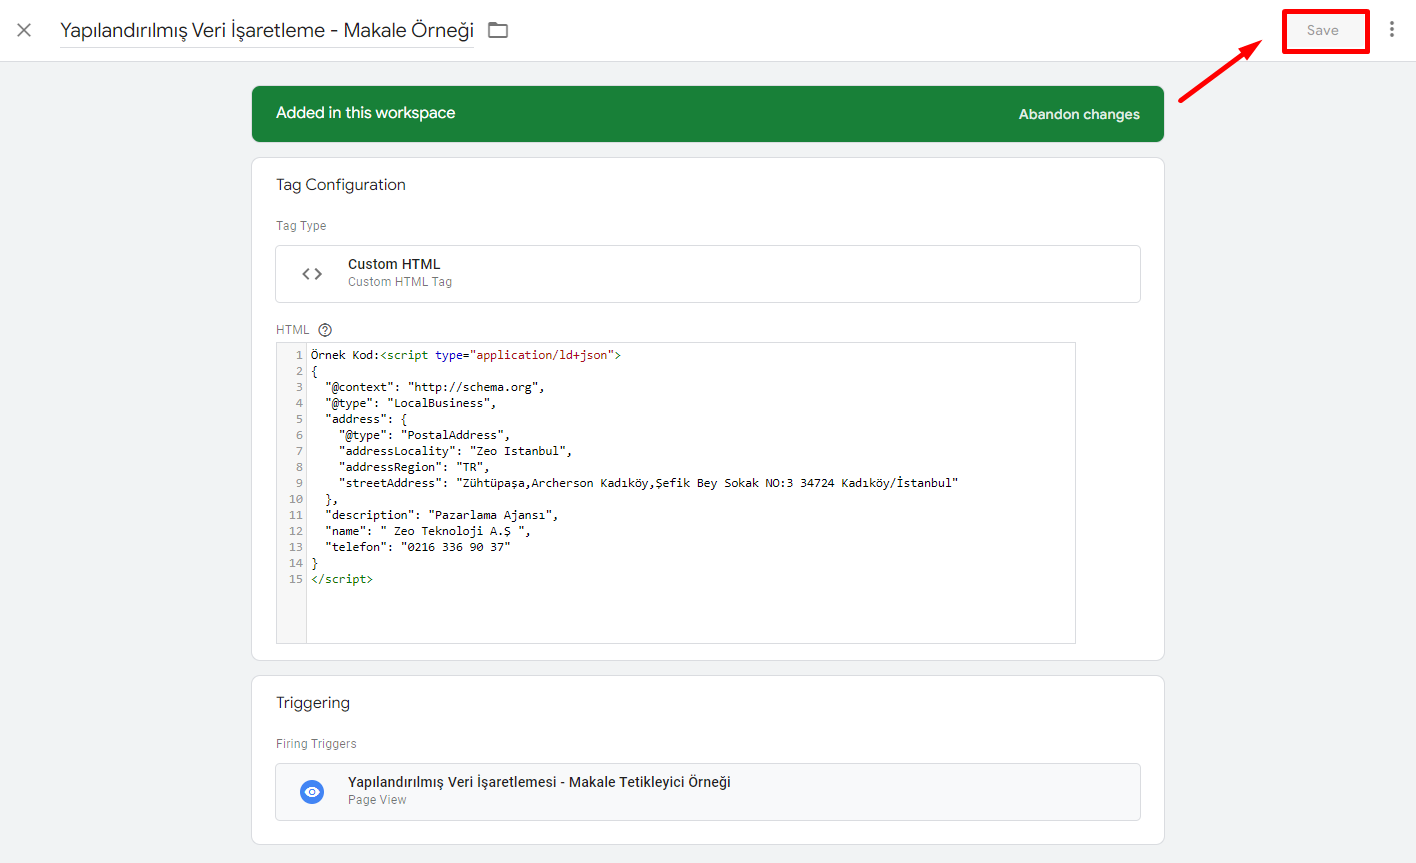
This is simple for one page. But how do we do this for 10,000 product pages, each needing a unique Product schema? The answer is to make the tag dynamic using GTM variables.
The Key to Scale: GTM Variables
Instead of a static script, we create a template with placeholders. These placeholders, formatted as {{Variable Name}}, are automatically replaced by GTM with live data from the page when the tag fires.
There are two primary methods for creating these variables.
Method 1: Data Layer Variables (The Most Robust Method)
The data layer is a JavaScript object on your site that holds key information. For e-commerce sites, this is often pre-configured to include product names, SKUs, prices, etc. If the data is in the data layer, you can easily pull it into a GTM variable. This is the most reliable method but may require initial setup by a developer.
Enrich Search Results with JSON-LD Markup through Google Tag Manager
The video 'Enrich Search Results with JSON-LD Markup through Google Tag Manager' by MeasureSchool provides an excellent walkthrough of this entire process using data layer variables.
Please watch from 02:24 to 10:02. This is the core of the video. Observe how a static product schema is first created (02:24-05:40) and then made dynamic by replacing hard-coded values like the product name and rating with data layer variables (06:37-10:02).
Method 2: DOM Element Variables (The SEO's Best Friend)
What if you don't have a perfect data layer? You can create variables that "scrape" content directly from the page's HTML using DOM Element variables. The DOM (Document Object Model) is the structured representation of the page's HTML. You can tell GTM to find an element using a CSS Selector (e.g., the h1 tag) and grab its text.
This method gives you incredible power without needing developer intervention.
How to Create Dynamic Schema With Google Tag Manager
The article 'How to Create Dynamic Schema With Google Tag Manager' by Go Fish Digital is a fantastic, step-by-step guide for using DOM Element variables. It walks through a real-world example of creating dynamic Article schema for a blog.
Please read from 'Step 2: Create the Schema Code Template' through 'Step 7: Create a Google Tag Manager Trigger'. This will guide you through the entire process: Creating a schema template with {{variable}} placeholders. Creating User-Defined Variables of the 'DOM Element' type. Using CSS Selectors to target specific HTML elements (like h1.blog-title). Putting it all together in a Custom HTML tag with a JavaScript wrapper. Setting up a trigger to fire only on blog pages.
The process detailed in the article is your playbook:
- Create a Template: Write your JSON-LD script, using placeholders like
{{Blog_Headline}}and{{Author_Name}}. - Create Variables: For each placeholder, create a new "DOM Element" variable in GTM.
- Configure the Variable:
- Selection Method: Set to "CSS Selector".
- Element Selector: Enter the CSS selector that uniquely identifies your target element (e.g.,
h1for the headline,.author-namefor the author's name). You can find this by right-clicking an element on your page and choosing "Inspect" in your browser's DevTools. - Attribute Name (Optional): Leave this blank to get the text content. If you need the value of an attribute (like the
srcfrom an<img>tag), you'd enter it here.
- Build the Tag: Paste the JavaScript wrapper and your schema template into a Custom HTML tag.
- Set the Trigger: Create a trigger that fires on "Page View" where "Page Path contains /blog/" (or whatever identifies your target page type).
Test your understanding!
You want to create a GTM variable to dynamically pull the publication date for your Article schema. After inspecting the page, you see the date is inside the following HTML element: <meta property="article:published_time" content="2026-05-20T14:30:00+00:00">.
How would you configure the DOM Element variable in GTM? What would be the 'Element Selector' and what would be the 'Attribute Name'?
Show answer
- Element Selector:
meta[property='article:published_time'] - Attribute Name:
content
This configuration tells GTM to find the meta tag with that specific property attribute, and then instead of grabbing its text (which is empty), extract the value from its content attribute.
3. Validation: The Non-Negotiable Quality Gate
Deploying broken schema is worse than deploying no schema. A robust validation process is essential.
Phase 1: Pre-Deployment Testing with GTM Preview
GTM's Preview Mode is your first line of defense. It lets you test your changes on your live site without publishing them.
The GoFishDigital article you just read covers this in Step 8. When in Preview Mode:
- Navigate to a target page (e.g., a blog post).
- In the Tag Assistant window, select the "Container Loaded" or "DOM Ready" event on the left.
- Confirm your new schema tag appears under "Tags Fired".
- Click on the tag, then select the "Variables" tab. Check if your variables were populated with the correct data from the page. If they are
undefined, your CSS selector is likely incorrect. - Check the rendered HTML of the page (using "View Source" or DevTools) to see the final, populated JSON-LD script injected into the page's
<head>.
Phase 2: Post-Deployment Validation
After publishing, you need to verify the implementation is working correctly in the wild.
- Spot-Check with Testing Tools: Manually test a few different URLs using Google's Rich Results Test and the Schema Markup Validator. The Rich Results Test shows if you're eligible for Google features, while the Schema Validator checks for general syntax errors.

- Audit at Scale with Screaming Frog: To check thousands of pages, configure Screaming Frog to:
- Enable JavaScript rendering (
Configuration > Spider > Rendering). - Crawl your target pages.
- Use Custom Extraction to pull the content of the
script[type="application/ld+json"]tag. - This will give you a spreadsheet with the deployed schema for every page, which you can scan for errors or missing fields.
- Enable JavaScript rendering (
Phase 3: Ongoing Monitoring in Google Search Console
Finally, Google Search Console (GSC) will tell you how Google sees your schema over time. Under the "Enhancements" section in the sidebar, GSC creates reports for each schema type it finds (e.g., Products, Articles, Videos). These reports show:
- Valid: Pages with correctly implemented schema.
- Valid with warnings: Schema is valid but could be improved (e.g., missing a recommended property).
- Invalid: Pages with critical errors that prevent Google from reading the schema.
Monitor these reports regularly, especially after a deployment, to catch any widespread issues.
Conclusion
You now possess a powerful, scalable, and professional workflow for deploying and validating structured data. By combining the flexibility of Google Tag Manager with a multi-layered validation process, you can manage schema for even the largest websites efficiently and effectively, freeing you from developer dependencies and manual grunt work.
Key Takeaways:
- GTM is a scalable solution for deploying dynamic schema, using a Custom HTML Tag with a schema template and a Trigger.
- Dynamic variables are the key to scale. Use Data Layer variables for robustness when available, and DOM Element variables for an agile, SEO-driven approach.
- Validation is a multi-stage process:
- Test before deployment using GTM Preview mode.
- Verify after deployment with the Rich Results Test and scaled crawls.
- Monitor long-term performance using Google Search Console.
In our next lesson, we will continue our focus on on-page automation by learning how to implement automated workflows for creating descriptive image alt text at scale, another critical task for large websites.