Hello! Welcome to the final lesson in our module on consuming external APIs.
In our previous lessons, we successfully used Guzzle to make GET requests to fetch data from an API and then parsed the JSON responses into usable PHP arrays. This covers half of the equation: getting information. Now, we'll tackle the other half: sending information.
Today's learning outcome is to send data to an API using POST and PUT requests. These HTTP methods are the standard way to create new resources and update existing ones. By the end of this lesson, you'll be able to build PHP applications that can fully interact with APIs, not just read from them.
1. Preparing Data to Send: json_encode()
In the last lesson, we used json_decode() to turn a JSON string from an API into a PHP associative array. To send data to an API, we do the reverse. We start with a PHP associative array and convert it into a JSON string. PHP's built-in function for this is json_encode().
It's very straightforward:
$newPostData = [
    'userId' => 10,
    'title' => 'My New Post with Guzzle',
    'body' => 'This is the content of the post.'
];

$jsonString = json_encode($newPostData);

echo $jsonString;
// Output: {"userId":10,"title":"My New Post with Guzzle","body":"This is the content of the post."}
This jsonString is what we will send in the body of our request.
2. Sending Data with Guzzle: POST and PUT
Just as Guzzle provides a get() method for GET requests, it has convenient methods for other HTTP verbs, including post() and put().
POST: Typically used to create a new resource. For example, submitting a new blog post or registering a new user. The server is responsible for assigning an ID and the final URL to the new resource.PUT: Typically used to update or replace an existing resource entirely. You must know the specific URL of the resource you want to modify (e.g.,/posts/1).
The great thing about Guzzle is that it simplifies the process of sending data. You don't even have to call json_encode() yourself if you're sending JSON.
For a clear, practical guide on how to structure these requests, the following article is an excellent starting point.
Make a POST Request from PHP With Guzzle
This blog post by Lorna Jane provides a very clear and modern approach to making POST requests with Guzzle. It's a great practical introduction.
Read the sections 'Send Form Data With Your Post Request' and 'Send JSON With Your Post Request'. Pay close attention to the difference between the form_params option and the json option. For most modern APIs, you'll be using the json option.
As you read, you saw that Guzzle provides special request options:
'form_params': Use this when you need to send data asapplication/x-www-form-urlencoded, which mimics a standard HTML form submission.'json': Use this for sending JSON data. Guzzle will automatically runjson_encode()on your PHP array and set theContent-Type: application/jsonheader for you. This is incredibly convenient and the method we'll focus on.
For a more comprehensive look at all the ways you can send data, the official Guzzle documentation is the best reference.
Quickstart - Guzzle Documentation
The official Guzzle documentation covers all methods for sending data. It's a good idea to see the full range of possibilities.
Skim the 'Uploading Data' section. You'll see the body, json, and form_params options we've discussed. Notice how the json option is a simple, one-line way to handle JSON payloads.
3. Practical Example: Creating a Resource with POST
Let's use what we've learned to create a new post on our test API, https://jsonplaceholder.typicode.com.
The API documentation (or in this case, common knowledge about this test API) tells us we can send a POST request to /posts to create a new one.
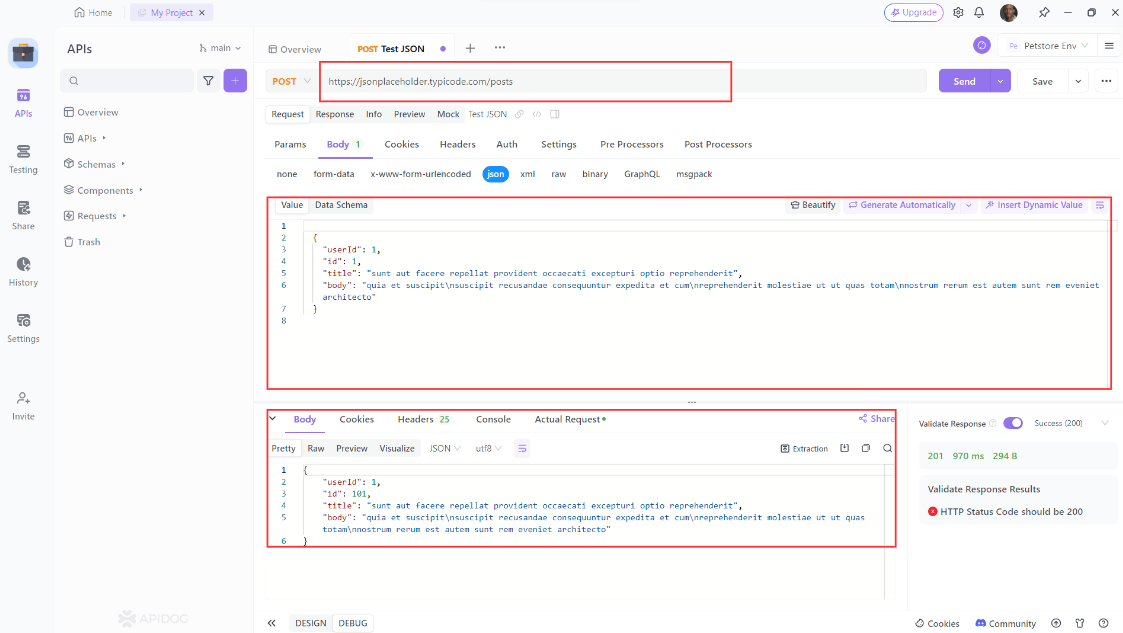
Here is the PHP code to perform that same action using Guzzle:
<?php

require 'vendor/autoload.php';

use GuzzleHttp\Client;
use GuzzleHttp\Exception\RequestException;

$client = new Client([
    'base_uri' => 'https://jsonplaceholder.typicode.com',
    'timeout'  => 2.0,
]);

// 1. Prepare the data as a PHP associative array
$newPost = [
    'userId' => 5,
    'title'  => 'Learning to POST with Guzzle',
    'body'   => 'This is exciting! Guzzle makes sending data so easy.'
];

try {
    // 2. Make the POST request
    $response = $client->post('/posts', [
        'json' => $newPost // 3. Use the 'json' option
    ]);

    // 4. Handle the response
    if ($response->getStatusCode() === 201) { // 201 Created
        $body = $response->getBody()->getContents();
        $createdPost = json_decode($body, true, 512, JSON_THROW_ON_ERROR);

        echo "Successfully created a new post!\n";
        echo "New Post ID: " . $createdPost['id'] . "\n";
        print_r($createdPost);
    }

} catch (RequestException $e) {
    echo "Guzzle Error: " . $e->getMessage();
} catch (JsonException $e) {
    echo "JSON Decode Error: " . $e->getMessage();
}
Code Breakdown:
- We define our new post's data in a simple PHP associative array.
- We call the
$client->post()method, specifying the endpoint (/posts). - In the options array, we pass our PHP array to the
'json'key. Guzzle handles thejson_encode()and setting theContent-Typeheader. - A successful creation (
POST) usually returns an HTTP status code of201 Created. We check for this and then decode the response body to see the final resource as created by the server, which now includes anid.
4. Practical Example: Updating a Resource with PUT
Now, let's update an existing post. We'll modify the post with id of 1. A PUT request is ideal for this. The process is almost identical to a POST request, but we use the put() method and specify the full resource URL.
<?php

require 'vendor/autoload.php';

use GuzzleHttp\Client;
use GuzzleHttp\Exception\RequestException;

$client = new Client([
    'base_uri' => 'https://jsonplaceholder.typicode.com',
    'timeout'  => 2.0,
]);

// Data for updating post with ID 1
$updatedPostData = [
    'id'     => 1, // It's good practice to include the ID
    'userId' => 1,
    'title'  => 'My Updated Title',
    'body'   => 'The content has been completely replaced by this new body.'
];

try {
    // Note the endpoint includes the ID of the resource to update
    $response = $client->put('/posts/1', [
        'json' => $updatedPostData
    ]);

    if ($response->getStatusCode() === 200) { // 200 OK
        $body = $response->getBody()->getContents();
        $updatedPost = json_decode($body, true, 512, JSON_THROW_ON_ERROR);

        echo "Successfully updated post 1!\n";
        print_r($updatedPost);
    }

} catch (RequestException $e) {
    echo "Guzzle Error: " . $e->getMessage();
} catch (JsonException $e) {
    echo "JSON Decode Error: " . $e->getMessage();
}
As you can see, the only significant changes were calling $client->put() and adding the resource /1 to the endpoint.
5. For Your Curiosity: The Native PHP Way
Guzzle provides a fantastic, high-level abstraction. Given your PHP background, you might be curious about how this is done without a library. The native way involves using the cURL extension. The following video demonstrates sending data with native cURL and then with Guzzle, which effectively highlights why libraries like Guzzle are the modern standard.
How to call APIs from PHP: file_get_contents, cURL, Guzzle and SDKs
This video from Dave Hollingworth shows how to send data with both native cURL and Guzzle. It's a great way to appreciate the simplicity Guzzle brings.
First, watch the cURL section from 10:16 to 11:58. Notice the manual setup of options like CURLOPT_CUSTOMREQUEST and CURLOPT_POSTFIELDS. Then, watch the Guzzle section from 16:15 to 17:32. Compare how cleanly Guzzle handles the same task (in this case, a PATCH request, which is very similar to PUT).
Watching this comparison should solidify why using a dedicated HTTP client like Guzzle is the preferred, more maintainable approach for professional development.
Conclusion
Congratulations! You can now perform the full range of basic interactions with a RESTful API: fetching, creating, and updating data. This is a fundamental skill for any modern web developer.
Key Takeaways:
- Use
POSTto create new resources andPUTto update existing ones. - Guzzle simplifies these requests with its
post()andput()methods. - The
'json'request option is the easiest way to send a PHP associative array as a JSON payload. Guzzle handles the encoding and headers automatically. - The structure for making
POSTandPUTrequests is very similar, differing mainly in the HTTP method and the endpoint URL.
Preview of the Next Lesson:
We've spent this module focused on the "how" of API communication. Now, we're going to take a step back and look at the "where". In the next module, we'll introduce the Model-View-Controller (MVC) design pattern. This is a crucial architectural concept that will help you organize your code—including API clients like the ones we've built—into a clean, scalable, and professional application structure.