Hello! Welcome back.
In our last lesson, we explored what Composer is and why it's an indispensable tool for modern PHP development. We established that it manages project dependencies, preventing the chaos of manual library management.
Today, we'll move from theory to practice. This lesson is all about getting your hands dirty and setting up a project the professional way. You will learn to initialize a project and manage its dependencies using the composer.json file. This is the foundational step for building any serious PHP application, from a simple library to a full-scale web app, bringing you closer to your goal of PHP mastery.
1. Installing Composer
Before we can use Composer, we need to install it. Composer is a command-line tool, so you'll be interacting with it through your terminal. The installation is straightforward, but it varies slightly depending on your operating system.
The following video from the excellent Laracasts series will guide you through the process.
PHP For Beginners, Ep 47 - Composer and Free Autoloading
This segment demonstrates how to download and install Composer. It's important to install it globally so you can run the composer command from any directory on your system.
Watch the video from 02:28 to 03:50. The instructor is using a Mac, but the principle is the same for Linux. For Windows, the installer on the getcomposer.org download page handles these steps for you. The key goal is to get the composer command working in a new terminal window.
Action Step:
- Visit the official Composer download page.
- Follow the instructions for your operating system (Windows, or Linux/macOS). For Linux/macOS users, make sure to follow the steps for a global installation.
- Once finished, open a new terminal window and run the command
composer. You should see a list of available commands, which confirms the installation was successful.
2. Initializing a Composer Project
With Composer installed, you can now initialize a new PHP project. The heart of a Composer project is a configuration file named composer.json. This file tells Composer everything it needs to know about your project, including its name, description, and—most importantly—its dependencies.
While you can create this file manually, Composer provides a handy interactive command to get you started: composer init.
PHP For Beginners, Ep 47 - Composer and Free Autoloading
This next part of the Laracasts video walks you through the composer init command. This interactive wizard is the easiest way to generate your initial composer.json file.
Watch from 03:50 to 05:20. Follow along with the instructor by creating a new empty directory for your project and running composer init inside it. Pay attention to the questions the wizard asks.
Action Step:
- Create a new folder for your practice project (e.g.,
php-project). - Navigate into that folder in your terminal.
- Run
composer init.
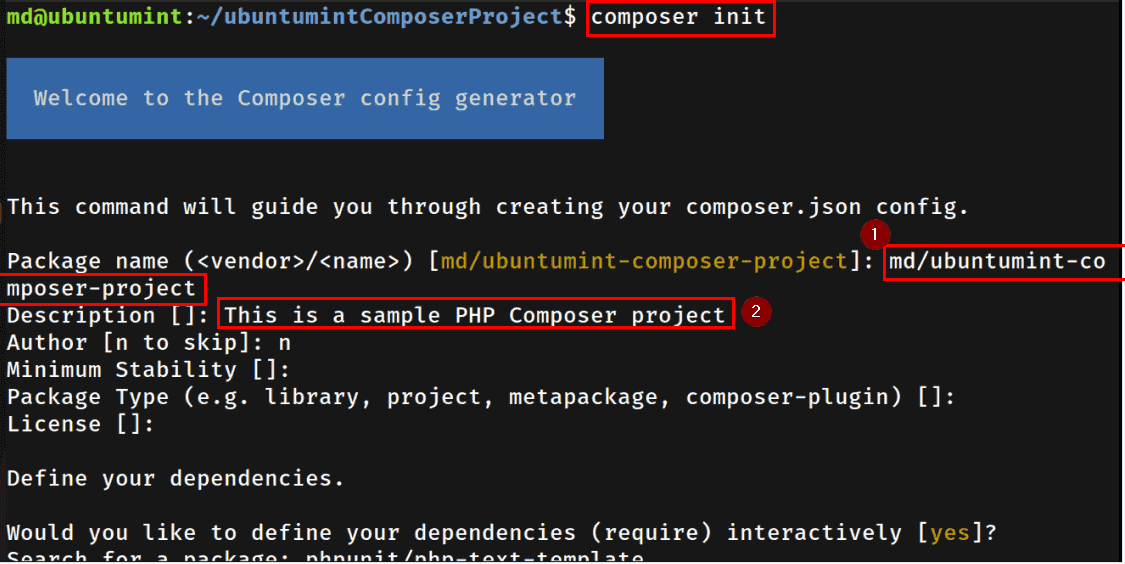
You'll be prompted for some information. Here's a quick guide:
- Package name (
<vendor>/<name>): A unique identifier for your project. Thevendorpart is usually your GitHub username or company name. For example:my-username/php-project. - Description: A short explanation of your project.
- Author: Your name and email.
- Minimum Stability: You can press Enter to accept the default (
stable). - Package Type: You can press Enter to accept the default (
project). - License: e.g.,
MIT. - Define your dependencies interactively? Press
nfor no. We will add them manually. - Add PSR-4 autoload mapping? Press
nfor no. We'll cover this in the next lesson. - Add to .gitignore? Press
yfor yes. This is very important.
Here is what the process looks like in the terminal:
After you complete the wizard, you will see two new files in your project directory:
composer.json: Your project's configuration file..gitignore: A file for the Git version control system, pre-configured to ignore thevendordirectory.
3. Understanding the composer.json File
Now, open the composer.json file in your code editor. It should look something like this:

This file is where you declare the libraries your project needs to function. There are two main sections for this:
"require": For dependencies needed for the application to run in a production environment (e.g., a logging library, an email library)."require-dev": For dependencies only used during development (e.g., testing frameworks like PHPUnit, or debugging tools).
This separation is crucial. When you deploy your application to a live server, you can tell Composer to skip installing the development dependencies, making your deployment lighter and more secure.
How To Manage PHP Dependencies Using Composer - Mend.io
This article from Mend.io provides a clear, practical breakdown of the composer.json file's structure, including the distinction between require and require-dev.
Read the section titled 'How to use composer.json file'. Focus on the descriptions of the require and require-dev keys. The other keys (autoload and autoload-dev) will be covered in our next lesson.
Defining Version Constraints
Simply listing a package isn't enough; you must also tell Composer which version of the package you want. This is done using version constraints. A well-defined constraint ensures you get updates and bug fixes without accidentally pulling in a new major version that could break your code.
The most common and recommended version constraint is the caret (^) operator. For example, ^7.0 means "install version 7.0 or any later version up to, but not including, version 8.0". This follows the principle of Semantic Versioning (SemVer), where major version changes (e.g., 7.x to 8.x) can introduce breaking changes.
The following video explains this concept very clearly.
Use Composer to Easily Manage PHP Packages
This video by Dave Hollingworth gives an excellent explanation of version constraints, particularly the caret operator, and demonstrates how composer update uses these constraints to get the latest compatible versions.
Watch the segment from 06:59 to 11:29. Pay close attention to the explanation of the caret (^) symbol and how it allows for safe updates. The demonstration of adding a package manually to composer.json and running composer update is a key concept.
4. Installing Dependencies: composer.lock and the vendor Directory
So far, we have only declared our dependencies. To actually download and install them, you run one of two commands: composer install or composer update.
When you run one of these commands for the first time:
- Composer reads
composer.json. - It resolves all dependencies and their required versions.
- It downloads the packages into a new directory called
vendor. - It creates a file called
composer.lock.
The composer.lock file is critical. It records the exact versions of every package that was installed. This "locks" your project to that specific set of dependencies. When another developer on your team, or a deployment server, runs composer install, Composer will read the composer.lock file (if it exists) and install those exact same versions, guaranteeing consistency and preventing "it works on my machine" bugs.
For a final clarification on the roles of these files and commands, please consult the official documentation.
The official Composer documentation provides the definitive explanation of the installation workflow, the purpose of the composer.lock file, and why it's so important to commit it to version control.
Read the sections 'Installing dependencies' and 'Commit your composer.lock file to version control'. This reinforces the concepts of the vendor directory and the lock file's role in creating reproducible builds.
Conclusion
Congratulations! You've taken a significant step toward professional PHP development. You now have the practical skills to set up a new project and define its dependencies.
Key Takeaways:
- Composer is installed as a global command-line tool.
- The
composer initcommand creates acomposer.jsonfile, which is the configuration hub for your project. - Dependencies are declared in the
require(for production) andrequire-dev(for development) sections ofcomposer.json. - Version constraints (like the caret
^) give you control over which package versions are installed, allowing for safe updates. - Running
composer installorupdatedownloads packages into thevendordirectory and creates acomposer.lockfile. - The
composer.lockfile ensures that every developer and server uses the exact same package versions, providing consistency.
Preview of the Next Lesson:
In the next lesson, "Install and update project dependencies from Packagist", we'll put all this knowledge to use. You'll learn how to search for packages on Packagist (the main Composer repository), add them to your project using the composer require command, and manage their versions with the install and update commands.