Hello! Welcome back to your training.
In the last lesson, we focused on the attacking side of free kicks, exploring how to manipulate and exploit a defensive wall. You learned how to use deception, attacking walls, and clever movement to create scoring opportunities.
Today, we're switching perspectives to master the defensive side of the equation. This lesson addresses the learning outcome: Organise a defensive wall and the subsequent defensive shape for various free kick scenarios. We will break down the entire process, from deciding how many players to use, to the specific roles and responsibilities within the wall, and finally, to organising the rest of the team. This will equip you with the principles needed to build a defence that is resilient to the very tactics we discussed previously.
1. The First Decision: To Build or Not to Build?
Before any player moves, a decision must be made. The location of the free kick—its distance and angle from the goal—is the primary factor in determining whether to form a wall and, if so, how many players it should contain.
As a general rule: the closer and more central the free kick, the more players are needed in the wall to reduce the shooter's angle on goal.
Soccer Defensive Wall Building - Coaching American Soccer
To start, let's read about the fundamentals of this decision-making process. The 'Soccer Defensive Wall Building' article from Coaching American Soccer provides an excellent overview.
Please read the section titled 'Making the Decision to Build a Wall'. Focus on who makes the decision (the goalkeeper) and the general principles for determining the number of players based on the ball's location. Pay close attention to the diagram provided in this section.
The diagram in that article gives you a solid mental model. Now, let's look at a more visual representation of these zones.
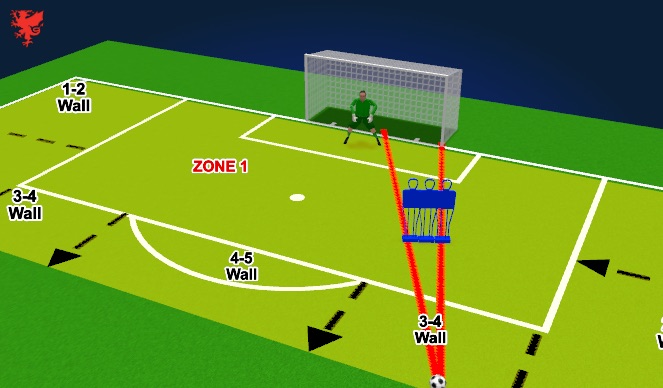
This zonal approach is a fundamental principle used throughout professional football.
2. Building the Wall: Speed, Roles, and Technique
Once the number of players is decided, the wall must be formed quickly and efficiently. In professional football, attacking teams will exploit any delay with a "quick free kick" (QFK).
The video below demonstrates a practical, on-field approach to organising the wall with the urgency required at a high level.
SoccerCoachTV - Organizing Your Defensive Wall.
This video from SoccerCoachTV shows a coach drilling his players on wall organisation. It emphasizes the speed and pre-assignment of roles that are critical in a match.
Watch from the beginning until 04:26. Pay attention to these key points: The '5-second rule' for organisation (00:22). The importance of pre-determined roles (who is number 1, 2, 3 in the wall). A practical example of how wall size changes with location (01:00). The need for bravery and commitment from wall players (02:06). How the goalkeeper should communicate with hand signals, not shouting (03:32).
Key Wall Construction Principles
The video you just watched highlighted the practical side. Now, let's formalise the key principles for building a solid wall, drawing from a goalkeeper's perspective.
Build YOUR Freekick Wall like a PRO - Goalkeeper Training 101
Goalkeeper Conor O'Keefe provides a fantastic breakdown of how to build a wall for different scenarios. He uses tactical graphics to illustrate the logic behind his decisions.
Watch the segments covering the three main scenarios: Wide Free Kicks (01:01 - 04:04): Notice how the wall's job is primarily to protect the near post, allowing the keeper to position for a cross. Direct Free Kicks (04:04 - 06:28): Focus on the specific instruction to place the tallest player as the second man in, directly in line with the post, to block the most dangerous shot trajectory. Central, Close-Range Free Kicks (08:10 - 11:27): This is the most challenging scenario. Understand the logic for placing the wall to one side to give the keeper a clear line of sight, and the crucial instruction for the wall not to jump.
To summarise the core techniques for building the wall:
- Speed is paramount: Players must know their roles before a free kick is given.
- Use an 'Anchor': The first player in the wall (the 'Anchor' or 'Post-man') lines up with the near post. The goalkeeper then uses hand signals to adjust their position. The other players fill in shoulder-to-shoulder.
- Player Selection: The wall needs your tallest players (especially in central positions) and your bravest players who will not turn away from the ball.
- To Jump or Not to Jump?:
- Further out (>25 yards): The wall should jump to block a shot over the top. The goalkeeper has enough time to react if the ball goes underneath.
- Close range (<25 yards): The wall must not jump. From this distance, a low, driven shot under a jumping wall is almost impossible for the goalkeeper to save. It is harder for the attacker to get the ball up and down over the wall from close range.
- The 'Draught Excluder': You may have seen a player lying on the ground behind the wall. This tactic, sometimes called a 'draught excluder' or 'bullet player', is a modern counter-measure to prevent attackers from shooting under a jumping wall.
3. The Subsequent Defensive Shape
The wall is only one part of the defensive structure. The learning outcome specifies organising the wall and the subsequent defensive shape. The players who are not in the wall have critical roles to play.
The diagram below illustrates a comprehensive defensive setup.
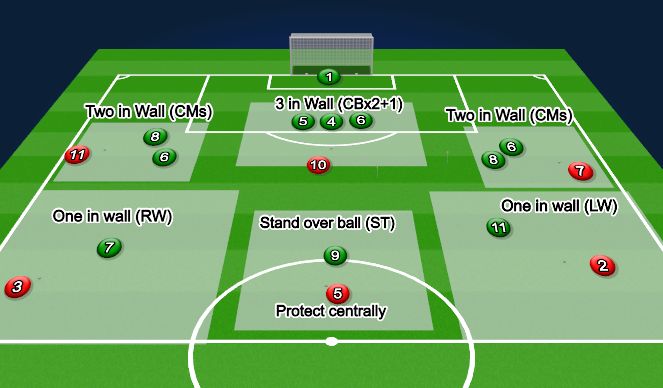
Let's break down these roles:
- The Wall: As discussed, its job is to block a significant portion of the goal from a direct shot.
- The 'Charger' or 'Threatening Player': A player positioned near the wall, ready to sprint and close down the ball if the attacking team attempts a short pass or a lay-off. This was mentioned in the
SoccerCoachTVvideo (04:26). - Man/Zonal Markers: The remaining defenders and midfielders must organise to mark attacking threats in the penalty area. They might use man-marking (each defender tracks a specific attacker), zonal marking (each defender is responsible for a specific area), or a hybrid system.
- Back Post Cover: A player is often positioned to protect the back post area. Their alignment is crucial; they should be on the line between the ball and the post.
- Goalkeeper: With the wall set, the goalkeeper positions themselves to cover the part of the goal the wall doesn't cover. Their view of the ball is paramount.
Dealing with Attacking Interference
In the last lesson, you learned about "attacking walls." The rules of the game were updated in 2019 to counter this. As Build YOUR Freekick Wall like a PRO explains (at 11:48), if the defending wall has three or more players, all attacking players must remain at least 1 meter away. As a coach, you must ensure your players communicate this to the referee if opponents try to interfere with the wall.
Conclusion
You have now learned the essential principles for building a robust free kick defence. This involves much more than just telling players to stand in a line; it is a coordinated effort involving every player on the pitch.
Key Takeaways:
- Organisation starts with location: The number of players in a wall is determined by the free kick's distance and angle.
- Speed and pre-assigned roles are non-negotiable: A well-drilled team organises its wall in seconds.
- The Goalkeeper is the architect: They decide on the wall, set its position using an 'Anchor' player, and communicate with clear, non-verbal signals.
- The wall's behaviour must be tactical: Jumping is for long-range kicks; staying grounded is for close-range threats.
- The defensive shape is a team effort: Players outside the wall have vital roles in closing down short options, marking attackers, and protecting the goal.
Preview of the Next Lesson:
We have now examined both attacking and defending free kick routines. In our next lesson, we will synthesise this knowledge to analyse a team's free kick patterns (attacking and defending) from video footage. The frameworks for wall construction and defensive shape that you learned today will be the exact criteria you use to scout an opponent's strengths and weaknesses.