Hello! Welcome back.
In our last lesson, we started designing direct and indirect free kick routines. We focused on the building blocks: delivery, movement, and targets. We touched upon the idea that for direct free kicks, manipulating the defensive wall is a key design element.
Today, we will dive deep into that specific skill. This lesson is dedicated to the learning outcome: Explain techniques to manipulate or exploit a defensive wall from an attacking perspective. You'll learn to see the wall not just as a barrier to overcome, but as a tactical element that can be used to your advantage. We will explore methods of deception, direct interference, and how to exploit the space and confusion a wall creates.
By the end of this lesson, you will have a comprehensive understanding of how to turn the opposition's primary defensive tool into a key part of your attacking routine.
1. The Wall: Obstacle and Opportunity
Every attacking coach views the defensive wall in two ways. First, it's an obstacle that blocks the most direct path to goal. Second, it's an opportunity. The wall is made up of several players who are:
- Temporarily removed from open play.
- Facing the ball, with their backs to the penalty area.
- Blocking their own goalkeeper's view.
- Often static and prone to predictable reactions (like jumping).
A clever routine exploits these weaknesses. The tactical diagram below illustrates several ways an attacking team can use movement to exploit the area around a defensive wall.

This image serves as a great visual summary of our goal today: to coordinate actions at the ball with movements around the wall to create a goal-scoring chance. Let's break down the specific techniques.
2. Deception at the Point of Delivery
The first phase of manipulation happens before the ball is even kicked. The goal is to create uncertainty and trigger a premature or incorrect reaction from the defence.
Multiple Takers
As we briefly discussed in the last lesson, having two or three players stand over the ball is the simplest form of deception. The defence has to guess:
- Will it be a right-footed or left-footed delivery?
- Will it be an inswinger or an outswinger?
- Is it a direct shot or a setup for an indirect play?
This hesitation, however brief, can be all the advantage your attackers need.
The Dummy Run and the "Stutter"
A more active form of deception is the dummy or "stutter" run, where one player runs over or towards the ball as if to strike it, only for another player to actually take the kick. This can have a powerful effect on the defensive line, not just the wall.
The following video provides an excellent real-world example of how a simple stutter can be used to exploit a specific defensive weakness identified through scouting.
WHAT ARE THE BEST WAYS TO COACH SET-PIECES??
Watch this clip from the 'Modern Soccer Coach' channel. It first explains the principle of a 'stutter' run and then shows a fantastic example from a professional match where it was used to exploit an opponent's poor defensive coordination.
Watch the video from 00:10:27 to 00:10:46 to understand the basic concept of using a stutter run to make the defensive line drop. Then, watch carefully from 00:12:07 to 00:13:06. The analyst explains that through scouting, they knew the opposition's defensive line was 'inconsistent in when they dropped.' Notice how the stutter run by the first player causes several defenders to drop at different times, breaking the line's integrity and creating a free player at the back post.
This example is crucial because it connects a tactical concept (the stutter run) directly to your future role as an analyst. The routine was successful because it was designed specifically to exploit a weakness found in opposition analysis.
3. Direct Wall Manipulation
Beyond deception, you can physically interact with the wall to create advantages.
The "Attacking Wall"
One of the most effective techniques is to form your own "attacking wall" of players who stand in or next to the defensive wall. This tactic, famously used by set-piece innovator Gianni Vio, serves two primary purposes:
- Screening the Goalkeeper: Your players directly obstruct the goalkeeper's line of sight. They won't see the ball until it's past the wall, significantly reducing their reaction time.
- Creating Confusion: Just before the kick, your players can disperse in different directions. One might block a defender, another might run into space. Defenders who were focused on the wall are suddenly faced with new threats from unexpected angles.
This next reading describes exactly how Gianni Vio employs this tactic.
Set-pieces analysis: Gianni Vio.. The banker who ...
The article 'Set-pieces analysis: Gianni Vio..' from Tactical Trends highlights some of Vio's signature moves. We'll focus on the part that describes his use of attacking walls.
Read the short paragraph in the middle of the article that begins: 'Vio’s routines usually aim to create an element of uncertainty...'. Focus on this specific sentence: 'Another of his favoured moves is for the attacking side to build their own walls at free-kicks, often taking up an offside position before dispersing, causing confusion amongst the defence.'
By placing players in offside positions within this attacking wall, you add another layer of complexity for the defence, as they have to track players who can become active at any moment by moving back onside.
4. Exploiting the Space Created by the Wall
The wall's presence creates exploitable space and stationary targets. The defenders in the wall are easy to manipulate because their primary focus is blocking a direct shot, not tracking runners.
Tactical Theory: Set-Pieces - Spielverlagerung.com
Let's revisit the excellent 'Tactical Theory: Set-Pieces' article from Spielverlagerung.com. It has a specific section that discusses exploiting the defenders in the wall.
Find the section on 'Free-kicks' and navigate to 'Strategies against a zonal-oriented setup'. Within that text, locate the paragraph that starts 'Attacking the spaces behind the wall...'. Read this paragraph carefully. It makes a key point: wall defenders are 'the easiest to manipulate' and often 'just stay in position' after a short free-kick, making it easy to create a free runner behind them.
This concept is simple but powerful. If you design a routine with a short or sideways pass, the defenders in the wall are often the last to react. A well-timed run into the space they vacate can lead to a clear-cut chance. Furthermore, you can use the static players in the wall as 'natural screens' for your attackers to run off, creating separation from their markers.
5. Case Study: Manipulating the Defensive Line
Manipulating the wall is part of a broader objective: disrupting the entire defensive structure. Sometimes the best way to exploit the wall is to draw attention to it while creating an overload elsewhere.
The work of Gianni Vio with Italy at Euro 2020 provides a masterclass in this.
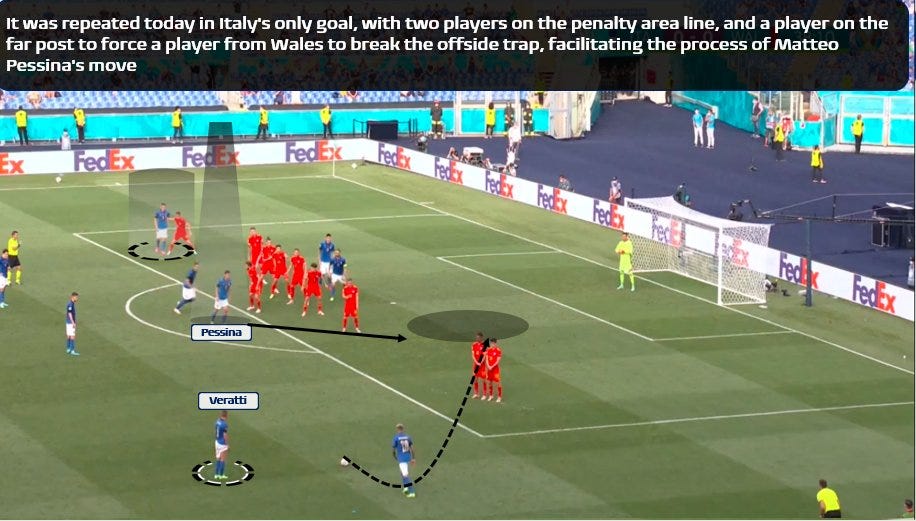
This routine is brilliant because it's not about beating the wall directly. It's about using player positioning far away from the ball to negate the offside trap that the rest of the defensive line wants to hold. The threat of the direct kick pins the wall and the defenders near it, while the real action is a subtle manipulation of the far-post defender.
This is the level of detail a professional set-piece coach works at—every player's position has a purpose.
Conclusion
Today you've learned that the defensive wall is much more than a simple barricade. It is a tactical element full of potential weaknesses waiting to be exploited.
Key Takeaways:
- Deception is Key: Using multiple takers and dummy runs creates uncertainty and can provoke errors from the wall and defensive line.
- Manipulate the Wall Directly: Building your own "attacking wall" can screen the keeper and create chaos when your players disperse.
- Exploit the Space Behind: The defenders in the wall are often slow to react to indirect plays. Design routines with short passes and timed runs into the space they occupy.
- Think Beyond the Wall: The wall's presence can be used to fix defenders' attention while you manipulate other parts of the defensive line, as seen in the Italy example.
Preview of the Next Lesson:
Now that you know a variety of ways to attack and manipulate a defensive wall, it's time to switch sides. In the next lesson, you will learn how to organise a defensive wall and the subsequent defensive shape for various free kick scenarios. You will learn how to build a defence that is resilient to the very techniques we have discussed today.