Hello! Welcome to the first lesson in our new module, "Tactical Throw-ins & Transitions."
In the previous module, we completed our study of free kicks by focusing on how to build and implement robust communication protocols. You learned how to use clear, concise language and pre-agreed roles to organise a defence under pressure.
Now, we shift our focus to the most frequent, yet often most underestimated, set piece in football: the throw-in. While they may seem simple, professional clubs are increasingly treating them as a major tactical weapon. This lesson addresses the learning outcome: Explain the tactical value of throw-ins for possession and attack in different pitch zones.
By the end of this lesson, you will understand why throw-ins are so important and how their tactical purpose changes fundamentally depending on where you are on the field.
1. The Underrated Opportunity: Why Throw-ins Matter
A typical match has between 40 and 50 throw-ins, far more than corners or dangerous free kicks combined. However, many teams neglect to coach them, leading to a surprising statistic: in the Premier League, possession is lost from a throw-in under pressure more than 50% of the time. This isn't just a failure to restart play; it's a turnover that can lead to a dangerous counter-attack.
Conversely, a well-coached throw-in strategy offers a huge competitive advantage. To understand this, let's hear from the man who pioneered the specialist throw-in coach role at the highest level, Thomas Gronnemark.
Thomas Gronnemark • Throw-in coach for Liverpool FC • Ask the Coach Full Episode
In this interview with Coaches' Voice, Liverpool's throw-in coach Thomas Gronnemark explains his core philosophy and presents a compelling case for why throw-ins are so critical.
Please watch the following segments: 03:07 - 07:16: Listen for his 'long, fast, and clever' philosophy and how he uses different pitch zones. 09:31 - 11:28: Pay close attention to the statistics showing Liverpool's improvement in possession retention and the number of goals scored from these situations. 20:33 - 21:15: Hear his argument for why the throw-in is the 'most important set piece'.
Gronnemark's points are clear:
- Frequency: Their sheer number makes them a constant tactical factor.
- Risk vs. Reward: A good throw-in retains possession and can create a chance; a bad one leaves your team unbalanced and vulnerable to a counter.
- Measurable Impact: Liverpool's transformation from 18th to 1st in the league for possession retained from throw-ins demonstrates the tangible benefit of dedicated coaching. They didn't just keep the ball; they scored 13 goals from throw-in situations in one season.
The key takeaway is that a throw-in is not just a restart. It is an opportunity to impose your tactical will on the game.
2. A Coach's Map: Understanding Pitch Zones
To understand the tactical value of a throw-in, we must first think like a coach and divide the pitch into zones. The most fundamental way to do this is by splitting the pitch into thirds: a defensive third, a middle third, and an attacking third.
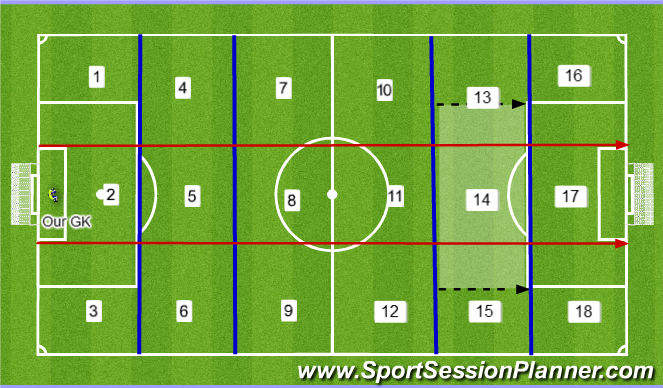
The objective of a throw-in changes completely depending on which of these three zones you are in. What is a smart play in the attacking third could be a disastrous risk near your own goal.
3. The Core Tactical Trade-Off: Security vs. Opportunity
At its heart, every throw-in strategy involves a trade-off between two primary goals:
- Retaining Possession: Keeping the ball securely.
- Creating a Chance: Progressing the ball into a dangerous area to create a scoring opportunity.
A fascinating academic study used logistic regression on thousands of throw-ins to determine the optimal strategy for each goal in each pitch zone. This gives us evidence-based insights into the tactical value of different choices.
[PDF] Identifying Optimal Throw-in Strategy in Football Using ...
We will now look at a research paper titled 'Identifying Optimal Throw-in Strategy in Football' that analyzes what makes a throw-in 'successful'. This will give you a data-driven perspective that is highly valued in modern coaching.
Please read the following parts of the paper: Abstract (Page 1): Read the entire abstract to get a quick summary of the key findings. Section 5.2 Logistic regression models (Pages 46-48): Read this section to understand the detailed discussion of the results for both possession and chance creation. Focus on how the best strategy changes based on the goal (possession vs. chance) and the pitch location. Chapter 6 Conclusions (Pages 52-53): Read the conclusions, which neatly summarise the actionable insights for coaches.
Let's break down the findings from the paper and combine them with our coaching principles.
Defensive Third
- Primary Value: Security. The number one priority is to retain possession safely. Losing the ball here directly exposes your goal.
- Optimal Strategy: The data shows that throwing the ball backwards (e.g., to a full-back or centre-back) gives you the highest probability of both keeping the ball and, interestingly, of eventually creating a goal-scoring opportunity in that possession sequence.
- Why? A backwards throw draws the opponent's press towards you, opening up space further up the field to be exploited once possession is secured. It's a "safe and build" approach.
Middle Third
- Primary Value: Possession and Progression. This zone is about controlling the game's tempo and setting up attacks.
- Optimal Strategy: Similar to the defensive third, throwing backwards is the most effective way to guarantee possession. From this secure base, you can then look to switch play to the weaker side or progress through midfield. Throwing it long down the line is a 50/50 ball that often cedes control.
Attacking Third
- Primary Value: Chance Creation. This is where the tactical trade-off is most dramatic.
- Optimal Strategy - The Trade-Off:
- High-Risk / High-Reward (Chance Creation): The data is unequivocal. A long, flat, direct throw into the penalty area gives you the highest probability of creating an immediate goal-scoring opportunity. This is the "Rory Delap" model. However, it also has a very low probability of retaining possession if the first or second ball isn't won.
- Low-Risk / High-Reward (Sustained Pressure): To maximize possession, the best strategy is to throw the ball backwards or short towards the corner flag. This allows your team to keep the ball, recycle possession, and build a more controlled attack. This aligns with Gronnemark's "clever throws" used by teams like Liverpool to maintain pressure.
As a set-piece coach, your job isn't to pick one strategy, but to know which one to deploy based on your team's strengths, the opponent's weakness, and the game situation.
4. Six Tactical Objectives for Attacking Throw-ins
Now that we understand the value of throw-ins by zone, we can categorize the specific tactical intentions behind them.
What are the 6 objectives of an offensive throw-in?
This article from MBP School of Coaches provides an excellent framework by defining six distinct objectives for an offensive throw-in. This will help you structure your thinking when designing plays.
Please read the entire article, paying attention to the six defined objectives and the description of the player movements (PM) for each one.
Let's link these objectives to the zones we've discussed:
| Pitch Zone | Primary Tactical Objectives (from MBP School) | Description |
|---|---|---|
| Defensive Third | 1. Start the attacking phase 4. Clear the ball in depth |
Use a safe, backwards throw to build from the back. If under intense pressure, a long throw up the line can relieve pressure, but you concede possession. |
| Middle Third | 2. Keep the ball 3. Attack the opposite side |
Focus on combinations to maintain possession and progress. A key opportunity here is to draw the opponent to one side and then switch play. |
| Attacking Third | 5. Attack in behind 6. Attack the box 2. Keep the ball |
This is the most versatile zone. You can go direct into the box, use clever movement to play a runner in behind the defence, or simply keep possession to sustain pressure. |
This framework gives you a clear menu of options to consider when analyzing or designing throw-in strategies.
Conclusion
Today's lesson has established the significant and often overlooked tactical value of throw-ins. You have moved beyond seeing them as a simple restart and now understand them as a crucial tactical battleground.
Key Takeaways:
- High Value: Throw-ins are the most frequent set piece, and mastering them provides a significant, measurable advantage in both attack and defence.
- Zone-Dependent Strategy: The optimal throw-in strategy is fundamentally dictated by the pitch zone (defensive, middle, or attacking).
- The Core Trade-Off: Especially in the attacking third, there is a critical choice between a high-risk direct throw for an immediate chance and a lower-risk possession throw to sustain pressure.
- Clear Objectives: Your strategy should be driven by clear tactical objectives, whether it's to build play safely, switch the attack, or go directly for goal.
Preview of the Next Lesson:
Now that you understand the why and where of tactical throw-ins, our next lesson will focus on the how. We will move from theory to practice and begin to design specific throw-in routines for the defensive, middle, and attacking thirds, looking at the patterns, player movements, and space creation techniques required to bring these objectives to life.