Hello! Welcome back to our module on Tactical Throw-ins.
In the last lesson, we established the fundamental tactical value of throw-ins. We saw how their purpose shifts dramatically depending on the pitch zone and explored the trade-off between securing possession and creating chances. You learned the six core objectives of an attacking throw-in, giving you a framework for what you want to achieve.
Today, we move from the why to the how. This lesson directly addresses the learning outcome: Design throw-in routines for the defensive, middle, and attacking thirds. We will break down specific patterns of movement, space creation, and deception that you can use as a blueprint for your own set piece designs.
1. Universal Principles of Routine Design
Before we look at zone-specific routines, it's crucial to understand the universal principles that make any throw-in effective. A well-designed routine isn't just a rigid sequence of movements; it's a flexible system built on core ideas that allow players to adapt.
Let's explore these principles by examining how an elite team like Liverpool structures their throw-ins.
Liverpool: Throw-In Analysis - Spielverlagerung.com
This detailed analysis of Liverpool's throw-in strategy on Spielverlagerung.com reveals the fundamental principles behind their success. We'll focus on the core structure and movements that apply to all zones.
Please read the sections titled 'Basic structure' and 'Movements to create space'. As you read, focus on these key concepts: The half-circle shape to provide multiple options. The importance of maintaining good distance from the thrower. Sideways movements to disrupt defenders. Opposite movements (one player drops, one moves away) to 'vacate and exploit' space. The use of blocks/screens.
From this reading, we can extract four essential principles for any routine you design:
- Offer Multiple Options: Always provide the thrower with several passing choices (the "half-circle"). A routine with only one intended target is easy to defend.
- Movement Creates Space: Static players are easy to mark. Effective routines are built on coordinated movements:
- Opposite/Counter Movements: One player moves towards the ball, dragging a defender, while another moves into the space that was just vacated.
- Crossing Routes: Two players run across each other's paths to create 'traffic' and confusion for man-markers.
- Blocks/Screens: A player intentionally obstructs the path of a defender to free up a teammate.
- Activate the Thrower: The thrower is the only unmarked player. A simple "bounce pass" (a one-touch return pass) immediately brings them into play as a free player with the ball at their feet, creating a numerical advantage.
- Deception is Key: Disguise your intention. Players can look away or feign disinterest before making a sharp movement to receive the ball. The thrower can look to one target before throwing to another.
Keep these four principles in mind as we now apply them to each third of the pitch.
2. Designing Routines for the Defensive Third
Primary Objective: Security. Retain possession and initiate a controlled build-up. A turnover here is catastrophic.
The main challenge is overcoming the opponent's high press. Your routine must be designed to create a safe exit route.
BEST Throw-In Routines! (Soccer Coach Guide)
The 'Catalan Soccer' video provides an excellent overview of the three main directional throws. Pay close attention to the section on backward throws, as it's the foundation of a secure routine in the defensive third.
Watch the segment on backwards throw-ins (05:16 - 07:45). Note the emphasis on player composure, space, and especially the importance of depth in the supporting player's positioning.
Routine 1: The "Safe and Switch"
This is the bread-and-butter routine for your defensive third. It prioritizes safety and uses the opponent's pressure against them.
- Objective: Retain possession and create space to switch play.
- Execution:
- The primary option is a throw back to a player offering depth (e.g., a centre-back or dropping full-back), as explained in the video. This player should be at least 7-10 yards away to have time and space.
- This backwards throw acts as a trigger to draw the opposition's press towards the ball.
- The receiving player aims to secure the ball and switch play to the far side of the pitch, where your team should now have a numerical or spatial advantage.
- Coaching Point: The player receiving the throw must be comfortable on the ball and have good awareness to execute the switch. The rest of the team must be positioned to facilitate the switch.
Routine 2: The "Long Escape"
This is a pressure-relief option when the "Safe and Switch" is not viable due to intense, well-organized pressure.
- Objective: Clear the ball from the danger zone.
- Execution: A long, hard throw down the line into the channel. The target is not necessarily to a specific player's feet, but into an area where your forward can challenge for the ball.
- Coaching Point: While this often results in a 50/50 ball and potential loss of possession, it achieves the primary goal of moving the ball away from your goal. As the Spielverlagerung article notes, this can be used proactively to win a second ball or another throw-in higher up the pitch.
3. Designing Routines for the Middle Third
Primary Objective: Possession and Progression. Control the tempo and launch attacks.
This zone offers the most variability. Routines here can be used to consolidate possession or to create a chance with a clever switch of play.

Let's look at two fundamental routines for this area.
BEST Throw-In Routines! (Soccer Coach Guide)
We'll return to the 'Catalan Soccer' video to look at two simple but highly effective routines for progressing the ball from the middle third.
Watch the following two clips: Forward Throw-ins & the Bounce Pass (01:05 - 03:21): Focus on how the 'bounce pass' activates the thrower. Sideways Throw-ins (03:21 - 05:20): Observe how this is used to switch the point of attack.
Routine 1: The "Bounce and Go"
This routine uses the principle of activating the thrower to create a simple overload.
- Objective: Keep the ball and progress into the opponent's half.
- Execution:
- A player shows for the ball, positioned relatively close to the thrower.
- The ball is thrown firmly to their feet.
- The receiver plays a one-touch "bounce pass" back into the path of the thrower, who has now stepped onto the pitch.
- The thrower is now the free player, in possession and facing forward, able to dictate the next phase of play.
Routine 2: The "Draw and Switch"
This routine uses deception to open up the opposite side of the pitch.
- Objective: Attack the opposite side (Objective #3 from our last lesson).
- Execution:
- The thrower and nearby players all look and gesture down the line, drawing the defensive team's attention and shape to that side.
- A supporting player (often a central midfielder) makes a late, horizontal run from the center of the pitch towards the thrower.
- The thrower makes a quick, disguised throw to this midfielder.
- The midfielder receives on the half-turn, already facing the less congested side of the pitch, and executes a switch of play to the far winger or full-back.
4. Designing Routines for the Attacking Third
Primary Objective: Chance Creation. This is where you can be most inventive.
Routines in this area are about generating a shot on goal, often by creating space for a cross or a direct pass into the box. Screens, blocks, and overloads are common tactics.
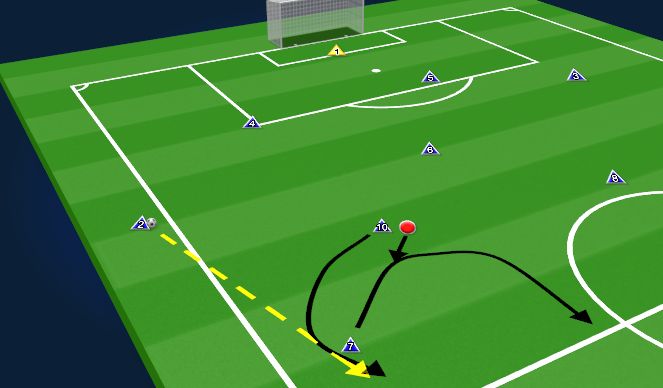
Breakdown of Maurizio Sarri Attacking Throw-In Routines!!!
This video from Modern Soccer Coach provides a fantastic breakdown of Maurizio Sarri's attacking throw-in routines. These are perfect examples of how to use coordinated movements to create chances near the opponent's box.
Watch the clips from 01:16 to 02:21 and 03:10 to 03:39. Observe how two or three players work together using screens and combination play to create a crossing opportunity.
Routine 1: The "Screen and Spin"
This is a classic routine to free up your most dangerous winger or full-back.
- Objective: Create space for a player to receive the ball and deliver a cross.
- Execution (based on the video):
- Two players (e.g., a winger and a striker) start close together.
- On a signal, they switch positions. The striker's movement is designed to screen (block) the defender marking the winger.
- The winger uses this temporary separation to make an unopposed run in behind the defense.
- The throw-in is delivered into the space for the winger to run onto and cross the ball.
Routine 2: The "Third-Man Overload"
This routine adds a third player to create a numerical advantage against a zonal or man-marking system.
- Objective: Use a quick combination to break the defensive line.
- Execution (based on the video):
- Two players (winger and striker) start wide. A third player (attacking midfielder) positions themself at the edge of the box.
- The first two players make decoy runs to create space centrally.
- The throw is made to the attacking midfielder, who has dropped into a pocket of space.
- The attacking midfielder plays a quick lay-off or through ball to one of the original players, who has spun off their marker to attack the box.
This tactic is especially effective against zonal defenses, as it works just like receiving the ball between the lines in open play.
Conclusion
Today, we have translated tactical theory into practical, designable routines. You now have a foundational playbook of throw-in strategies for every key area of the pitch.
Key Takeaways:
- Universal Principles: Effective routines are built on movement, offering options, activating the thrower, and deception.
- Defensive Third Routines: Prioritize security. The "Safe and Switch" is your primary tool to build from the back, with the "Long Escape" as a pressure-relief valve.
- Middle Third Routines: Focus on possession and progression. Use the "Bounce and Go" to move forward and the "Draw and Switch" to exploit space on the far side.
- Attacking Third Routines: Aim to create chances. Use coordinated movements like the "Screen and Spin" and "Third-Man Overload" to generate crossing or shooting opportunities.
Preview of the Next Lesson:
We've covered a range of clever, possession-based routines. However, there is another powerful weapon in the throw-in arsenal: the long throw. In our next lesson, we will focus exclusively on how to design an attacking routine to exploit a long throw-in opportunity, turning a simple restart into an aerial assault on the opponent's penalty box.