Welcome to the third lesson in your C programming journey. In the previous session, you did the essential but often challenging work of setting up your programmer's workshop: installing a code editor (VS Code) and a C compiler (GCC). With your tools sharpened and ready, it's time for the payoff.
Today, we take the crucial step from setup to execution. You will write, compile, and run the traditional first program for any new programmer: "Hello, World!". This lesson is all about achieving that first "quick win"—seeing your own code come to life. By the end of this session, you will have confirmed that your entire development environment is working correctly and you'll have executed your first piece of C code, a milestone for every programmer.
Step 1: Writing Your First Program
First, let's get the code down. The "Hello, World!" program is a simple tradition that serves as a basic sanity check for your programming setup.
- Open Visual Studio Code.
- Go to
File > Open Folder...and either create a new folder for your C projects (e.g.,C_Projects) or open the one you may have created in the last lesson. Working inside a dedicated folder is good practice. - Once the folder is open in the VS Code Explorer panel on the left, click the "New File" icon and name your file
hello.c. The.cextension is crucial—it tells VS Code and the compiler that this is a C source code file. - Type or copy the following code into the
hello.cfile. Don't worry about what each line means just yet; we'll dissect it in the next lesson. For now, focus on transcribing it exactly.
#include <stdio.h>

int main() {
    printf("Hello, World!\n");
    return 0;
}
Step 2: Compile and Run—The Quick Win
With your code written, it's time to bring it to life. The C/C++ extension you installed in VS Code provides a simple "Run" button that automates the process of compiling and executing your code. This is your first "quick win."
- Make sure your
hello.cfile is saved and open in the editor. - Locate the "play" button in the top-right corner of the editor.
- The first time you click it, you may be prompted to select a debug configuration. Choose the one that mentions
gccorclang—this tells VS Code to use the compiler you installed.
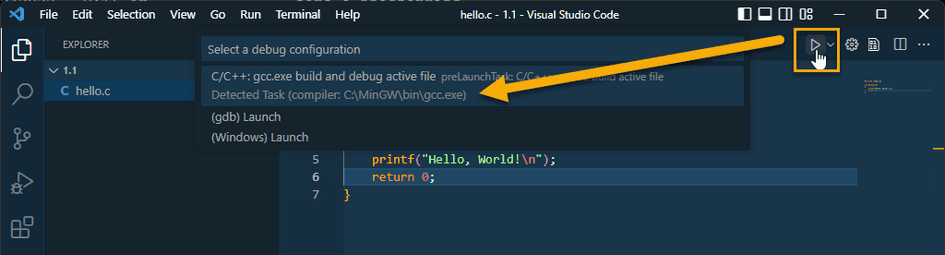
After you click the button and select the compiler, a terminal panel will open at the bottom of VS Code. The extension will automatically invoke the compiler to build your program and then run the resulting executable. If everything is set up correctly, you will see the "Hello, World!" message printed in the terminal.

Congratulations! You have just written, compiled, and run your first C program. This confirms your entire toolchain is correctly configured.
Step 3: Understanding the Process: Under the Hood
That "play" button feels like magic, but it's really just a shortcut for two commands that are executed in the terminal. Understanding these commands is crucial for your growth as a programmer, as it gives you control over the build process.
Let's look at what the button does behind the scenes.
C Programming for Beginners: Your First Step
This article from DEV Community clearly explains the fundamental commands that the 'Run' button automates. Mastering this process is a key step toward proficiency.
Read the subsection "Compiling and Running Your Program". Pay close attention to the two distinct steps: Compiling: The gcc hello.c -o hello command takes your source code (hello.c) and produces a machine-readable executable file named hello (or hello.exe on Windows). Running: The ./hello (on macOS/Linux) or hello.exe (on Windows) command executes that program.
To try this yourself, open a new terminal in VS Code (Terminal > New Terminal or `Ctrl+``) and type those two commands in sequence. You'll see the exact same result, but now you know the two-step dance of compiling and running that is at the heart of C development.
For a quick visual recap of this process in the terminal, the following clip is very helpful.
Installation of VS Code & GCC Compiler Setup for C and C++
This short clip from Yeasir Arafat provides a clear, visual demonstration of running the compiler commands directly within the VS Code integrated terminal.
Watch the final segment from the terminal demo to see these commands in action.
Your First Challenge: Make It Your Own
The best way to learn is by doing and experimenting. Now that you have a working program, it's time to tinker with it. Don't be afraid to break things; every error is a learning opportunity.
Try these small challenges:
- Change the Message: Modify the text inside the
printfquotation marks. Can you make it greet you by name? - Print Multiple Lines: Add a second
printf()statement right after the first one. What happens? How can you make the second message appear on a new line? (Hint: The original code already contains the clue!)
This hands-on experimentation will start building your intuition for how C programs behave.
Conclusion
In this lesson, you successfully bridged the gap between setup and execution. This is a significant milestone. Let's recap the key achievements:
- You wrote your first C program, the classic "Hello, World!".
- You used the VS Code "Run" button to compile and execute your code, confirming your entire toolchain works.
- You looked "under the hood" to understand the fundamental two-step process of using the
gcccompiler command followed by the execution command. - You started experimenting by modifying the code yourself.
You've proven your workshop is fully functional. You have a program that runs, but you might be wondering why it runs. What do include, main, and return actually mean?
Preview of the next lesson: Now that you've seen a C program in action, we will dissect the hello.c code line by line. You'll learn the purpose of each statement, transforming the code from a magic incantation into a logical set of instructions.