Welcome back. In the previous lesson, you successfully set up your pentesting lab, installed sqlmap, and performed your first automated scan against a target URL. That initial scan used heuristic checks to suggest that a parameter was potentially injectable. While useful, a security analyst's work requires confirmation, not just suggestion.
This lesson will take you to the next crucial step: using sqlmap to definitively confirm the presence of an SQL injection vulnerability. We will explore how sqlmap automates the very detection techniques you learned to perform manually, and you will learn to use key command-line flags to control the depth and nature of your scans. By the end of this lesson, you will be able to confidently identify and verify injectable parameters in a web application.
How sqlmap Confirms a Vulnerability
In Module 9, you spent considerable time learning to manually test for different types of SQL injection. You probed for vulnerabilities by looking for application errors (Error-based), observing changes in page content (Boolean-based), and measuring server response times (Time-based). sqlmap automates this entire process by systematically sending a vast array of payloads designed to trigger these specific conditions.
To understand the logic behind sqlmap's detection engine, it is helpful to review these techniques from an automation perspective.
Practical Identification of SQL Injection Vulnerabilities
This document from the Cybersecurity and Infrastructure Security Agency (CISA) provides a concise, professional overview of automated detection heuristics.
Please read the section titled "Detection Heuristics." Focus on the descriptions for Boolean-based blind, Time-based blind, and Error-based SQL injection. As you read, notice how these are the exact same principles you applied manually, now codified into an automated tool.
sqlmap runs through these techniques and more, analyzing the HTTP responses to infer the database's behavior. When it finds a payload that consistently produces the expected response—a specific error message, a predictable delay, or a true/false content switch—it flags the parameter as vulnerable.
Targeting with Precision: From URLs to Request Files
In the last lesson, we used the -u flag to provide a target URL directly. While simple, this method can become cumbersome for complex web applications, especially those involving POST requests, custom headers, or intricate authentication tokens.
A more robust and universally applicable method is to use a raw HTTP request file. This is standard practice in professional penetration tests. You can use a proxy tool like Burp Suite (which is also in your Kali VM) to intercept a request from your browser, save it to a text file, and feed it directly to sqlmap. This ensures sqlmap perfectly replicates the conditions of your test, including all headers, cookies, and POST data.
The following video demonstrates this professional workflow.
Automated SQL Injection: How to Use Sqlmap like a PRO
In this video, "Automated SQL Injection: How to Use Sqlmap like a PRO," cybersecurity professional Kyser Clark demonstrates how to integrate Burp Suite with sqlmap.
Watch the section from the beginning of the demo. Pay close attention to how he: Intercepts a login request using Burp Suite. Right-clicks the request and saves it to a file (request.txt). Calls sqlmap using the -r flag (for "request") to load the file. This -r flag is extremely powerful and is often more reliable than constructing long, complex URLs with the -u flag.
Controlling Scan Aggressiveness: Level and Risk
Not all SQL injection vulnerabilities are obvious. Some are hidden in less common HTTP headers (like User-Agent or Referer) or require more complex payloads to trigger. By default, sqlmap performs a relatively quick scan that covers the most common cases. To be thorough, you need to tell it to dig deeper. This is done with the --level and --risk flags.
-
--level: This flag controls the comprehensiveness of the tests. It ranges from 1 (default) to 5.- Level 1: Tests GET and POST parameters.
- Level 2: Adds tests for HTTP Cookies.
- Level 3: Adds tests for
User-AgentandRefererheaders. - Levels 4-5: Add even more tests and payloads. A higher level means a more thorough but slower scan.
-
--risk: This flag controls the "danger" of the payloads used. It ranges from 1 (default) to 3.- Risk 1: Benign tests that won't modify data.
- Risk 2: Adds heavy time-based queries that can stress the database.
- Risk 3: Adds
OR-based tests that can potentially modify data in poorly constructedUPDATEstatements. Use this with caution and only on non-production systems where you have explicit permission.
Let's see how these flags are used in practice.
Automated SQL Injection: How to Use Sqlmap like a PRO
We return to Kyser Clark's demonstration to understand how to apply these critical flags.
Watch the segment explaining the command from level and risk. He explains why he uses --level 5 and --risk 3 for maximum thoroughness on a test system. This is the approach you will often take in a controlled lab environment or a pentest engagement with a dedicated staging server.
Interpreting the Results: From "Might Be" to "Is"
After running its battery of tests, sqlmap will present its findings. Your goal is to move beyond the initial heuristic test shows... might be injectable to a definitive confirmation.
When sqlmap successfully confirms a vulnerability, the output will change to something like this:
GET parameter 'id' is vulnerable. Do you want to keep testing the others (if any)? [y/N]
It then provides a detailed summary of its findings.
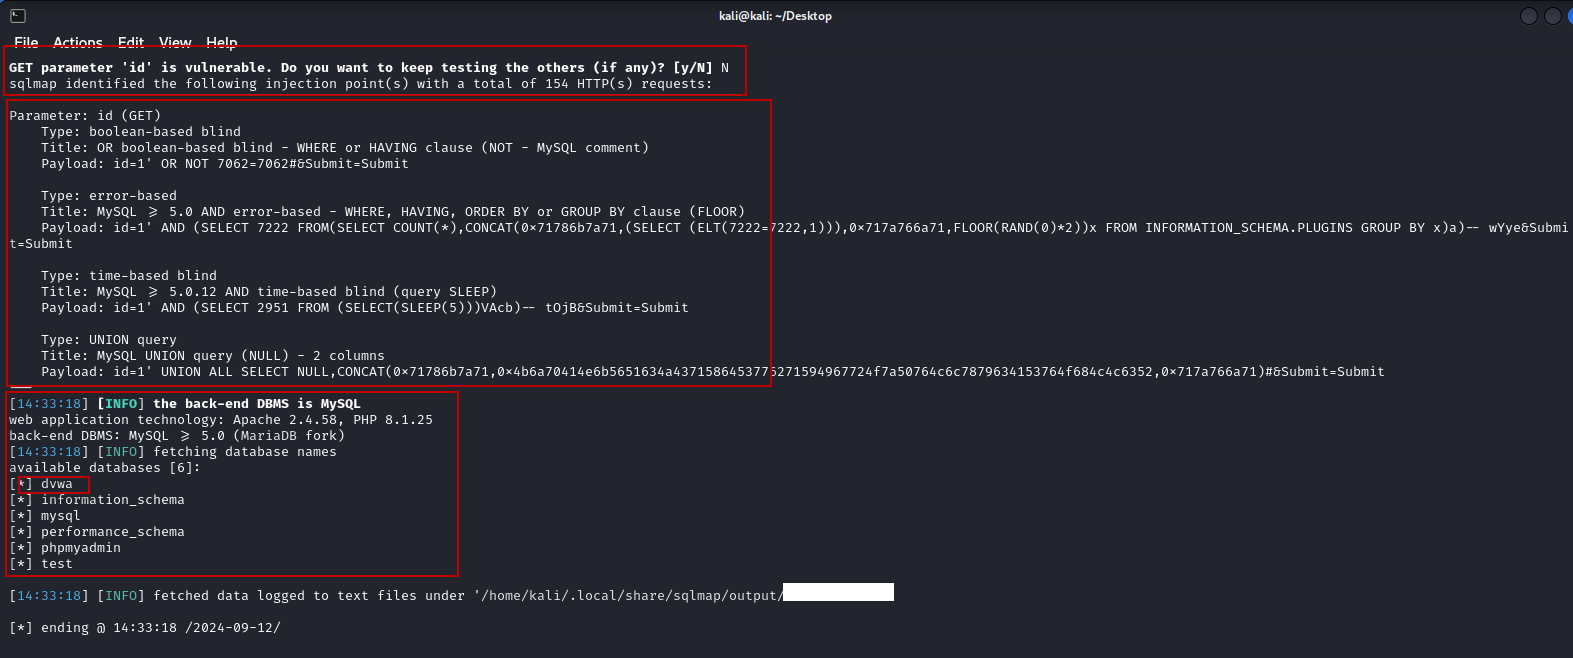
This output is a goldmine for a security analyst. It not only confirms the vulnerability but also tells you how it's vulnerable. In the example above, the id parameter is susceptible to four different injection techniques. This gives you a clear understanding of the attack surface and helps in assessing the severity.
Hands-On Practice: Confirming a Vulnerability
It's time to put this all together in your lab. You will now use the request file method with adjusted level and risk to definitively identify the vulnerability in DVWA.
- Log in to DVWA: Ensure you are logged into DVWA and the security level is set to "Low".
- Capture the Request:
- In your Kali VM, open Burp Suite. Go to the "Proxy" -> "Intercept" tab and make sure "Intercept is on".
- Configure your browser to use Burp's proxy (usually
127.0.0.1:8080). - Navigate to the "SQL Injection" page in DVWA, enter a user ID (e.g.,
1), and click "Submit". - Burp Suite will capture the request. It should look like a
GETrequest to/vulnerabilities/sqli/?id=1.... - Right-click in the request window and choose "Save item". Save it as
request.txton your Kali desktop.
- Run
sqlmap: Open a terminal in Kali and run the following command. The--batchflag is used here to accept all default prompts for this exercise.sqlmap -r ~/Desktop/request.txt --level=5 --risk=3 --batch - Analyze the Output: Watch the terminal as
sqlmapruns. You will see it trying many different payloads. The key output to look for is the confirmation:
[INFO] GET parameter 'id' is '...' injectable
followed by:
GET parameter 'id' is vulnerable. Do you want to keep testing the others (if any)?
By completing this exercise, you have used a professional workflow to not just suggest, but prove, the existence of an SQL injection vulnerability.
Conclusion
In this lesson, you moved from preliminary scanning to definitive vulnerability detection. You learned how sqlmap automates the complex manual detection techniques and how to use request files for more precise targeting. Most importantly, you now understand how to use the --level and --risk flags to control the scan's thoroughness and how to interpret the output to confirm a finding.
Key Takeaways:
sqlmapconfirms vulnerabilities by testing for error-based, boolean-based, and time-based responses, automating what you learned to do manually.- Using request files with the
-rflag is a robust method for targeting applications, especially for POST requests or authenticated sessions. - The
--level(1-5) and--risk(1-3) flags are essential for controlling the depth and aggressiveness of a scan. - A definitive
sqlmapfinding will explicitly state that a parameter "is vulnerable" and list the successful injection types.
You are now proficient at finding injectable parameters. In our next lesson, we will leverage this ability to perform the next step in an attack: enumerating the database structure to discover databases, tables, and columns.