Hello! Welcome to the next lesson in our course.
In our last few sessions, we've focused on analyzing algorithms, learning how to measure their time and space efficiency using Big O notation. We looked at algorithms that operate on data stored in structures like lists. Now, we're going to shift our focus from just analyzing to building.
Today's lesson addresses the learning outcome: Define and use Python classes to represent custom data structures. We'll explore how to create your own data types in Python. This is a foundational skill for any programmer, and it's essential for tackling data structures that aren't built-in, which are common in technical interviews.
Why Create Custom Data Structures?
You might wonder why we need to build our own data structures when Python provides powerful and flexible lists and dictionaries. There are a few key reasons:
- Modeling Concepts: Classes allow us to model real-world or abstract entities in our code. For a data engineer, this could be a
DataPipeline, aLogEntry, or aStreamRecord. Grouping data and related functions (behavior) together makes code more organized and intuitive. - Implementing Core Structures: Many fundamental data structures you'll be asked about in interviews—like linked lists, trees, and graphs—are not native Python types. You need to know how to build them from scratch.
- Encapsulation: Classes help you package data and the methods that operate on that data together, hiding the complex internal details from the outside world. This is a core principle of robust software design.
Let's look at where these custom structures fit in the broader landscape of data structures.
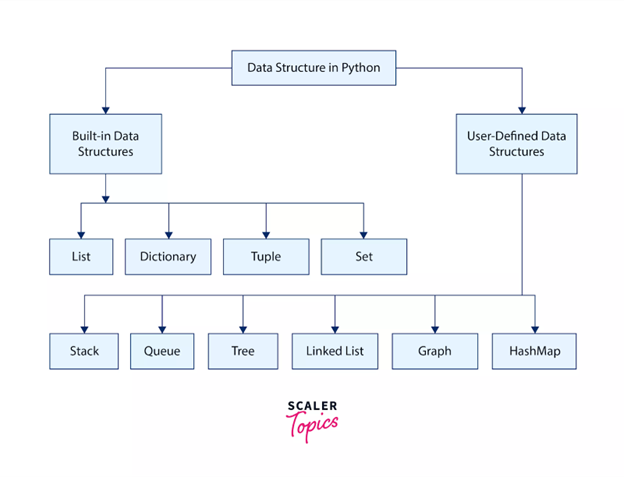
The primary tool Python gives us for this task is the class.
1. The Blueprint: Understanding Python Classes
Think of a class as a blueprint or a template. For example, an engineering drawing for a gear is a blueprint. It defines all the properties of a gear (number of teeth, diameter, material) but isn't a physical gear itself. From that one blueprint, you can manufacture many identical-but-separate physical gears.
In Python:
- The class is the blueprint (
Employee,Dog,Node). - An instance (or object) is the concrete thing created from the blueprint (a specific employee like
john_smith, your dogbuddy, a particular node in a list).
To learn the core mechanics of defining and using classes, the following video provides an exceptionally clear introduction.
Python OOP Tutorial 1: Classes and Instances
Watch these segments from Corey Schafer's highly-regarded Python OOP tutorial. They cover the essential concepts of creating a class, initializing an instance, and adding methods.
Please watch the following three parts: Class vs. Instance (00:29 - 02:55): Focus on the difference between the Employee class (the blueprint) and the individual employee instances (the objects). The __init__ Method (04:43 - 08:54): This is crucial. Pay close attention to how the special __init__ method acts as a constructor to set up initial data for an instance. Understand the role of self. Adding Methods (08:54 - 12:00): This part explains how to add functions inside a class (called methods) to give your objects behavior, like calculating a full name.
Key Concepts Summary
Let's consolidate what you just saw in the video:
classKeyword: You define a class withclass ClassName:. By convention, class names useCamelCase.__init__(self, ...): This special method is the constructor. It runs automatically whenever you create a new instance of the class. Its job is to set up the initial state of the object.self: The first parameter of any method inside a class is alwaysself. It represents the instance itself. When you writeself.first = first, you are attaching the value of thefirstparameter to the specific instance being created.- Attributes: These are the variables associated with a class instance (e.g.,
self.first,self.pay). They hold the data for the object. - Methods: These are functions defined inside a class. They define the object's behavior and can access the object's attributes using
self.
Here is a simple example based on the video:
class Employee:
    # The constructor method
    def __init__(self, first_name, last_name, pay):
        # These are instance attributes
        self.first_name = first_name
        self.last_name = last_name
        self.pay = pay
        self.email = f"{first_name}.{last_name}@company.com"

    # This is a method
    def fullname(self):
        return f"{self.first_name} {self.last_name}"

# --- Using the class ---

# 1. Create two instances (objects) from the Employee blueprint
emp_1 = Employee('Corey', 'Schafer', 50000)
emp_2 = Employee('Test', 'User', 60000)

# 2. Access attributes of an instance
print(emp_1.email)  # Output: Corey.Schafer@company.com

# 3. Call methods on an instance
print(emp_2.fullname()) # Output: Test User
Test your understanding!
Define a Python class named Book. It should have an __init__ method that accepts title and author as arguments and stores them as attributes. Then, create a method called get_description that returns a string in the format: "Title by Author". For example, "The Pragmatic Programmer by Andrew Hunt".
Show answer
class Book:
    def __init__(self, title, author):
        self.title = title
        self.author = author

    def get_description(self):
        return f"{self.title} by {self.author}"

# Example of how to use it:
my_book = Book("The Pragmatic Programmer", "Andrew Hunt")
print(my_book.get_description())
2. Application: Building a Linked List
Now for the practical part. Let's use our new knowledge of classes to define a custom data structure that is a staple of coding interviews: the Linked List.
A linked list is a linear collection of data elements, but unlike an array or Python list, its elements are not stored at contiguous memory locations. Instead, each element (which we call a node) points to the next one.

To model this in Python, we need two classes:
Node: A class to represent a single node. It will have two attributes: thedatait holds and a pointer to thenextnode.LinkedList: A class to manage the whole list. It just needs one attribute to start: a pointer to thehead(the first node).
Let's see how this is done in code.
Python Linked Lists: Tutorial With Examples
This article from DataCamp provides a clear, step-by-step guide to creating a linked list in Python. We will focus on just the initial class definitions.
Please read the two short sections: 'Initializing a node' and 'Creating a linked list class'. This will show you exactly how to define the Node and LinkedList classes we just discussed.
Based on the reading, here are the two class definitions:
# The blueprint for a single node
class Node:
    def __init__(self, data):
        self.data = data  # The data stored in the node (e.g., a number, a string)
        self.next = None  # The pointer to the next node, initialized to None

# The blueprint for the linked list structure itself
class LinkedList:
    def __init__(self):
        self.head = None  # The list is initially empty, so head is None
Notice how simple these are. The Node class just bundles a piece of data with a next reference. The LinkedList class acts as a container, holding a reference to the very first node.
3. Adding Behavior: Your Turn to Code
A data structure isn't very useful without operations to modify it. Let's add a method to our LinkedList class to insert a new node at the beginning of the list.
The logic is as follows:
- Create a new
Nodewith the given data. - Set the
nextpointer of this new node to point to the currentheadof the list. - Update the list's
headto be this new node.
The following video clip demonstrates exactly this logic.
Linked List - Data Structures & Algorithms Tutorials in Python #4
This short clip from the codebasics channel visually demonstrates how to implement the insert_at_beginning method.
Watch from 08:26 to 09:36. Focus on how the new node is created and how the self.head reference is updated to add the new node to the front of the list.
Hands-On Practice (Approx. 20-30 minutes)
Now it's your turn to put everything together. In your code editor, complete the following tasks. This is your main practice for the lesson, so take your time and try to solve it without peeking at the final solution.
Task:
- Define the
Nodeclass as shown above. - Define the
LinkedListclass with its__init__method. - Implement the
insert_at_beginningmethod inside theLinkedListclass, following the logic we just reviewed. - Bonus: Implement a
print_listmethod that iterates through the list from theheadand prints the data of each node. This is a great way to verify your insertion method works! Hint: You'll need awhileloop that continues as long as the current node is notNone.
# --- Start of your code ---

# 1. Define the Node class
class Node:
    def __init__(self, data):
        self.data = data
        self.next = None

# 2. Define the LinkedList class
class LinkedList:
    def __init__(self):
        self.head = None

    # 3. Implement the insert_at_beginning method
    def insert_at_beginning(self, data):
        # Your code here
        pass

    # 4. (Bonus) Implement the print_list method
    def print_list(self):
        # Your code here
        pass

# --- Example Usage (to test your code) ---
ll = LinkedList()
ll.insert_at_beginning(10) # List should be: 10 -> None
ll.insert_at_beginning(5)  # List should be: 5 -> 10 -> None
ll.insert_at_beginning(3)  # List should be: 3 -> 5 -> 10 -> None

print("My linked list contains:")
ll.print_list() # Expected output: 3 5 10
Show Solution
class Node:
    def __init__(self, data):
        self.data = data
        self.next = None

class LinkedList:
    def __init__(self):
        self.head = None

    def insert_at_beginning(self, data):
        # Create a new node instance
        new_node = Node(data)
        # Set the new node's next pointer to the current head
        new_node.next = self.head
        # Update the head of the list to be the new node
        self.head = new_node

    def print_list(self):
        # Start at the head of the list
        current_node = self.head
        # Loop until we reach the end of the list (None)
        while current_node:
            # Print the data of the current node
            print(current_node.data, end=" ")
            # Move to the next node
            current_node = current_node.next
        print() # For a new line at the end

# --- Example Usage ---
ll = LinkedList()
ll.insert_at_beginning(10)
ll.insert_at_beginning(5)
ll.insert_at_beginning(3)

print("My linked list contains:")
ll.print_list()
Conclusion
Excellent work! Today you've made the leap from using existing data structures to defining your own. This is a significant step in your journey as a developer.
Here are the key takeaways from this lesson:
- A
classis a blueprint for creating objects in Python. - An instance is a specific object created from a class.
- The
__init__method is the constructor used to initialize an instance's attributes (its data). - The
selfkeyword refers to the current instance, allowing methods to access that instance's unique data. - Methods are functions inside a class that define an object's behavior.
- We applied these concepts to create
NodeandLinkedListclasses, the building blocks for one of the most common user-defined data structures.
In our next lesson, we will circle back to performance analysis. We'll analyze the time and space efficiency of Python's built-in list and dictionary operations. Understanding their performance characteristics is crucial for writing efficient code and for justifying your choice of data structure in an interview.