In our last session, we focused on organizing and investigating existing data using sorting and filtering. You learned how to bring structure to large datasets and isolate specific information for analysis. Today, we shift our focus from reacting to data that's already in your spreadsheet to proactively ensuring its quality from the very start.
This lesson introduces data validation, a fundamental Excel feature for maintaining data integrity. In accounting, the principle of "garbage in, garbage out" has significant consequences; a single incorrect data entry can ripple through financial statements and lead to flawed analysis. By learning to set up data validation rules, you will build a crucial line of defense against common entry errors, making your work more accurate and reliable.
Why Data Validation is Non-Negotiable in Accounting
Before we dive into the mechanics, it's important to understand the role of data validation in a professional accounting context. Inaccurate data can corrupt everything from a simple budget reconciliation to an audited financial statement.
How to Validate Data in Excel: A Guide for Accountants and Finance
This article from Wisdify provides a concise overview of why data validation is so critical in your field.
Read the introduction and the section titled Why Data Validation Matters. This will frame the practical steps we're about to take within the broader context of financial data integrity.
As the article highlights, data validation is not just a feature; it's a practice that underpins reliable financial analysis and decision-making.
Setting Up Data Validation Rules
Data validation works by applying a set of rules to a cell or range of cells. If a user tries to enter data that violates these rules, Excel can prevent the entry and provide feedback.
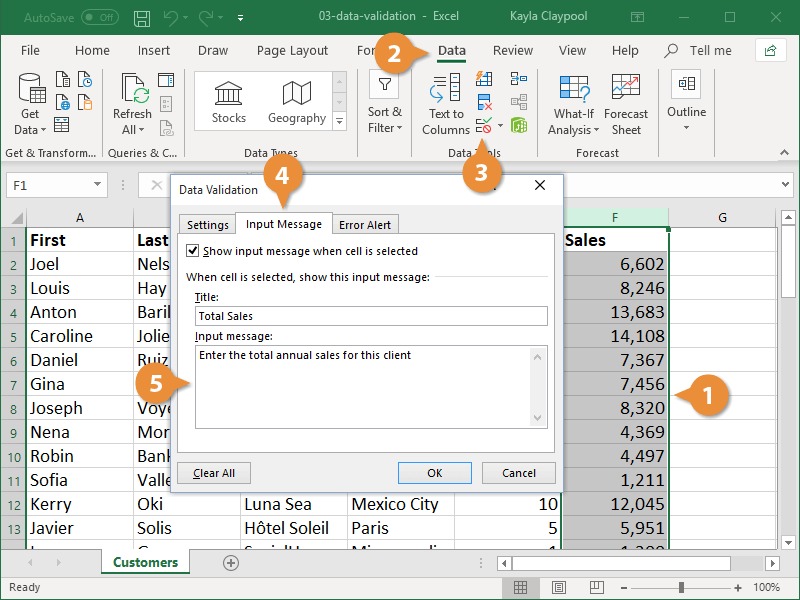
The control center for this feature is the Data Validation dialog box. To access it:
- Select the cell or cells where you want to apply a rule.
- Go to the Data tab on the ribbon.
- In the Data Tools group, click the Data Validation button.
You will see a dialog box with three tabs: Settings, Input Message, and Error Alert. We'll start with the Settings tab, which is where you define the rule itself.
Let's explore the most common validation types used in accounting.
This video from TutorialsPoint provides a clear, step-by-step demonstration of setting up the most common types of validation rules.
Watch the following three segments: First, see how to restrict entries to whole numbers within a specific range, from this timestamp. This is perfect for validating things like quantity fields. Next, watch how to validate by text length, from this segment. This is useful for ensuring account codes or invoice numbers are the correct length. Finally, observe how to validate dates, ensuring they fall within a financial period, from this clip.
As you saw in the video, the Settings tab is quite versatile. You can restrict data entry to:
- Whole Numbers or Decimals: For financial amounts, you could set a rule that the value must be "greater than or equal to 0" to prevent negative entries in a revenue column.
- Dates or Times: For a monthly expense report, you could restrict date entries to fall between the first and last day of that month.
- Text Length: To enforce a standard format for a General Ledger account code (e.g., must be exactly 5 characters long), you can set the text length to "equal to 5".
Guiding the User: Input and Error Messages
A validation rule is most effective when the user understands it. Excel gives you two tools for this: Input Messages and Error Alerts.
Input Messages are proactive guides. They appear in a small pop-up box whenever a user selects a validated cell, providing instructions on what to enter. This prevents errors before they happen.
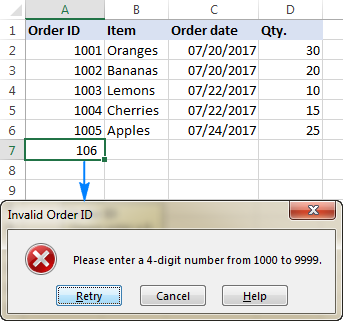
Error Alerts are reactive notifications. They appear after a user tries to enter invalid data. There are three types of alerts:
- Stop: This is the most restrictive and most common choice for accounting. It shows a message and completely prevents the user from entering the invalid data.
- Warning: This shows a message but gives the user the option to override the warning and enter the invalid data anyway.
- Information: This is the most permissive, simply informing the user that the data is invalid and letting them accept it by clicking OK.
For maintaining the integrity of financial data, you will almost always use the Stop alert.
Let's see how to configure these messages.
We'll return to the TutorialsPoint video to see how to create these custom messages.
Watch these two final segments: Learn how to create a custom Error Alert from this timestamp. Learn how to set up a helpful Input Message from this timestamp.
Finding Pre-existing Errors
Data validation only works on data as it is entered. If you apply a validation rule to cells that already contain invalid data, Excel won't flag them automatically. This is a common scenario when you inherit a workbook from someone else.
To find these pre-existing errors, Excel has a handy tool. After applying your validation rules to the range, go to the Data tab, click the dropdown arrow next to Data Validation, and select Circle Invalid Data. Excel will draw a red circle around any cell that violates the rule you just set.
Data validation in Excel: how to add, use and remove - Ablebits.com
This section from Ablebits.com explains and illustrates this useful feature.
Read the section on finding invalid data. Pay attention to the screenshot showing the red circles around the incorrect entries.
Once you correct the data in a circled cell, the circle will disappear automatically. This is an essential step for cleaning up a dataset and ensuring it conforms to your new standards of accuracy.
Conclusion
In this lesson, you have learned how to proactively safeguard the quality of your data using Excel's data validation tools. This is a foundational skill for any accounting professional, as it helps prevent the small data entry errors that can lead to large analytical inaccuracies.
Key Takeaways:
- Data validation restricts what can be entered into a cell, acting as a crucial first line of defense for data integrity.
- You can set rules to enforce specific data types, such as whole numbers, decimals, dates, and text of a certain length.
- Input Messages guide users before they enter data, while custom Error Alerts provide clear, actionable feedback when an entry is incorrect.
- For accounting purposes, the Stop error alert is the most appropriate choice to enforce strict data rules.
- The Circle Invalid Data feature helps you identify and correct errors that existed before the validation rules were applied.
You are now equipped to control the data that enters your spreadsheets. In our next lesson, we will build directly on this skill to explore one of the most powerful applications of data validation: creating dropdown lists. This technique is essential for standardizing categorical data (like department names, expense types, or regions) and is a key building block for creating automated and error-proof reports.