Welcome back. In our last lesson, you learned how to set up general data validation rules to control the types of data, such as numbers and dates, that can be entered into your spreadsheets. This is a fundamental skill for ensuring data accuracy.
Today, we'll build directly on that foundation to master one of the most powerful and common uses of data validation: creating dropdown lists. This technique is essential for standardizing text-based inputs, which is a constant requirement in accounting. By forcing users to select from a predefined list of categories—like 'Revenue', 'Expense', or 'Asset'—you eliminate typos and inconsistencies that can wreak havoc on your formulas and reports. This lesson will equip you to build more robust and error-proof worksheets, a key step toward reliable automation.
Why Dropdown Lists are Essential in Accounting
In accounting, consistency is not just a preference; it's a necessity. If one person enters an expense as "Travel" and another enters "Transportation," your SUMIFS formulas will fail to capture the total cost accurately. Dropdown lists solve this problem by providing a single source of truth.
Excel Drop Down List - Overview, Easy Step-by-Step Guide
This article from the Corporate Finance Institute (CFI) introduces the concept and highlights its importance in financial modeling, a field highly relevant to your commerce background.
Please read the introductory section "What is an Excel Drop Down List?" and the brief section on "Financial Modeling Applications." This will frame our practical exercise in the context of professional financial analysis.
As the article notes, dropdowns are key for building financial models with different scenarios (e.g., "Best Case," "Base Case," "Worst Case"). By selecting an option from a dropdown, you can make an entire financial statement update dynamically.
Creating Your First Dropdown List
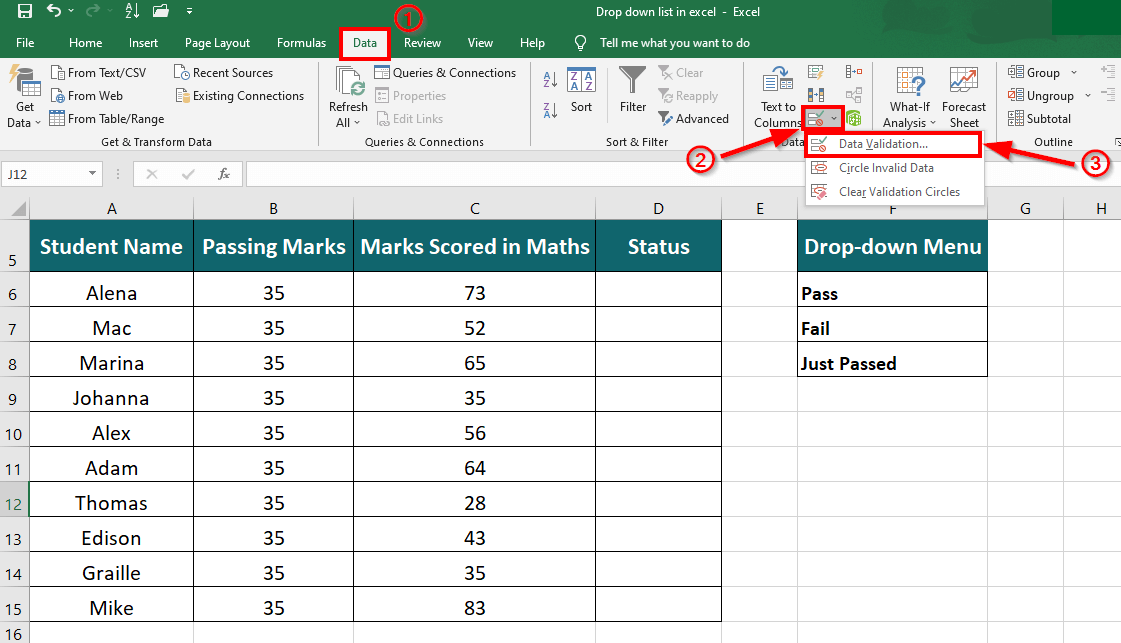
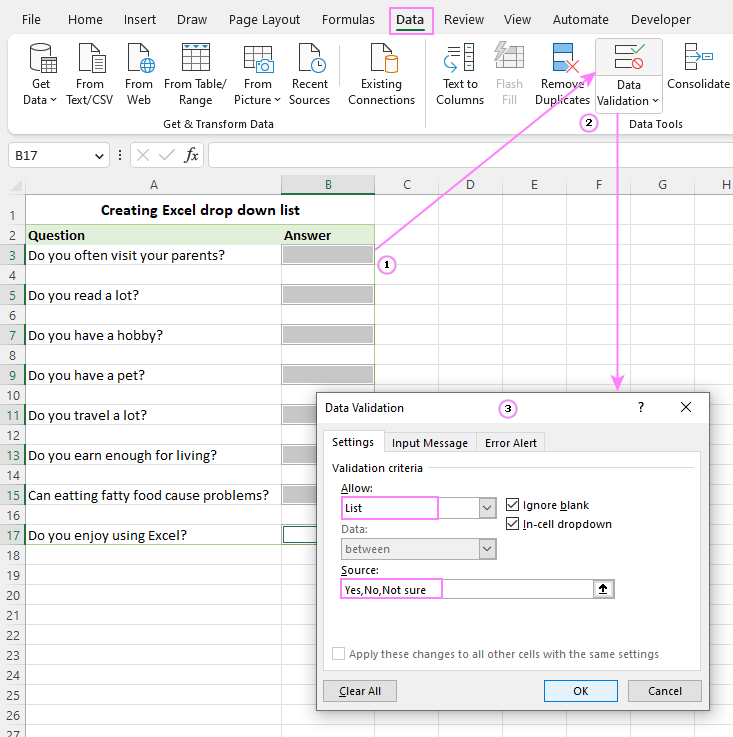
Creating a dropdown list uses the same Data Validation dialog box we explored in the last lesson. The process begins by selecting the cell or cells where you want the list to appear, navigating to the Data tab, and opening Data Validation.
Within the dialog box, under the Settings tab, you will change the Allow: criterion from "Any value" to List. This reveals a Source: box, which is where you will define the items for your list. There are two primary ways to do this.
Method 1: The Manual List (For Short, Static Lists)
The simplest method is to type your list items directly into the Source: box, separated by commas. This is suitable for very short lists that you don't expect to change, like "Yes,No,Maybe" or "Paid,Unpaid".
Let's watch a quick demonstration of this method.
This video by Kevin Stratvert clearly shows how to create a dropdown list by typing the source values directly.
Watch the segment from this timestamp. Notice how he applies the validation to a whole column at once and then populates it.
While quick, this method is not ideal for longer lists or lists that might need updating, as editing requires you to go back into the Data Validation settings for every cell.
Method 2: Referencing a Cell Range (The Professional Standard)
A far more robust and manageable approach is to list your options in a range of cells and then point the Data Validation Source: box to that range. Best practice is to place this list on a separate, dedicated worksheet, often named "Lists," "Admin," or "Data." This keeps your workbook organized and prevents users from accidentally changing the source list.
This next video, presented by a CPA, demonstrates this exact professional workflow in an accounting context.
Practical Excel for Accounting: Pivot Tables, Drop-down Lists, and VLOOKUP
In this practical clip, Hector Garcia, CPA, creates a dropdown list for a chart of accounts—a perfect real-world example for an accountant.
Watch from this timestamp as he sets up a dropdown list in one sheet by referencing a list of accounts from another sheet named "Chart of Accounts".
This method is superior because:
- The list is visible and easy to edit.
- You can add, remove, or sort the items in one place.
- It supports longer, more complex lists without cluttering the Data Validation dialog box.
Making Your Dropdown List Dynamic
Using a cell range is a big improvement, but there's a final step to achieve true automation. If you reference a fixed range (e.g., Lists!$A$1:$A$10) and later add a new item in cell A11, your dropdown list will not update automatically.
The modern and most effective solution is to format your source list as an Excel Table. As you learned in Module 3, Tables automatically expand to include new data. When a dropdown list's source is a column within a Table, the list becomes fully dynamic.
Create a Drop-down List in Excel (Easy Steps)
This guide from Excel-easy.com explains how to use an Excel Table to create a dynamic dropdown list.
Read the section titled Table Magic. It walks through converting a list to a Table and then using a special formula with the INDIRECT function to reference it. While the INDIRECT method shown is one way, an even simpler method that often works is to just select the table column data directly when you set the source. The key principle is that the Table structure is what makes the list dynamic.
Let's see this in action. The same video from Kevin Stratvert also demonstrates this powerful technique.
We'll return to Kevin Stratvert's tutorial to see how he makes a dropdown list dynamic using a Table.
Watch from this timestamp. Pay close attention to how he first converts his list of statuses into a Table, and then how the dropdown list automatically includes the new "accepted" and "rejected" statuses when he adds them to the Table.
By using an Excel Table as the source for your dropdown list, you create a low-maintenance and scalable system. You can update your chart of accounts, add a new department, or introduce a new transaction type in one place, and every dropdown list throughout your workbook will update instantly. This is a core principle of spreadsheet automation.
Conclusion
You have now learned how to create one of the most useful features for ensuring data integrity: the dropdown list. By moving beyond simple validation rules to implementing standardized, dynamic lists, you are building worksheets that are not only accurate but also user-friendly and easy to maintain.
Key Takeaways:
- Dropdown lists standardize text entries, preventing typos and inconsistencies that break formulas.
- The best practice for creating a dropdown list is to reference a source list of items located on a separate worksheet.
- For a truly automated and dynamic solution, format your source list as an Excel Table. This ensures the dropdown list automatically updates whenever you add or remove items from the source.
- This technique is fundamental in accounting for managing charts of accounts, transaction types, status fields, and scenario analysis in financial models.
In our next lesson, we will leverage the standardized data from our dropdown lists to visually analyze our data. You'll learn how to apply conditional formatting, which allows you to automatically highlight key financial data, such as changing a row's color to red if its status is set to "Overdue" from a dropdown menu.