Welcome to the next lesson in our journey to build a fully automated financial dashboard. In our previous sessions, you've done the heavy lifting behind the scenes: first, by creating a macro to refresh all your data sources, and then by writing a second macro to populate your dashboard's Key Performance Indicators (KPIs) with the latest figures. You've essentially built the engine of your reporting tool. Now, it's time to install the dashboard controls so anyone can drive it.
This lesson focuses on making your automation accessible and user-friendly. You will learn how to add form control buttons directly onto your worksheet. By assigning your RefreshAllData and UpdateDashboardKPIs macros to these buttons, you will transform your complex VBA procedures into simple, one-click actions, which is the final step in bridging the gap between your back-end code and the front-end user experience.
Why Use Buttons for Macros?
While you can run your macros from the Developer tab or the Visual Basic Editor, this is not a practical solution for the end-users of your reports, such as a manager or a client. A well-placed button on the worksheet provides a clear, intuitive instruction—"Click here to refresh"—that requires no technical knowledge from the user. This is a hallmark of professional-grade Excel development.
There are two primary methods for creating these clickable buttons, and we will cover both so you can choose the best one for your needs.
Method 1: Using Shapes as Buttons (Recommended)
The most flexible and modern approach is to use standard Excel shapes (like rectangles) as buttons. The main advantage is that you have complete control over their appearance—colors, borders, fonts, and effects—allowing you to seamlessly integrate them into the design of your financial dashboard.
The following video from Excel Campus provides an excellent demonstration of this technique.
How to Create Macro Buttons in Excel Worksheets
Watch this segment to see how to insert a shape, add text, and assign an existing macro to it.
Please watch from the beginning until the main demonstration. The presenter will first introduce the concept and then walk through creating a button from a shape, assigning a macro, and customizing its style. This is the core skill for this lesson.
As you saw in the video, the process is straightforward:
- Insert a Shape: Go to the
Inserttab >Illustrations>Shapes, and choose a rectangle or rounded rectangle. Draw it on your dashboard worksheet. - Add Text: Right-click the shape and select "Edit Text." Give it a clear, action-oriented label like "Refresh Data" or "Update Dashboard." You can format this text using the options on the
Hometab. - Assign the Macro: Right-click the shape again, select "Assign Macro...", and choose the desired macro from the list that appears. Ensure the "Macros in:" dropdown is set to "This Workbook."
Ensuring a Stable Dashboard Layout
A common issue with objects placed on a worksheet is that they can move or resize when a user adjusts the rows or columns behind them. This can ruin a carefully designed dashboard. To prevent this, you must change the object's properties.
How to Create Macro Buttons in Excel Worksheets
The same video also explains how to lock a shape's position and size.
Please watch the section from controlling shape behavior. This short clip demonstrates how to access the "Size and Properties" menu and select the "Don't move or size with cells" option.
This is a critical step for creating a professional and robust dashboard. By right-clicking your shape, going to "Size and Properties," and selecting Don't move or size with cells, you ensure your buttons remain exactly where you place them, regardless of what happens to the underlying grid.
Method 2: Using Form Control Buttons
The second method involves using the classic "Form Control" button. This approach is faster as it combines insertion and macro assignment into one step, but it offers very little formatting control. These buttons have a standard gray, legacy appearance.
The image below shows the process of adding a Form Control button.
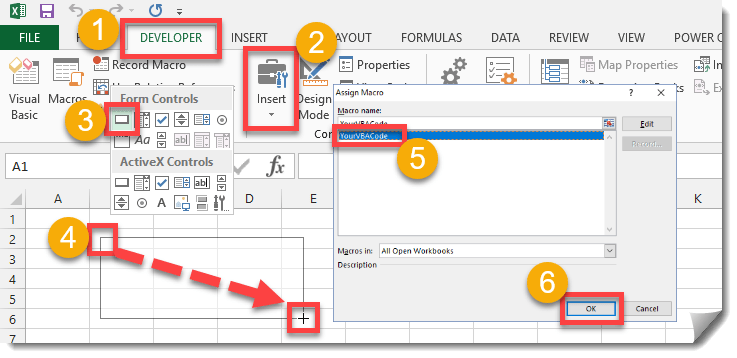
This method is very efficient for tools where functionality is more important than aesthetics. The following reading from TrumpExcel provides a detailed walkthrough.
How to Assign a Macro to a Button in Excel (Easy Guide)
This article provides clear, step-by-step instructions for the Form Control button method.
Read the section titled Assign a Macro to Form Control Button. It details the process of inserting the button and assigning a macro in one go. Also, review the short section on adjusting the properties to prevent the button from moving with cells, which is just as important for these controls.
Once a Form Control button is on your sheet, you can right-click it to change its text or assign a different macro, as shown here.

A Quick Note on ActiveX Controls
In the Insert menu, you will also see a section for "ActiveX Controls." While they offer more advanced event handling (e.g., code that runs on a double-click or mouse-over), they are notoriously buggy and can behave unpredictably, especially when a workbook is shared with other users. For the purpose of running a macro with a simple click, it is strongly recommended to stick with Shapes or Form Controls and avoid ActiveX Controls.
Your Task
Now it's time to apply what you've learned to our financial dashboard.
- Navigate to your "Dashboard" worksheet.
- Using the Shape method, create two buttons.
- Label the first button "Refresh All Data" and assign your
RefreshAllDatamacro to it. - Label the second button "Update Dashboard KPIs" and assign your
UpdateDashboardKPIsmacro to it. - For both buttons, set their properties to "Don't move or size with cells" to lock them in place.
- Arrange these buttons in an intuitive location, such as the top of your dashboard.
After completing these steps, you will have a truly interactive report. You can now refresh your data sources and update your key financial metrics, each with a single, simple click.
Conclusion
In this lesson, you have learned how to create a user-friendly interface for your complex VBA automation. By connecting your macros to on-sheet buttons, you have made your powerful financial reporting tool accessible to anyone, regardless of their Excel skills.
Key Takeaways:
- Buttons act as the user interface for your macros, making them easy to run.
- Using Shapes as buttons is the recommended method because it allows for full cosmetic control to match your dashboard's design.
- Form Controls are a quicker, more basic alternative for creating functional buttons.
- For a professional dashboard, always set the button's properties to "Don't move or size with cells."
- Avoid using ActiveX controls for simple macro buttons due to their unreliability.
In our next lesson, we will continue enhancing the interactivity of our dashboard. You will learn how to add a form control dropdown menu that will allow users to dynamically filter the data being displayed, for example, to view results for a specific business unit or region.