Welcome back! In our last lesson, you did an excellent job designing the static "canvas" for your financial dashboard. You now have a professional-looking layout with placeholders for KPIs and charts. While it sets the stage perfectly, it's currently just a picture. Today, we begin to breathe life into it by adding the automation engine.
This lesson addresses a fundamental requirement for any dynamic report: ensuring the data is always current. You will learn how to write a VBA macro that refreshes all of your workbook's data sources, including the PivotTables that summarize your raw accounting data. This is the first and most crucial step in transforming your static design into a truly interactive and reliable tool for financial analysis.
The Core of the Refresh: ThisWorkbook.RefreshAll
Imagine you've just imported a new month's worth of transactions into your raw data sheet. Your dashboard is useless until it reflects these new numbers. Manually refreshing every PivotTable and data connection is tedious and prone to error—exactly the kind of task we want to automate.
VBA provides a simple, powerful command to handle this: RefreshAll. When you execute this command on a workbook object, it's the equivalent of going to the Data tab in Excel and clicking the "Refresh All" button. It updates everything:
- All PivotTables in the workbook.
- All connections to external data sources (like other files or databases).
- All Power Query connections.
We'll start by creating a simple, self-contained macro to perform this action. In a later lesson, we'll assign this macro to a button on your dashboard for one-click updates.
The following video provides a concise demonstration of creating this exact type of macro.
Secret Excel Dashboard Buttons REVEALED 🔥 (🔁 Refresh | 💻 Full Screen | 🌓 Dark Mode)
This video from the Vedakarna channel shows the essential steps to create a standalone refresh macro, including adding a confirmation message.
Watch the section from this segment. The presenter will guide you through: Inserting a new module in the Visual Basic Editor (VBE). Writing a new Sub procedure. Using the ActiveWorkbook.RefreshAll command. Adding a MsgBox to provide feedback to the user.
Let's break down the code from the video. You will place this in a new standard module (which you can rename to something like DashboardControls for clarity):
Sub RefreshAllData()
    ' This procedure refreshes all data sources in the workbook.
    ThisWorkbook.RefreshAll

    ' Optional: Display a message to confirm completion.
    MsgBox "Dashboard data has been successfully refreshed."
End Sub
A quick note on ThisWorkbook vs. ActiveWorkbook:
ThisWorkbookrefers specifically to the workbook where the VBA code itself is stored. This is generally safer and more robust.ActiveWorkbookrefers to whichever workbook is currently active in the Excel window.
For our dashboard project, ThisWorkbook is the preferable choice as it ensures the code always acts on the correct file.
Automating the Refresh with Events
A manual refresh button is great, but sometimes you want the refresh to happen automatically in response to a specific event. VBA allows you to write code that runs when certain things happen, such as opening a workbook or changing a cell.
Method 1: Refresh When the Workbook Opens
A very common and professional feature is to have the data automatically refresh the moment the file is opened. This ensures that the user is always looking at the latest information without having to do anything.
This is achieved using the Workbook_Open event. The code is almost identical, but where you place it is different and very important. This code does not go in a standard module. It must be placed in the special code module for the ThisWorkbook object itself.
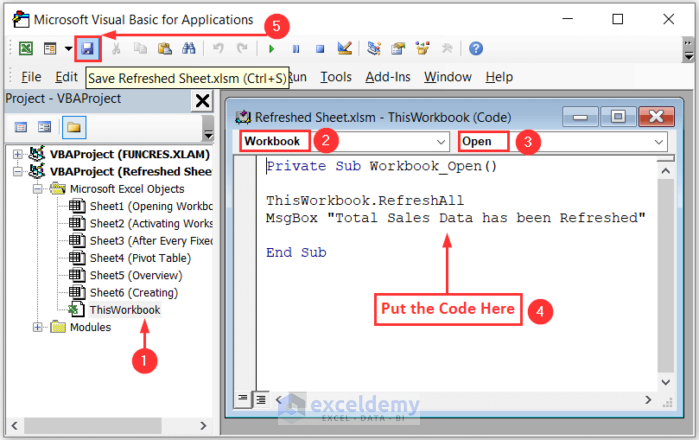
Here is the code you would place in that ThisWorkbook module:
Private Sub Workbook_Open()
    ' Refreshes all data connections when the workbook is opened.
    ThisWorkbook.RefreshAll
End Sub
With this in place, every time you open your macro-enabled Excel file, all your PivotTables and data sources will update automatically.
Method 2: Refresh When Source Data Changes (Use with Caution)
Another powerful event is Worksheet_Change. This event fires every time a cell on a specific worksheet is altered. You could use this to create a "live" dashboard that updates the instant you modify your source data.
The video below gives a thorough walkthrough of implementing this.
Pivot Tables: Automatically Update When Source Data Changes
This video from Excel Campus provides a detailed walkthrough of using the Worksheet_Change event to automatically refresh PivotTables.
Watch from this segment to see how to select the correct sheet and create the Worksheet_Change event procedure in its code module. Then, see the ThisWorkbook.RefreshAll command being added from this part. Finally, observe how to test the macro and use a breakpoint to confirm it's working from this section. This is a valuable debugging skill.
While this method seems ideal for a live dashboard, it comes with significant drawbacks that make it unsuitable for most professional work, especially in accounting where data integrity is paramount.
Refresh Pivot Tables Automatically When Source Data Changes
This article by Jon Acampora explains a major disadvantage of using the Worksheet_Change event for refreshing.
Please read the section that starts with the heading Refreshing Pivot Tables Without a Macro. Focus on the author's explanation of what happens to the Undo (Ctrl+Z) functionality.
As the article explains, running a macro clears Excel's Undo history. If your macro runs after every single cell change, you can never undo a mistake. For tasks like data entry, this is a critical limitation. Furthermore, if you have a large dataset and complex PivotTables, refreshing on every change can make Excel feel sluggish and unresponsive. For these reasons, we will not be using the Worksheet_Change method for our dashboard project.
Conclusion
In this lesson, you've added a vital piece of automation to your project. You now have a macro capable of ensuring all the data feeding your dashboard is up-to-date.
Key Takeaways:
- The
ThisWorkbook.RefreshAllcommand is the most direct way to update all PivotTables and data connections with a single line of VBA code. - A standard macro in a module is perfect for assigning to a button, giving the user control over when to refresh.
- The
Workbook_Openevent allows for automatic refreshing when the file is opened, a highly professional touch. - While the
Worksheet_Changeevent offers "live" updates, its negative impact on performance and the Undo feature makes it a poor choice for most dashboards.
In our next lesson, we will make your dashboard canvas truly dynamic. You will write VBA code to read the key metrics from your refreshed data sources and populate them into the KPI placeholders you designed previously.