Welcome back. In our previous lesson, we pulled back the curtain on macros by stepping into the Visual Basic Editor (VBE) and learning to read the VBA code that Excel generates. You learned how to interpret the object-method-property syntax that translates your actions into instructions.
Today, we're taking the next logical step: moving from a passive reader to an active editor. The goal of this lesson is to empower you to make simple but meaningful edits to a recorded macro's code. This is where true automation begins, as you'll learn to tweak and adapt recorded macros to be more flexible and powerful than what the recorder can produce on its own. This skill is the bridge between recording simple tasks and writing custom automation for complex accounting processes.
Getting Started: How to Edit a Macro
Before you can edit the code, you need to open it in the Visual Basic Editor. While you can use the Alt + F11 shortcut to open the VBE, a more direct way to edit a specific macro is through the Macros dialog box.
From the Developer tab, click the Macros button. This opens a list of all available macros. Select the macro you want to edit (for instance, the Format_Transactions macro from our previous exercises) and click the Edit button.
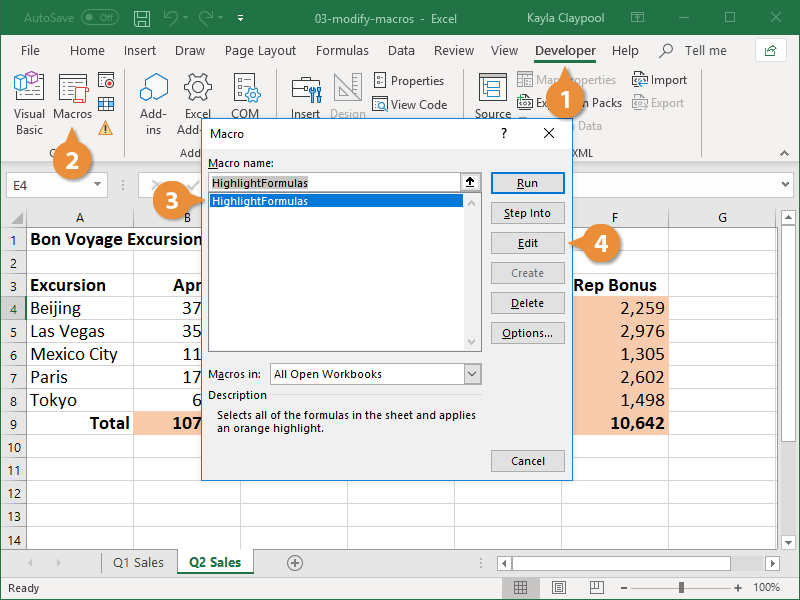
This action will launch the VBE and place your cursor within the Sub procedure for that specific macro, ready for you to make changes.
Your First Edit: Changing a Property's Value
The simplest and most common edit is changing the value assigned to an object's property. In the last lesson, you saw code like Selection.Font.Bold = True. The True part is a value you can change. If you wanted the font to be not bold, you could simply change True to False.
Let's see this in action. The following short video clip demonstrates this exact change.
Excel Macros & VBA - Tutorial for Beginners
This clip from Kevin Stratvert's "Excel Macros & VBA" tutorial provides a clear, quick demonstration of editing a basic property.
Watch the section from making modifications. Notice how a simple change from True to False in the code directly alters the macro's output in Excel.
This principle applies to many properties. You could change a color, a font size, or the text that a macro writes into a cell.
The following reading provides another example, showing how to change the text entered into a cell and, importantly, how to add a new line of code to apply a border.
Getting started with VBA in Office | Microsoft Learn
This section of the "Getting started with VBA in Office" article from Microsoft Learn walks you through editing a simple recorded macro.
Read the section titled Editing the code. Pay attention to how the code is changed from simply selecting a cell to inserting a new value ("Wow!") and then adding a new line to format the cell's border.
This demonstrates a key takeaway: you are not limited to just changing existing lines. You can also add new lines of code, copying the syntax you see in the recorded macro, to add more steps to your automated process.
Making Macros Dynamic: Replacing Hardcoded Values
A major limitation of the macro recorder is that it's extremely literal. If you record a macro that creates a chart and you type "Q1 Sales Report" as the title, the recorder will hardcode that exact text into the VBA.
ActiveChart.ChartTitle.Text = "Q1 Sales Report"
This isn't ideal for recurring tasks. What happens in Q2? You would have to edit the macro every time. A much better approach is to make the title dynamic by telling the macro to pull its text from a cell in your worksheet.
This next video from Leila Gharani shows exactly how to make this powerful edit.
How to Create & Use Excel Macros (Real world example)
This clip shows a practical example of modifying a macro to make a chart title dynamic, a common requirement in financial reporting.
Watch from correcting the title. The key change is replacing the hardcoded text "procurement department" with a reference to a cell's value: Range("A1").Value.
This simple change from a static string of text to a dynamic cell reference (Range("A1").Value) is a fundamental concept in VBA. It allows your macro to interact with your worksheet data, forming the basis for generating automated, up-to-date reports.
A Powerful Edit for Accounting: Handling Variable Data Length
Perhaps the single most important edit for accounting tasks is making a macro work on datasets of varying lengths. Accountants frequently work with transaction lists, trial balances, or sales reports that grow each day or month. A recorded macro that works on 100 rows this month will fail when next month's report has 150 rows.
The solution is to edit the code to dynamically find the last row of data and then use that information in your range selections.
The following guide provides an excellent walkthrough of this process.
How to Create and Edit Excel Macros : 19 Steps - Instructables
This guide from Instructables shows how to make a recorded macro flexible enough to handle data of any length. This is a critical skill for real-world automation.
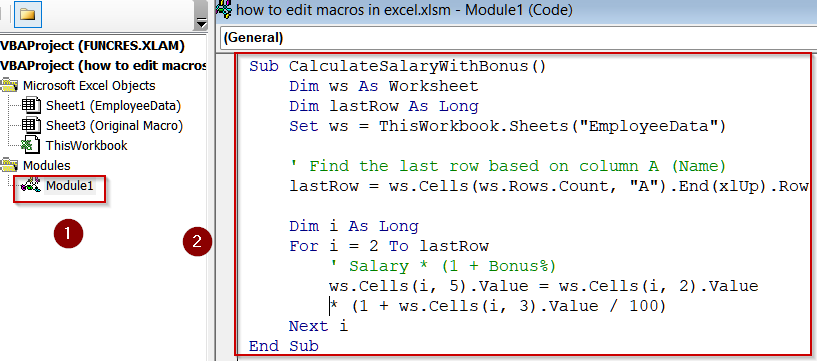
Focus on Steps 17 through 19. Pay close attention to the following key ideas: Commenting Out Code: In Step 18, notice the advice to use an apostrophe (') to "comment out" an old line of code. This turns the line green and tells Excel to ignore it. It's a safe way to disable old code without deleting it, in case you need to bring it back. Defining a Variable: Step 19 introduces the line Dim LastRow As Long. This creates a placeholder in memory called LastRow that can hold a number. Finding the Last Row: The next line is the magic formula: LastRow = Cells(Rows.Count, 1).End(xlUp).Row. This tells VBA to go to the very last cell in column 1 (A), then travel up until it finds the first cell with data, and store that cell's row number in our LastRow variable. Using the Variable: Finally, the guide shows how to replace a hardcoded range like Range("F2:F66") with a dynamic one like Range("F2:F" & LastRow). The ampersand (&) joins the text "F2:F" with the number stored in LastRow to build a flexible range address.
This technique of finding the last row is a cornerstone of automating accounting tasks in Excel, from formatting transaction lists to populating financial statement templates. The code in the Instructables guide might seem complex at first, but it's a standard and reusable pattern you will see often.
When Edits Go Wrong
As you start editing, you will inevitably introduce errors. This is a normal part of learning to code. The Microsoft Learn article you reviewed earlier also contains a helpful section on the two main types of errors:
- Syntax Errors: These are like grammatical mistakes. You might forget a parenthesis or misspell a keyword. The VBE will usually alert you immediately by turning the line red and showing an error message.
- Run-time Errors: The code's syntax is correct, but it asks Excel to do something impossible, like referencing a property that doesn't exist. These errors only appear when you try to run the macro. The VBE will stop and highlight the line of code that failed.
Don't be discouraged by errors. They are valuable feedback that helps you understand how the code works.
Conclusion
In this lesson, you made the crucial leap from interpreting code to modifying it. By making small changes, you've seen how you can significantly alter and improve the behavior of a recorded macro, making it more flexible and powerful.
Key Takeaways:
- You can edit a macro's code by selecting it in the Macros dialog and clicking Edit.
- Simple edits involve changing property values, such as
TruetoFalseor updating a color or text string. - A powerful technique is to replace hardcoded values (like
"Q1 Report") with dynamic references to worksheet cells (likeRange("A1").Value). - You can make macros work on datasets of any size by writing code to dynamically find the last row and using that variable to define your ranges.
- Using an apostrophe (
') to comment out old code is a safe way to test changes without deleting the original lines.
You've now had a taste of defining a variable with Dim LastRow As Long. In our next lesson, we will dive deeper into the concept of variables. They are the fundamental building blocks for storing information and are essential for writing any macro from scratch.