Welcome back. In our previous lessons, you've successfully recorded a macro and assigned it to a button, transforming a repetitive formatting task into a single click. You've seen what automation does; now it's time to see how it does it.
This lesson takes you behind the scenes into the Visual Basic Editor (VBE). This is the environment where all Excel macros live as code. Our goal is to open this editor, locate the code for your Format_Transactions macro, and begin to interpret its basic structure. Understanding this code is the foundational step that bridges the gap between simply recording actions and truly controlling Excel through programming.
Entering the "Engine Room": The Visual Basic Editor
Every time you record a macro, Excel translates your mouse clicks and keystrokes into a scripting language called Visual Basic for Applications (VBA). The Visual Basic Editor, or VBE, is the built-in tool you use to view, write, and edit this VBA code.
There are a few ways to open the VBE, but the quickest is a keyboard shortcut:
- Press
Alt + F11.
You can also access it from the Developer tab by clicking the Visual Basic button on the far left. Go ahead and open the VBE now using your preferred method.
Once open, the VBE can look a bit intimidating. Let's break down its main components.

The following video provides an excellent tour of this new environment.
Excel VBA tutorial for beginners: The Visual Basic Editor (VBE)
This video from Leila Gharani offers a clear introduction to the VBE, showing you how to open it and explaining the purpose of its most important windows.
First, watch the brief introduction on the different ways to open the VBE. Next, focus on the tour of the main VBE windows from Project view to the Code window. Pay close attention to the explanation of the Project Explorer and the Modules folder, as this is where your recorded macros are stored.
As you saw in the video, the Project Explorer on the left acts like a file navigator for all your open workbooks. Your recorded macro isn't saved with a specific sheet; instead, it's placed in a separate container called a Module. Find the folder named Modules in the Project Explorer, expand it, and double-click on Module1. This will display the VBA code for your Format_Transactions macro in the main Code Window.
Deconstructing Your First Piece of Code
Now that you're looking at the code, let's decipher what it means. At first, it might look like technical jargon, but it follows a logical structure that directly corresponds to the actions you recorded.
The following Microsoft Learn article introduces the fundamental concepts of how VBA works. Reading this will give you the mental model needed to interpret the code.
Getting started with VBA in Office | Microsoft Learn
This article explains the core idea behind VBA: interacting with "objects" by changing their "properties" or calling their "methods".
Read the first part of the article, starting from the section VBA Programming 101. Focus on understanding the hierarchy called the Object Model and the definitions of objects, properties, and methods. Think of it this way: an object is a noun (like a Range), a property is an adjective (like its Font.Bold status), and a method is a verb (like the .Select action).
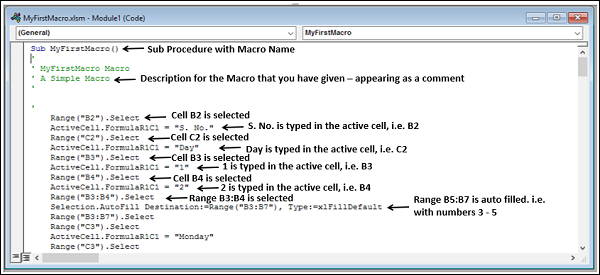
With those concepts in mind, let's examine the code you generated. It likely looks something like this:
Sub Format_Transactions()
'
' Format_Transactions Macro
'
    Range("A1:D1").Select
    Selection.Font.Bold = True
    Columns("A:D").Select
    Selection.Columns.AutoFit
    Range("C:C").Select
    Selection.Style = "Accounting"
End Sub
Let's break this down line by line.
Sub Format_Transactions(): This is the declaration that starts a "Sub-procedure," which is what a standard macro is called.Format_Transactionsis the name you gave it. All the code for this macro will be between this line andEnd Sub.' Format_Transactions Macro: Any line starting with a single apostrophe (') is a comment. Excel colors these lines green and completely ignores them when running the code. They are notes for you and other humans.Range("A1:D1").Select: This is a classic example of the Object-Method structure.- Object:
Range("A1:D1")refers to the specific group of cells from A1 to D1. - Method:
.Selectis the action performed on that object. This line literally means "Select the range A1 through D1."
- Object:
Selection.Font.Bold = True: This line demonstrates a property assignment.- Object:
Selection.Fontrefers to the font of whatever is currently selected. - Property:
.Boldis a characteristic of the font. - Assignment:
= Truesets the value of theBoldproperty toTrue.
- Object:
Columns("A:D").SelectandSelection.Columns.AutoFit: Here, you select the columns and then call theAutoFitmethod on them.Range("C:C").SelectandSelection.Style = "Accounting": Finally, you select column C and assign the string "Accounting" to itsStyleproperty.End Sub: This line marks the end of the procedure.
This annotated image shows a similar breakdown, helping you visualize how each line of code maps to a specific action in Excel.
The Nature of Recorded Code
The macro recorder is an excellent tool for learning because it shows you the VBA equivalent of your actions. However, it's important to realize that the recorder is very literal and often produces code that is inefficient or more complex than necessary.
This next video does a fantastic job of demonstrating this. The presenter records a macro with the VBE open, so you can see the code being generated in real-time, and then points out which lines are essential and which are redundant.
Understanding VBA Code in Microsoft Excel - VBA for Beginners
This video from Simon Sez IT provides a live demonstration of code generation and offers a critical look at the output.
Watch from the recording starts as a macro is recorded side-by-side with the VBE. Notice how the Modules folder appears and how lines of code are added as actions are taken in Excel. Next, listen to the walkthrough from code breakdown. The presenter explains the Sub/End Sub structure, comments, and how actions like selecting cells and changing fonts appear as code. Finally, pay close attention to the section from identifying unnecessary code. This is a key insight: the recorder adds many lines (like .Strikethrough = False) that aren't needed, because it documents every property, not just the ones you changed.
The main takeaway is that recorded code is a starting point, not a finished product. By learning to read it, you can begin to identify which parts are essential and which can be removed or improved.
Conclusion
In this lesson, you took a major step from being an Excel user to becoming an Excel automator. You've opened the Visual Basic Editor, located your macro's code, and started interpreting the fundamental language of VBA.
Key Takeaways:
- The Visual Basic Editor (VBE) is where you view and edit the VBA code behind macros. You can open it with
Alt + F11. - Macros are stored in Modules within the VBE's Project Explorer.
- A macro is a Sub procedure, starting with
Suband ending withEnd Sub. - VBA code manipulates Objects (like
RangeorSelection) by either calling their Methods (actions like.Select) or changing their Properties (characteristics like.Font.Bold). - Lines starting with an apostrophe (
') are comments and are ignored by Excel. - The macro recorder is a useful but very literal tool that often generates verbose and inefficient code.
You now have the foundational knowledge to understand what your macro is doing. In our next lesson, we will put this knowledge into practice by making simple edits to the VBA code to modify your macro's behavior, giving you your first taste of customizing automation.