Welcome back! In our last lesson, you successfully recorded your first macro, Format_Transactions, capturing a sequence of formatting steps. You now have a piece of automation saved in your .xlsm workbook, but it's not yet easily accessible. This lesson bridges that gap.
Today, we'll focus on bringing your recorded macro to life. First, you will learn the standard method for running a macro to test it. Then, we will move to the core of this lesson: assigning that macro to a clickable button directly on your worksheet. This skill is fundamental for creating the user-friendly, automated reports and tools that are highly valued in an accounting environment. By the end of this lesson, you'll have transformed a repetitive task into a one-click solution.
Running a Macro to Test Your Work
Before you build a button, it's good practice to run your recorded macro to ensure it works as expected. The most direct way to do this is through the "Macros" dialog box.
- Open the
.xlsmfile you saved in the previous lesson. If you need to, re-enter the sample transaction data on a fresh sheet. Make sure the data is unformatted. - Go to the Developer tab.
- In the "Code" group, click the Macros button. (Alternatively, you can press the shortcut
Alt + F8). - A dialog box will appear, listing all available macros. You should see
Format_Transactionsin the list. - Select
Format_Transactionsand click Run.
If you followed the recording steps correctly, your data should instantly be formatted—headers bolded, the amount column set to Accounting format, and columns auto-fitted.
This method is quick for testing, but it's not ideal for tasks you or others will perform regularly. For that, we need a more intuitive interface: a button.
Creating a Macro Button: The Gateway to Usability
Assigning a macro to a button places the power of your script just a click away. It transforms a worksheet from a static grid into an interactive tool. This is a key step in automating reports like a variance analysis or a month-end closing checklist. We'll explore two primary ways to create these buttons.
Method 1: The Form Control Button
Excel provides a standard, no-frills button object for this exact purpose. It's simple, reliable, and instantly recognizable as a button.
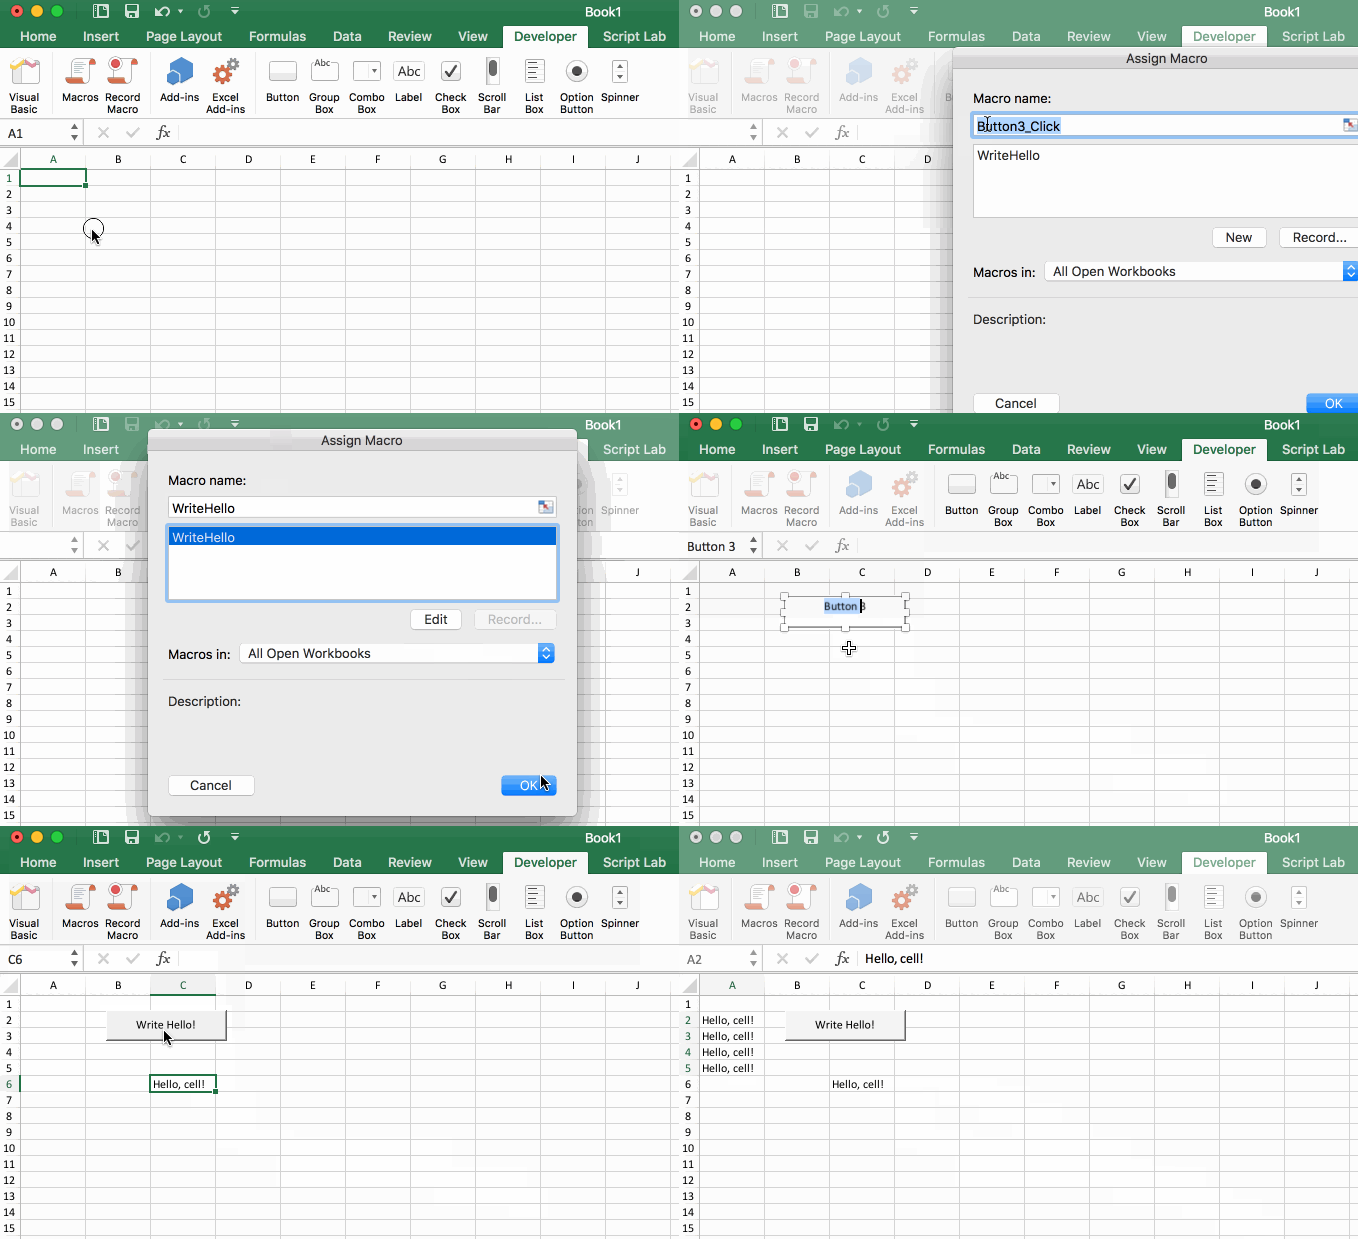
The process is straightforward: you draw the button on your sheet, and Excel immediately prompts you to assign a macro to it. The following article from Ablebits provides a clear, illustrated guide.
How to run macro in Excel and create a macro button - Ablebits.com
This guide walks you through the essential steps of inserting a form control button and linking it to your macro.
Focus on the section titled How to create a macro button. Follow the steps to insert the button and assign your Format_Transactions macro. Pay close attention to how you can right-click the button to change its default text to something more descriptive, like "Format Report".
Now, try it on your own sheet. Create a Form Control button and assign your Format_Transactions macro to it. Once done, you can click it to run your formatting sequence instantly.
Method 2: The Customizable Shape Button
While Form Control buttons are functional, they offer very limited formatting options. For creating professional, polished financial reports, you'll often want buttons that match your company's branding or your report's color scheme. The solution is to use a regular shape (like a rectangle or oval) and assign a macro to it.
This method gives you complete creative control. You can change the shape's color, add effects like shadows, and format the text exactly as you wish.

The following video from Excel Campus is an excellent guide to this technique. It not only shows you how to create and assign the macro but also explains why this method is often preferred and covers some important practical tips.
How to Create Macro Buttons in Excel Worksheets
This video demonstrates the preferred method for creating macro buttons using shapes, which offers greater flexibility for professional reports.
Watch the first part to see how to create and assign a macro to a shape. You can follow these steps to create a second button on your sheet for the Format_Transactions macro. Next, pay close attention to the section on customizing the button. This part covers changing the style and, importantly, how to control whether the button moves or resizes with the cells around it—a crucial detail for robust worksheet design.
Important Considerations
As you start using buttons, you'll encounter a few common situations:
- Editing a Button: Once a macro is assigned, a normal left-click will run it. To select the button to move, resize, or edit its text, you must either right-click it or hold down the Ctrl key while you left-click.
- ActiveX Controls: In the 'Insert' menu, you will also see a section for "ActiveX Controls." For now, it is best to avoid these. They are designed for more advanced programming scenarios, can be less stable, and are unnecessary for the vast majority of automation tasks you'll be doing. Stick with Form Controls and Shapes.
Now you have two types of buttons on your sheet, both capable of running the same automated task. This is the foundation of building interactive and efficient Excel tools.
Conclusion
In this lesson, you've learned how to execute a recorded macro and, more importantly, how to make it accessible through user-friendly buttons. You now understand the difference between a simple Form Control button and a more flexible, customizable shape-based button. This skill is a significant step forward in your journey to automate Excel, moving you from simply recording actions to building intuitive tools.
Key Takeaways:
- Macros can be run directly from the
Developer > Macrosdialog (Alt + F8), which is useful for testing. - Form Control buttons are the quickest way to add a standard, functional button to run a macro.
- Using Shapes as buttons provides full formatting control, allowing you to create professional-looking and branded reports.
- To edit a button with a macro assigned, you must right-click or Ctrl+click it.
- It's best practice to set a button's properties to "Don't move or size with cells" to ensure your report layout remains stable.
You've now seen how a macro is recorded and how it's run. In the next lesson, we will peel back the curtain and look at the language behind the automation. You'll be introduced to the Visual Basic Editor (VBE) to view and understand the basic structure of the VBA code that the Macro Recorder generated for you.