Welcome back! In our previous lesson, we established the critical importance of declaring variables to store data accurately and safely in your macros. You learned how to use Dim with specific data types like String, Long, and Currency to create reliable placeholders for information.
So far, we have only assigned values to these variables directly within our code. This lesson takes the next logical step: making your macros interactive. We will explore two essential functions, MsgBox and InputBox, that allow your macros to communicate with you and other users. You will learn how to display messages, ask for confirmation, and request information that can then be stored in the variables you now know how to create. For an accountant, this is how you build tools that can prompt for a reporting date, ask which client's statement to generate, or confirm a critical action like closing out a monthly ledger.
Displaying Messages and Asking Questions with MsgBox
The simplest way to communicate with a user is to display a message. The MsgBox (Message Box) function is perfect for this. It can be used to notify the user that a task is complete, warn them about an issue, or ask a question that requires a "Yes" or "No" answer.
Let's start with a video from Leila Gharani that provides a clear, practical walkthrough of how to use MsgBox, from displaying a simple message to capturing a user's response.
How to use the Message Box in Excel VBA (syntax you'll need for msgbox)
This video introduces the MsgBox function, showing its basic syntax and how to use it to both inform the user and capture simple responses like "Yes" or "No".
First, watch from the beginning to personalize a message. This section covers: The basic syntax for a simple message. How to add a custom title. How to combine text with variables or properties (like Application.UserName). Using vbNewLine to create multi-line messages. Next, watch the crucial section on capturing a response. Pay close attention to how a variable is declared to store the result of the MsgBox, and how an If...Then...Else statement is used to perform an action based on the user's click.
As the video demonstrated, using MsgBox to get a response is a two-step process:
- Display a message box with buttons like "Yes" and "No".
- Capture which button the user clicked and use that information to decide what the macro does next.
To do this effectively, you need to know the different button and icon styles you can use. You can combine these styles by adding them together with a + sign. For example, vbYesNo + vbQuestion will create a message box with "Yes" and "No" buttons and a question mark icon.
Here is a summary of the most common constants.
Button Types:
| Constant | Buttons Displayed |
|---|---|
vbOKOnly |
OK |
vbOKCancel |
OK, Cancel |
vbYesNo |
Yes, No |
vbYesNoCancel |
Yes, No, Cancel |
Icon Types:
| Constant | Icon | Purpose |
|---|---|---|
vbInformation |
ℹ️ | For informative messages. |
vbQuestion |
❓ | For asking a question. |
vbExclamation |
⚠️ | For warnings. |
vbCritical |
❌ | For critical errors. |
When a user clicks a button, MsgBox returns a value that you can check.
| Return Value | Button Clicked |
|---|---|
vbYes |
Yes |
vbNo |
No |
vbOK |
OK |
vbCancel |
Cancel |
Let's look at a classic accounting example. Imagine a macro that is about to post year-end journal entries. This is a critical action, so you want to get explicit confirmation from the user first.
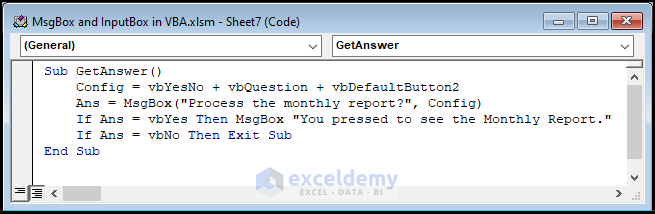
In this image, the variable Ans stores the result of the MsgBox. The code then checks If Ans = vbYes Then... to decide what to do. This is the fundamental pattern for making your macros responsive.
Getting User Data with InputBox
While MsgBox is great for confirmation, InputBox is what you use when you need the user to provide a specific piece of information, like a name, a number, or a date. The function displays a prompt and provides a text box for the user to type in. The value they enter is then returned by the function and can be stored in a variable.
This short video gives a great overview of the InputBox function and its arguments.
This tutorial from TutorialsPoint clearly explains the purpose of the InputBox and how to use its main arguments.
Watch from the beginning to provide default text. This covers the most important aspects: Displaying a simple prompt. Storing the user's input into a variable. Adding a custom title to the box. Providing a default value in the input field.
Now that you have the basics, let's combine InputBox with other VBA capabilities to build a genuinely useful tool. In Module 3, you learned how to use the VLOOKUP function to retrieve data from a table. You can use that same function inside your VBA code.
Consider a macro that looks up an employee's salary. It could work like this:
- Use
InputBoxto ask the user for the employee's name. - Store that name in a
Stringvariable. - Use
WorksheetFunction.VLookupto find the salary from a data table on your worksheet. - Use
MsgBoxto display the result.
The code would look something like this:
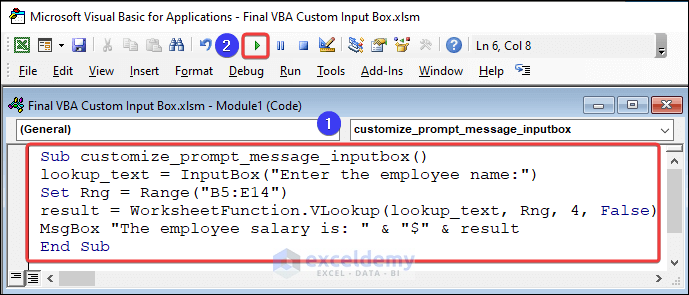
This example is a fantastic illustration of how you can integrate different skills. You're using variables (previous lesson), user interaction (InputBox, MsgBox), and an Excel function (VLookup) all within one short, powerful macro.
Handling User Input Robustly
When you ask a user for input, you can't always be sure what you'll get. They might type text where a number is expected, or they might simply click "Cancel". A well-written macro anticipates these possibilities.
Complete Guide to VBA InputBox and MsgBox
This article from Konomi App provides detailed code examples for building more robust input routines.
First, read the section on handling the Cancel button. This explains a specific technique using StrPtr to reliably tell the difference between a user clicking "Cancel" and a user clicking "OK" with an empty text box. Next, review the section on input validation. This example shows how to use a Do...Loop and the IsNumeric function to repeatedly prompt the user until they enter a valid number. This is a very common and important pattern.
While we haven't formally covered Do...Loop yet (we will in the next module), the pattern for validation is straightforward: keep asking for input until you get something valid. The IsNumeric() function is your first line of defense when you expect a number, preventing errors in accounting calculations.
Conclusion
In this lesson, you've added two of the most important tools for user interaction to your VBA toolkit. You've moved beyond macros that run silently in the background to creating procedures that can communicate, ask for direction, and receive data.
Key Takeaways:
- Use
MsgBoxto display information, warnings, or ask for confirmation. - Customize
MsgBoxwith different buttons (vbYesNo) and icons (vbQuestion,vbCritical) to match the context. - Capture the user's response from a
MsgBoxin a variable and use anIfstatement to control the macro's flow. - Use
InputBoxto prompt the user for data such as text or numbers. - Always store the result of an
InputBoxin a variable declared with the appropriate data type. - It's crucial to validate user input (e.g., with
IsNumeric) and handle cases where the user cancels the operation.
We got a preview of conditional logic today when we used If...Then...Else to act on a user's choice from a message box. This concept is the key to making your macros truly "smart." In our next lesson, we will officially begin our deep dive into VBA programming concepts by mastering If...Then...Else statements to add powerful decision-making capabilities to your automation tasks.