Welcome to the first lesson of our module on Excel automation. In the previous modules, you've mastered a wide array of functions and tools, culminating in building a sophisticated Accounts Receivable aging report. You've seen how far formulas, Tables, and PivotTables can take you in creating dynamic reports. Now, we're about to take a significant leap from dynamic analysis to true automation using macros.
This module is where you'll begin to instruct Excel to perform tasks for you. Our goal today is to prepare your Excel environment for this new journey. We will focus on two foundational steps: enabling the essential "Developer" tab and understanding the critical macro security settings that come with it. This initial setup is the gateway to all the automation techniques we will cover in the rest of the course.
What are Macros and the Developer Tab?
Before we start, let's briefly clarify what a macro is. In Excel, a macro is a recorded sequence of actions—clicks, keystrokes, and commands—that you can save and run whenever you need to repeat that sequence. It’s the first step toward building powerful automations that can save hours of repetitive work, a skill highly valued in any accounting role.
These powerful tools are not part of the standard Excel interface. They are housed in a special ribbon tab called the Developer tab, which is hidden by default. Microsoft hides it because it contains advanced features that, if used incorrectly or with malicious files, can pose a security risk. Our first task is to bring this tab out of hiding.
Developer Tab - Overview, Importance, How To Add
This article from the Corporate Finance Institute provides a concise overview of the Developer tab and its importance for finance professionals.
Please read the first two main sections of the article. Focus on the definition to understand its purpose, and the section on its importance to see why it's so relevant for your career goals.
Enabling the Developer Tab
Now, let's perform the one-time setup to make the Developer tab visible in your Excel ribbon. There are a couple of ways to get to the right menu, and different people prefer different methods. The videos below demonstrate the two most common ways.
Create Your First Excel Macro: A Step-by-Step Guide for Beginners🚀
This video from the Teacher's Tech channel shows a very common way to access the customization options by right-clicking the ribbon.
Watch the short clip from this section. Follow the instructor as they right-click the ribbon, select "Customize the Ribbon," and check the "Developer" box.
The image below provides a static summary of the steps you just saw. You go to File > Options > Customize Ribbon, check the "Developer" box, and click OK.
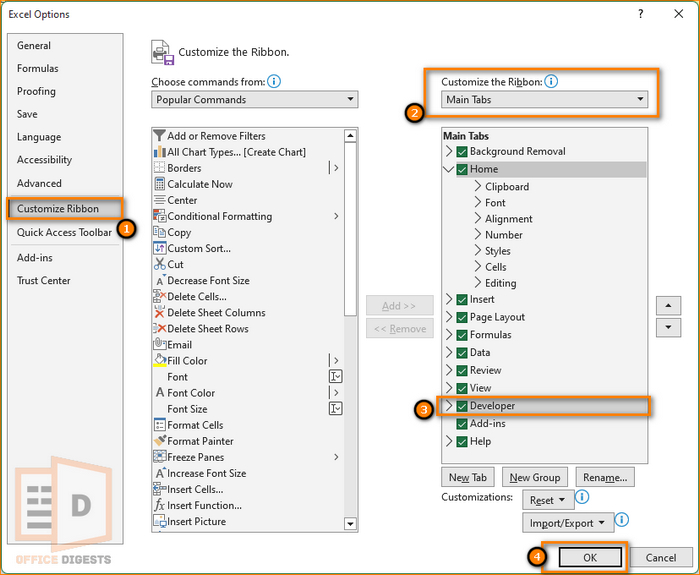
Once you've done this, you will see a new "Developer" tab in your Excel ribbon. Take a moment to click on it and look at the groups of commands available. You'll see sections for "Code," "Add-ins," "Controls," and more. For now, we are most interested in the "Code" group on the far left, which contains the "Macros" and "Record Macro" buttons.
Understanding Macro Security
With great power comes great responsibility. Because macros are essentially small programs running inside Excel, they can be used for malicious purposes, such as deleting files or stealing data. This is why Excel has a built-in security system to protect you from running potentially harmful code, especially from files you download from the internet or receive via email.
As an aspiring accounting professional, understanding and respecting these security settings is non-negotiable. You will often handle sensitive financial data, and maintaining its security and integrity is paramount.
When you open a file that contains macros, Excel will, by default, disable them and show a security warning.
Excel Macros & VBA - Tutorial for Beginners
This video by Kevin Stratvert clearly demonstrates what happens when you open a macro-enabled workbook and how to respond to the security warning.
Please watch from this clip. Pay close attention to the concepts of the security bar, enabling content, and making a file a "trusted document."
The choice to "Enable Content" should only be made if you are certain the file is from a trusted source. For the macros you create yourself, you can always trust them.
Excel's macro security is managed in a special area called the Trust Center. Let's explore the different levels of security you can set.
Enable Macros in Excel (Easy Steps)
This article from Excel Easy gives a clear, illustrated breakdown of the four macro security settings. It's important to understand what each one does.
First, see how to get to the settings by clicking Macro Security on the Developer tab. Then, carefully read the description of the four options, from disabling all macros to enabling all macros.
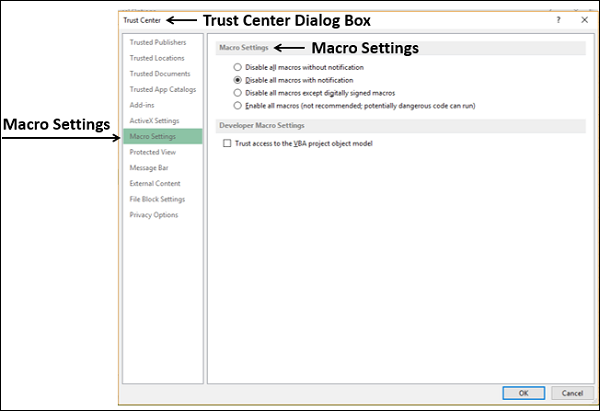
For our course, and for most professional work, the default setting—"Disable all macros with notification"—is the best choice. It provides a strong layer of security by forcing you to consciously approve any macro before it can run, while still allowing you to work with macros from trusted sources. The "Enable all macros" option is strongly discouraged as it exposes you to significant risk.
Saving Your Work: A Critical Step
Finally, there's one last crucial piece of housekeeping. When you create a macro and save it in a workbook, you cannot save it as a standard Excel Workbook (.xlsx). An .xlsx file cannot store macro code. If you try to, Excel will warn you and strip the code out, and all your automation work will be lost.
You must save your file as an Excel Macro-Enabled Workbook, which has the .xlsm file extension.
Create Your First Excel Macro: A Step-by-Step Guide for Beginners🚀
This part of the Teacher's Tech video explains exactly how to save your workbook correctly to preserve your macros.
Watch the segment from here to see how to select the correct file type in the "Save As" dialog.
This is a simple but vital step. Getting into the habit of saving your automated workbooks as .xlsm files from the very beginning will prevent you from accidentally losing your work.
Conclusion
In this foundational lesson, you have successfully configured Excel for automation. You've unlocked the powerful Developer tab and, more importantly, learned about the security measures that govern the use of macros. This knowledge is not just a technical preliminary; it's a professional practice that ensures data integrity.
Key Takeaways:
- The Developer tab is your control center for creating and managing macros and must be manually enabled via Excel Options.
- Macros are powerful but carry security risks. You must be cautious about enabling content from untrusted sources.
- The recommended security setting is "Disable all macros with notification," which provides a balance of security and usability.
- Workbooks containing macros must be saved in the Excel Macro-Enabled Workbook (
.xlsm) format to preserve the code.
You are now fully prepared to begin your journey into automation. In our next lesson, you will create your very first macro by recording a simple, repetitive task, and then learn how to run it with the click of a button.