In our previous lesson, we explored how to make a macro perform actions on every single worksheet in a workbook. This is a crucial skill for managing complex files. Today, we tackle another fundamental challenge in automation: making our macros smart enough to handle data that grows over time.
This lesson focuses on writing VBA code to dynamically find the last-used row in a column. For accounting tasks, this is indispensable. Whether you're importing new transactions, logging entries, or consolidating reports, you almost never want to overwrite existing data. Instead, you need to find the end of your current data and append the new information right below it. Hard-coding a cell like A500 is fragile; a dynamic approach ensures your macro is robust and can be used month after month without manual adjustments.
The Problem with Static Ranges
Imagine you've recorded a macro to copy summary data from a monthly report to a "Year-to-Date" summary sheet. The first time you run it, it pastes the data in row 2. The next month, if you run the same macro, it will paste over the data in row 2 again.
What we need is a way for the macro to first check the "Year-to-Date" sheet, find the last row that contains data (say, row 13), and then paste the new data in the next available row (row 14). This is the skill you will master today.
Finding the Last Row: The Range.End Method
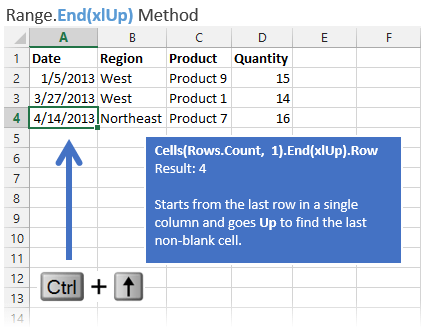
The most common and intuitive way to find the last row in VBA mirrors a keyboard shortcut you might already use: Ctrl + Arrow Key. If you select a cell at the very bottom of an Excel sheet (like A1048576) and press Ctrl + Up Arrow, Excel jumps to the last non-blank cell in that column. The Range.End method in VBA automates this exact action.
Let's watch a short video that demonstrates this concept and shows the basic code structure.
Find the Last Row, Column, or Cell in Excel VBA with the Range.End Method (Part 1 of 3)
This video from Excel Campus - Jon clearly explains the Range.End method.
Please watch the following two segments: The concept: The presenter explains how the method works just like the Ctrl + Up Arrow keyboard shortcut. The VBA code: Observe how the code is written to start at the bottom of the sheet and find the last cell with data.
As you saw, the core piece of code looks like this:
Cells(Rows.Count, 1).End(xlUp).Row
Let's break this statement down piece by piece:
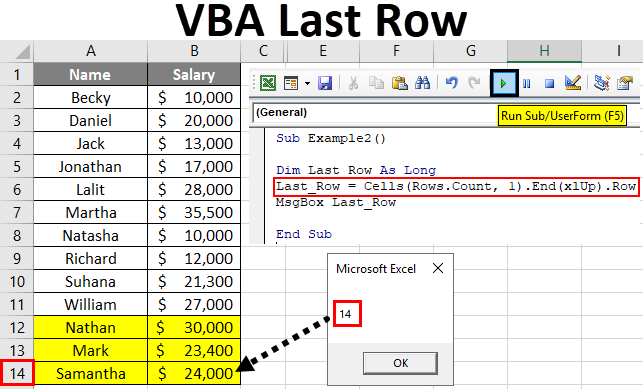
Rows.Count: This property returns the total number of rows in a worksheet (1,048,576 in modern Excel versions).Cells(Rows.Count, 1): This refers to a cell using its row and column number. In this case, it points to the cell in the very last row of the first column (Column A). This is our starting point at the bottom of the sheet..End(xlUp): This is the instruction that mimics pressingCtrl + Up Arrow. It tells Excel to "jump" up from the starting cell until it hits the first cell that contains data..Row: After.End(xlUp)finds the cell, the.Rowproperty extracts its row number as a numerical value (e.g., 14).
This single line of code is incredibly powerful. You can store this number in a variable, typically declared as Long because row numbers can be large.
The image below shows this code within a complete VBA procedure. The macro finds the last row, stores it in the Last_Row variable, and displays it in a message box.
Best Practices and Limitations
While powerful, the Range.End method has one critical caveat: it operates on a single column. This means its accuracy depends entirely on the column you choose for the check.
VBA Tutorial: Find the Last Row, Column, or Cell on a Sheet
This article from Excel Campus provides an excellent summary of the Range.End method, including its pros and cons.
Please read the section titled #1 – The Range.End() Method. Pay close attention to the "Cons of Range.End" subsection, which highlights the method's main limitation.
The key takeaway is that if your chosen column has blank cells within the data range, End(xlUp) will stop prematurely, giving you an incorrect last row.
For example, in a transaction list, if you use a "Comments" column to find the last row, but some transactions have no comments, the macro will fail. Therefore, the best practice is to always use a column that is guaranteed to have a value for every record, such as a Transaction ID, Date, or Account Code. In well-structured accounting data, such a column usually exists.
VBA Code To Find Last Row Or Last Column (Best Way)
This article from The Spreadsheet Guru emphasizes the importance of data structure for this technique to work reliably.
Read the section titled Prep Your Excel Data!. It illustrates why having a continuous block of data is ideal.
From "Last Row" to "Next Empty Row"
Our ultimate goal is to append data. Finding the last row with data is the first half of the job. The second half is identifying the next row, which is simply LastRow + 1.
A slightly more direct way to get the cell in the next empty row is to use the .Offset() method. Offset(1, 0) refers to the cell one row down and zero columns across from the reference cell.
Let's watch a quick video that focuses specifically on this "next empty row" trick.
Next Empty Row Trick in Excel VBA & Macros
This video from TeachExcel provides a clear walkthrough of finding the next empty row, which is perfect for appending data.
Watch the following segments: The code for the next empty cell: The presenter demonstrates using .End(xlUp).Offset(1). The conceptual explanation: This part reinforces how Rows.Count, .End(xlUp), and .Offset(1) work together.
Putting It All Together: A Practical Macro
Let's write a practical macro that you could use in an accounting context. This macro will add a new journal entry to a "GeneralLedger" sheet. It will first dynamically find the next empty row and then write the new transaction data into the cells of that row.
Sub AddJournalEntry()
    ' Purpose: Adds a new transaction to the first available empty row
    '          in the "GeneralLedger" worksheet.

    Dim ws As Worksheet
    Dim nextEmptyRow As Long

    ' Set a reference to the worksheet to keep the code clean
    Set ws = ThisWorkbook.Sheets("GeneralLedger")

    ' --- Step 1: Find the next empty row ---
    ' We use column A ("EntryID"), assuming it always contains a value.
    ' We find the last row with data and add 1 to get the next empty row.
    nextEmptyRow = ws.Cells(ws.Rows.Count, 1).End(xlUp).Row + 1

    ' --- Step 2: Write the new data to that row ---
    ws.Cells(nextEmptyRow, 1).Value = "JE-006" ' Column A: EntryID
    ws.Cells(nextEmptyRow, 2).Value = Date ' Column B: Date (uses today's date)
    ws.Cells(nextEmptyRow, 3).Value = 1010 ' Column C: Account Code (e.g., Cash)
    ws.Cells(nextEmptyRow, 4).Value = 500.00 ' Column D: Debit
    ws.Cells(nextEmptyRow, 5).Value = 0 ' Column E: Credit

    ' Add the other side of the entry in the row below
    ws.Cells(nextEmptyRow + 1, 1).Value = "JE-006"
    ws.Cells(nextEmptyRow + 1, 2).Value = Date
    ws.Cells(nextEmptyRow + 1, 3).Value = 4010 ' e.g., Sales Revenue
    ws.Cells(nextEmptyRow + 1, 4).Value = 0
    ws.Cells(nextEmptyRow + 1, 5).Value = 500.00

    ' --- Step 3: Provide confirmation ---
    MsgBox "New journal entry JE-006 has been added to rows " & nextEmptyRow & " and " & nextEmptyRow + 1 & "."

End Sub
This macro is now robust. It doesn't matter if your general ledger has 10 entries or 10,000; it will always find the correct place to add the next one.
Conclusion
You have now learned one of the most essential techniques in VBA for data processing. Dynamically finding the last row is the key to creating scalable and resilient macros that don't break as your data grows.
Key Takeaways:
- The
Cells(Rows.Count, "A").End(xlUp).Rowpattern is the standard method for finding the last row of data in a column. - The reliability of this method hinges on choosing a column that has no empty cells within the dataset (e.g., a primary key or ID column).
- To find the first empty row for appending new data, you can either add 1 to the last row number or use the
.Offset(1)method. - This skill is a prerequisite for automating tasks like data consolidation, logging, and importing new transactions into existing lists.
In our next lesson, we will combine this new skill with the worksheet looping technique from our previous session. You will learn how to create a macro to consolidate data from multiple worksheets into a single summary sheet—a classic and powerful automation task in finance and accounting.