Welcome to our next lesson. In our previous session, we focused on the For...Next loop, which gave your macros the power to repeat actions many times. We used numerical coordinates like Cells(5, 2) to work with data, but this approach assumes we are always working on a single, active sheet. To build truly powerful automation—like consolidating data from multiple files or generating reports from various tabs—we need more control over the structure of our Excel files.
Today, we'll zoom out and learn how to programmatically command Excel's core components: its workbooks and worksheets. You will learn to reference and manipulate these objects, moving beyond a single sheet to build macros that can open files, create new sheets, and navigate between them with precision. This is a foundational step in building the kind of robust automation used in professional accounting environments.
The Excel Object Hierarchy
To control Excel with VBA, it's helpful to think of it as a hierarchy of objects. At the very top is the Application itself (Excel). The Application contains a collection of Workbooks. Each Workbook object, in turn, contains a collection of Worksheet objects. Finally, each Worksheet is made up of Range and Cell objects, which we'll explore in our next lesson.
This parent-child structure is often called the Excel Object Model. Understanding this hierarchy is key to writing clear VBA code, as you will often navigate down this chain to get to the specific data you want to work with.

Controlling Workbooks
A Workbook object represents an entire Excel file (e.g., a .xlsx or .xlsm file). Your macros will often need to interact with multiple workbooks, such as opening a file with raw data, processing it, and saving the results in a separate report file.
Referencing and Activating Workbooks
There are several ways to refer to a workbook. The most important distinction is between ThisWorkbook, which is the most reliable, and ActiveWorkbook, which can be unpredictable.
Excel VBA Introduction Part 7 - Workbooks
This video from WiseOwlTutorials clearly demonstrates the main ways to reference, activate, and interact with workbooks.
First, watch the segment that explains how to refer to workbooks by their name and index. Then, pay close attention to the explanation of the crucial difference between ActiveWorkbook and ThisWorkbook. Understanding this distinction is vital for writing bug-free code.
As the video highlights:
Workbooks("Report.xlsx"): Refers to an open workbook by its file name.ActiveWorkbook: Refers to the workbook that currently has focus. Use this with caution. If the user clicks on another workbook while your macro is running,ActiveWorkbookwill change, and your code might modify the wrong file.ThisWorkbook: Refers to the workbook where the VBA code itself is stored. This is the safest and most robust way to refer to your main file, as it will always point to the correct workbook, even if you rename the file.
Opening, Creating, and Saving Workbooks
Beyond referencing open workbooks, VBA allows you to manage the entire lifecycle of a file. You can open existing files, create new ones, and save them in different formats or locations. This is essential for automating reporting processes.
The Complete Guide To The VBA Workbook - Excel Macro Mastery
This guide from Excel Macro Mastery provides detailed code examples for common workbook operations. It serves as an excellent reference.
Focus on the following sections: Open Workbook: Read the examples under the Open Workbook heading to see how to open a file from a specific path. Create New Workbook: Review the section Create New Workbook to learn how to add a blank workbook. Close and Save: Skim the sections on Close Workbook and Save Workbook to understand the .Close, .Save, and .SaveAs methods.
A common accounting task is to open a raw data file, process it, and save a new report. A typical sequence might look like this:
- Use
Workbooks.Opento open the source data file. - Use
Workbooks.Addto create a new, blank workbook for the report. - Copy and summarize data from the source workbook to the new report workbook.
- Use
wbReport.SaveAs "C:\Reports\Monthly_Summary.xlsx"to save the new report. - Use
wbData.Close SaveChanges:=Falseto close the source data file without saving any accidental changes.
Manipulating Worksheets
Once you have a reference to the correct workbook, the next step is to target the correct worksheet within it.
Referencing Worksheets: The Power of Code Names
Just like with workbooks, there are a few ways to reference a worksheet. You can use its visible tab name (Worksheets("Sales")) or its position (Worksheets(1)). However, both of these are fragile. If a user renames the "Sales" tab to "Sales_Data" or drags it to a new position, your macro will fail with an error.
The most robust method for referencing a worksheet within the same workbook as your code is to use its Code Name.
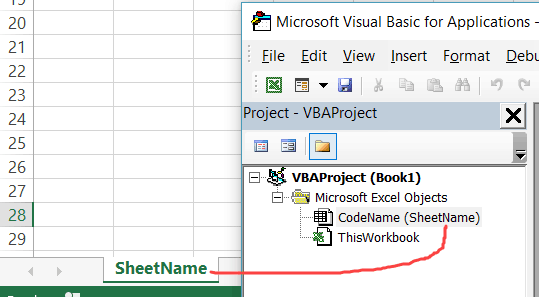
The Code Name is an internal VBA name for the sheet that users cannot change from the Excel interface. This makes your code immune to users renaming or reordering tabs.
Better Worksheet References in VBA for Excel
The TeachExcel channel has an excellent video that breaks down the different ways to reference worksheets, with a great explanation of why Code Names are superior.
Please watch the segments explaining references by tab name and by index number. Most importantly, watch the detailed explanation of Code Names, which shows you how to view, change, and use them to make your code more reliable.
To summarize the best practices from the video:
- For sheets in
ThisWorkbook: Use the Code Name (e.g.,Sheet1.Activateor, after renaming it,shData.Activate). - For sheets in other workbooks: You must use the tab name or index, as Code Names are not directly accessible from another workbook (e.g.,
Workbooks("Source.xlsx").Worksheets("Sheet1").Activate).
Adding, Deleting, and Renaming Worksheets
VBA also gives you full control to modify the structure of a workbook's worksheets.
The Complete Guide To The VBA Worksheet
This Excel Macro Mastery article provides the syntax for adding, deleting, and otherwise managing worksheets.
Please review the sections titled Add Worksheet and Delete Worksheet. Notice the Application.DisplayAlerts = False trick, which is very useful for preventing pop-up warnings during automation.
Using Object Variables for Cleaner Code
In the last lesson, you declared counter variables like Dim i As Long. We can do the same for objects like workbooks and worksheets. Instead of repeatedly typing long references like ThisWorkbook.Worksheets("Trial_Balance_Data"), you can assign the object to a variable.
This practice makes your code much cleaner, more readable, and easier to maintain.
' Without variables
ThisWorkbook.Worksheets("Summary").Range("A1").Value = "Total Revenue"
ThisWorkbook.Worksheets("Summary").Range("B1").Value = 50000
ThisWorkbook.Worksheets("Summary").Range("A1:B1").Font.Bold = True

' With a worksheet variable - much cleaner!
Dim wsSummary As Worksheet
Set wsSummary = ThisWorkbook.Worksheets("Summary") ' Note the 'Set' keyword for objects

wsSummary.Range("A1").Value = "Total Revenue"
wsSummary.Range("B1").Value = 50000
wsSummary.Range("A1:B1").Font.Bold = True
Notice the Set keyword is required when assigning an object to a variable. This is a key difference from assigning simple values like numbers or text.
The following video segment explains this concept very well.
Better Worksheet References in VBA for Excel
Let's return to the TeachExcel video to see a practical demonstration of using worksheet variables.
Watch the section from this simple structure. The instructor explains how setting a reference once at the top of your macro makes the rest of the code much easier to manage.
Conclusion
You have now learned how to navigate and manipulate the primary containers in Excel: workbooks and worksheets. Mastering these objects moves you from writing code that works on a single sheet to creating powerful automation that can orchestrate complex, multi-file workflows.
Key Takeaways:
- Excel has a hierarchical object model:
Application>Workbooks>Worksheets>Ranges. - For reliability, always prefer
ThisWorkbookoverActiveWorkbookto refer to the file containing your code. - For worksheets within
ThisWorkbook, use Code Names to protect your macros from users renaming or moving tabs. - Use object variables (
Dim wb As Workbook,Set wb = ...) to make your code cleaner, more readable, and easier to maintain. - You can loop through collections of these objects (e.g.,
For Each ws In ThisWorkbook.Worksheets) to perform actions on every sheet in a workbook.
In our next lesson, we will dive into the final level of the hierarchy: the Range and Cell objects. You'll learn how to precisely select, read from, and write to any group of cells on a worksheet, giving you the final tool you need to manipulate data directly.