Hello! In our last session, we mastered If...Then...Else, giving your macros the ability to make decisions. You learned how to create code that performs different actions based on logical conditions, a crucial skill for automating tasks that require judgment.
Today, we move from decision-making to repetition. While an If statement can check a single transaction, it's not practical for checking a thousand. This is where loops come in. In this lesson, we will focus on the For...Next loop, the workhorse of VBA automation. You will learn how to write a macro that can repeat an action a specific number of times, allowing you to process entire columns of data, perform calculations on hundreds of rows, or format a block of cells in an instant. This is the key to scaling up your automation from single actions to large-scale accounting procedures.
The Anatomy of a Loop
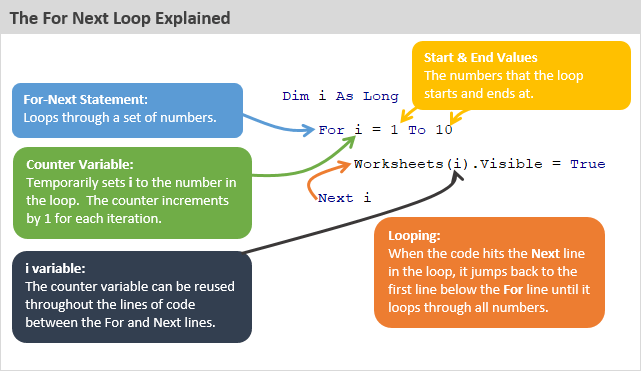
At its heart, a For...Next loop is a structure that tells VBA to run a block of code over and over again, using a counter to keep track of how many times it has run. Imagine you have a list of 100 invoices and you need to check the due date for each one. A For...Next loop lets you write the "check due date" logic once and have VBA automatically apply it to all 100 rows.
The structure consists of a few key components:
- The
Forstatement: This initiates the loop and defines the counter variable, its starting value, and its ending value. - The Counter Variable: A temporary variable (often named
i,j, or something descriptive likerowNumber) that VBA uses to count from the start value to the end value. - The Code Block: The set of actions you want to repeat in each iteration.
- The
Nextstatement: This signals the end of the code block. When VBA hitsNext, it increments the counter and jumps back to the top of the loop, continuing until the counter exceeds the end value.
This image provides an excellent visual breakdown of these components.
For a dynamic demonstration, let's watch a short video segment that steps through a simple loop.
Process Rows Instantly: Excel VBA For Next Scripts
The "Excel For Freelancers" channel provides a clear, step-by-step walkthrough of a basic For...Next loop's execution.
Watch the section from this simple loop. The instructor uses the F8 key to step through the code line by line. Pay close attention to how the value of the number variable changes with each pass through the loop.
The general syntax, as you've seen, is quite straightforward.
How to Use For Next Loop in Excel VBA
This article from Excel Insider clearly defines the syntax of the For...Next loop.
Please read the section titled Syntax of the For Next Loop. This will formalize the structure we just discussed.
A Practical Accounting Example
Let's apply this concept to a common accounting task: calculating totals from a list of transactions. Imagine you have monthly sales figures in adjacent columns and need to populate a "Total Sales" column.
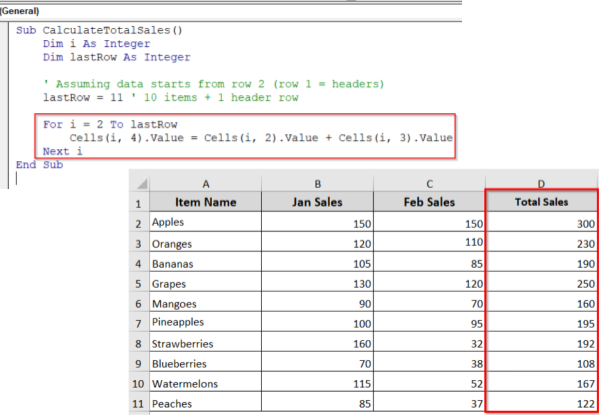
This is a perfect use case for a For...Next loop. We can loop through each data row, performing the same addition (Jan Sales + Feb Sales) for each item. The following resource provides the exact code to accomplish this.
How to Use For Next Loop in Excel VBA
We will now examine the code for the "CalculateTotalSales" example shown in the image above.
In the same article, find the subsection "Single loop" and read the explanation and code under the Steps. Note how the loop counter i is used in Cells(i, 4), Cells(i, 2), and Cells(i, 3) to refer to cells in the current row being processed.
This is the fundamental pattern you will use constantly. By changing the lastRow variable, this same code can process 10 rows, 100 rows, or 10,000 rows without any other modifications.
Controlling the Loop's Pace and Direction
By default, a For loop increments its counter by 1 in each iteration. However, you can control this behavior with the Step keyword.
Step 2will process every second item (e.g., 1, 3, 5, ...). This is useful for tasks on alternating rows.Step -1will make the loop count backwards. This is a critical technique for certain operations, such as deleting rows from a dataset. If you delete rows while looping forwards, you risk skipping the row immediately after the one you deleted, because the row numbers shift up. Looping backwards avoids this problem entirely.
You can also exit a loop prematurely using the Exit For statement. If you are searching a list for the first occurrence of a specific value, there's no need to continue looping after you've found it. Exit For makes your code more efficient by stopping the loop as soon as its job is done.
This video demonstrates these control structures very effectively.
Process Rows Instantly: Excel VBA For Next Scripts
This video shows practical examples of using Step and Exit For to control loop execution.
First, watch the demonstration of exiting a loop early once a condition is met. Notice how the code stops looping after it finds the first value that meets the criteria. Next, watch the sections on stepping forward by more than one, and then stepping backwards using a negative step.
A Glimpse of Nested Loops
What if you need to process a grid of data, like a table of monthly expenses where months are in columns and expense categories are in rows? To do this, you need to loop through both the rows and the columns. This is achieved by placing one For...Next loop inside another, a technique known as nesting.
The outer loop typically handles the rows, and for each row, the inner loop iterates through all the necessary columns. This is an extremely powerful technique that combines the decision-making of If statements with the repetitive power of two-dimensional loops.
The following video shows a fantastic example where a nested loop is used to check every cell in a sales table and apply formatting if the value is over a certain threshold.
Process Rows Instantly: Excel VBA For Next Scripts
This segment demonstrates how to use a nested loop to iterate through rows and columns, combining it with an If statement.
Watch the section on nested loops. Observe how the code has an outer loop for rowNumber and an inner loop for columnNumber. This allows the If statement inside to check the value of every single cell in the specified grid.
Conclusion
You have now learned the fundamental mechanism for automating repetitive tasks in VBA. The For...Next loop is a cornerstone of programming that you will use in almost every macro you write.
Key Takeaways:
- A
For...Nextloop repeats a block of code a specified number of times using a counter variable. - This is essential for processing lists of data, such as transactions, journal entries, or account balances.
- The
Stepkeyword allows you to control the loop's increment, enabling you to skip rows or loop backwards (Step -1). - The
Exit Forstatement allows you to stop a loop prematurely, improving code efficiency. - Nested loops (a loop within a loop) are used to process two-dimensional data, like iterating through both rows and columns in a table.
In this lesson, we primarily used row and column numbers to work with cells (e.g., Cells(i, 4)). In our next session, we will build on this by learning how to refer to Workbooks, Worksheets, and Ranges as objects. This will allow you to write more robust and readable code that can work across different files and sheets with greater flexibility.