Hello! In our last lesson, we explored how to control entire workbooks and worksheets, giving you command over the file structure of your Excel projects. We established the importance of using robust references like ThisWorkbook and worksheet CodeNames.
Now, we will drill down to the most fundamental level of the Excel object hierarchy: the Range and Cell objects. These represent the individual cells on a worksheet where your data resides. Today's goal is to master the core VBA methods for referencing and manipulating these objects. You will learn how to use Range, Cells, and Offset to precisely target any cell or group of cells to read from or write to. This skill is the bedrock of automating almost any task in Excel, from data entry to generating complex financial reports.
The Ground Rules: Direct Manipulation vs. Selecting
When you record a macro, Excel often generates code that first selects a cell and then performs an action on it, like this:Range("A1").SelectActiveCell.Value = "My Value"
While this works, it's inefficient and can make your code slow and flicker. A much better practice is to manipulate the cell directly, without selecting it. This is a crucial habit for writing professional-quality VBA.
' Inefficient way
Range("A1").Select
ActiveCell.Value = 100

' Efficient and preferred way
Range("A1").Value = 100
The following video segment explains this distinction clearly. It's a foundational concept that will make all your future code better.
Excel VBA Introduction Part 5 - Selecting Cells (Range, Cells, Activecell, End, Offset)
This video from WiseOwlTutorials demonstrates the inefficient "select then act" method and then shows the more direct and efficient approach.
Please watch the section that explains and demonstrates how to change cell values without selecting. Notice how the code becomes shorter and the macro runs faster without the screen selection changing.
From now on, we will always use this direct approach.
The Three Core Ways to Reference Cells
To work with data, you first need to tell VBA which cells you're interested in. There are three primary methods to do this, each with its own strengths.
Leila Gharani's video provides an excellent visual overview of these methods. We will watch it in segments as we discuss each one.
Excel VBA: Referring to Ranges & Writing to Cells (Range, Cells, Offset, Names)
This comprehensive video demonstrates the key properties for referencing ranges: Range, Cells, and Offset.
For now, just get an overview by watching the first few minutes, from the introduction of the Range property up to the beginning of the Offset property discussion Range and Cells. We will break this down further.
Let's dissect what you just saw.
1. The Range Property: Using "A1" Notation
This is the most intuitive method, as it uses the same "A1" style references you use in Excel formulas. It's perfect when you know the exact, fixed address of the cell(s) you want to work with.
As shown in the video, Range is very flexible:
- Single cell:
Range("A1") - Contiguous block of cells:
Range("A1:C5") - Non-contiguous cells:
Range("A1, C5, F2") - Entire columns or rows:
Range("A:A")orRange("1:1")

2. The Cells Property: Using Numerical (Row, Column) Notation
The Cells property lets you refer to a cell using its numerical coordinates: Cells(row_number, column_number). For example, Cells(1, 1) is cell A1, and Cells(3, 2) is cell B3.
Its main advantage comes alive when used with loops. Since you already know how to write For...Next loops, you can see how this would be powerful. Imagine you need to process 100 rows of transactions. You can loop a variable i from 1 to 100 and use Cells(i, 1) to work with each cell in column A dynamically.
You can also combine Range and Cells to define a block of cells using numerical coordinates, which is extremely useful.
' This refers to the range from A1 to E10
Dim myRange As Range
Set myRange = Range(Cells(1, 1), Cells(10, 5))
3. The Offset Property: Relative Referencing
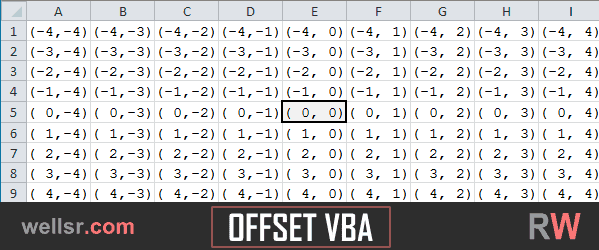
The Offset property allows you to navigate from a starting cell or range. It takes two arguments: Offset(rows_to_move, columns_to_move).
- Positive numbers move down and right.
- Negative numbers move up and left.
- Zero means no movement on that axis.
Let's watch the segment from Leila's video that focuses on Offset.
Excel VBA: Referring to Ranges & Writing to Cells (Range, Cells, Offset, Names)
Let's return to the video to see a practical demonstration of the Offset property.
Watch the segment from this one now. Pay attention to how it moves from a starting point (Range("A1")) to a target cell by specifying the row and column shifts.
For accounting tasks, Offset is incredibly useful. For instance, if your code finds the cell containing the text "Net Income", you can use .Offset(0, 1) to refer to the cell immediately to its right to write the calculated value.
A Powerful Combination: Finding the Last Row
In accounting, you rarely work with data that has a fixed number of rows. A transaction list will grow every day. Writing a macro that only works for 100 rows is not robust. You need a way to dynamically find the last row of data.
We can achieve this by combining Range, Offset, and a new property: .End. The expression .End(xlDown) is the VBA equivalent of selecting a cell and pressing CTRL + Down Arrow. It jumps to the last contiguous cell in that direction.
The following video provides an excellent, step-by-step guide to this essential technique.
Excel VBA Introduction Part 5 - Selecting Cells (Range, Cells, Activecell, End, Offset)
This video from WiseOwlTutorials masterfully explains how to find the end of a list and select the next blank cell, a cornerstone of dynamic automation.
Watch the section on relative cell referencing. The instructor first demonstrates the logic step-by-step (.Select, .End(xlDown), .Offset) and then combines it into a single, powerful line of code.
Let's break down the final, combined line of code from the video:
Range("A1").End(xlDown).Offset(1, 0)
Range("A1"): Start at a known fixed point at the top of the column..End(xlDown): Jump down to the last used cell in that block (e.g., A14)..Offset(1, 0): Move one row down and zero columns across, landing you on the first empty cell (A15), ready for a new entry.
Mastering this one line of code will significantly elevate the quality and flexibility of your automation scripts.
Reading and Writing Cell Values
Now that you know how to reference any cell, the most common thing you'll do is read or write its value. This is done using the .Value property.
Sub ManipulateValues()
    Dim ws As Worksheet
    Set ws = ThisWorkbook.Worksheets("Sheet1")

    ' Write a value TO a cell
    ws.Range("A1").Value = "Total Assets"

    ' Write a number TO a cell
    ws.Range("B1").Value = 150000

    ' Read a value FROM one cell and write it TO another
    ws.Range("A2").Value = ws.Range("A1").Value
End Sub
The article below provides more detail on how values are moved between cells.
The Complete Guide to Ranges and Cells in Excel VBA
This guide from Excel Macro Mastery is a great written companion to the videos, covering the Range, Cells, and Offset properties in detail.
Please read the sections on The Range Property, The Cells Property, Using Cells and Range together, and The Offset Property. Finally, review the section Reading Values, which reinforces how to copy values between cells using the .Value property.
Conclusion
Today you've acquired one of the most essential skills in VBA programming: targeting and manipulating cells. By moving beyond recorded macros and learning to reference cells directly and dynamically, you can now start writing code that is both powerful and robust.
Key Takeaways:
- Always manipulate cells directly using properties like
.Valueinstead of relying on.SelectandActiveCell. - Use
Range("A1")for static, known addresses. - Use
Cells(row, col)for dynamic addressing, especially within loops. - Use
Offset(rows, cols)to navigate relative to a known position. - Combine
Range("A1").End(xlDown).Offset(1, 0)to dynamically find the next empty row in a list, a critical technique for accounting automation.
In our next lesson, we will expand on the .Value property. You'll learn how to read a cell's value into a VBA variable, perform calculations on it, and then write the result back to a different cell. This will unlock the ability to perform complex data processing and analysis within your macros.