Welcome back. In our previous lesson, you successfully built a dynamic ratio analysis sheet, transforming your financial statements from static reports into powerful analytical tools. You have now constructed, validated, and analyzed a complete financial model. The final step in this module is to prepare this model for distribution, ensuring its integrity and guiding users on how to interact with it.
Today, we will focus on a crucial skill for any accountant preparing reports: protecting worksheets and locking specific cells. This process prevents accidental edits to critical formulas and data, preserving the accuracy of your work when it's shared with colleagues or management. You'll learn how to lock down your calculation-heavy sheets while leaving designated input cells open, creating a robust and user-friendly report.
The Two-Step Logic of Protection
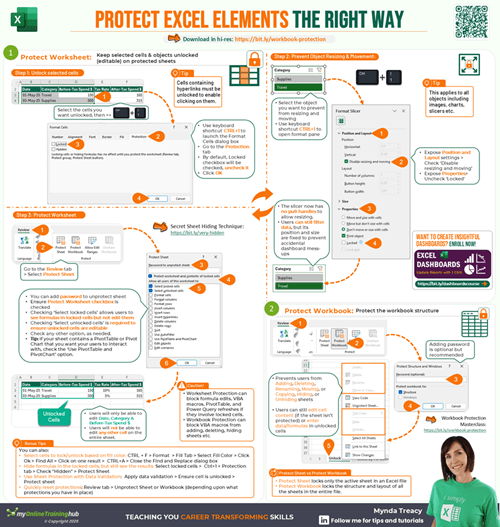
A common point of confusion in Excel is the difference between a cell's "Locked" property and actual worksheet protection. Think of it this way: every cell has a lock on it by default, but the door to the entire worksheet is wide open. Activating "Protect Sheet" is the act of closing and locking that main door. Only then do the individual cell locks become meaningful.
The article from Excel University explains this fundamental concept clearly.
Allow Specific Section to be Edited - Excel University
This article from Excel University provides a step-by-step tutorial on worksheet protection. We'll start with the core concept.
Please read the section Exercise 1. Pay close attention to the explanation of why you can edit cells even though the "Locked" checkbox is checked by default. This distinction is the key to understanding how protection works.
So, the process is always a two-step sequence:
- Define which cells should be editable: You do this by "unlocking" them in their cell properties.
- Activate protection for the worksheet: This engages the locks on all the cells you left "locked".
Implementing Protection in Your Financial Model
Let's apply this to your workbook. You have different types of sheets:
- Final Reports (Income Statement, Balance Sheet, Ratio Analysis): These sheets contain only formulas and text. No user input should be allowed. Therefore, you can simply protect these sheets directly, as all cells are locked by default.
- Input Sheets (e.g., a data entry or assumptions page): These sheets require users to enter data in specific cells, while formulas and headers must remain protected.
The following video from Leila Gharani provides an excellent, practical demonstration of how to protect a sheet while leaving specific input cells open for editing.
How to Lock Cells 🔒in Excel to Protect your Formulas & Only Allow Input where Needed
This video provides a very clear, hands-on guide to locking and unlocking cells for creating templates.
First, watch the section from this timestamp to understand where to find the "Locked" property in the Format Cells dialog (Ctrl+1). Next, see how to unlock specific cells so they remain editable after the sheet is protected. Watch from this segment. Finally, observe a powerful technique for efficiency. The presenter uses Find & Select to select all input cells based on their fill color and unlock them in one step. This is a fantastic trick for automating the setup of your templates. Please watch from this part.
Based on this, you would apply the following strategy to your financial model:
- On your "Income Statement," "Balance Sheet," and "Ratio Analysis" sheets, go to Review > Protect Sheet. You can add an optional password. This will lock down all formulas and text.
- On any sheet that requires user input, first use the
Ctrl+F(Find) >Formatmethod to select all your designated input cells (e.g., all cells with a light blue fill). - With these cells selected, press
Ctrl+1, go to theProtectiontab, and uncheck the "Locked" box. - Finally, go to Review > Protect Sheet to lock the rest of the sheet. Now, users can only edit the cells you specifically unlocked.

Fine-Tuning User Permissions
When you protect a sheet, Excel gives you a list of actions that users are allowed to perform. By default, they can only select locked and unlocked cells. However, you might want them to be able to sort data or use filters.
The following resource provides a detailed breakdown of each permission.
How to Lock Cells in Excel: A Step-by-Step Guide | DataCamp
This section from a DataCamp tutorial contains a very helpful table that explains each option in the 'Protect Sheet' dialog box.
Please review the table under the heading What Sheet Protection Settings Can Control. You don't need to memorize every option, but familiarize yourself with what's possible. For example, allowing users to Use AutoFilter can be very useful on a data table.
Securing the Workbook Structure
Protecting a worksheet prevents changes within that sheet. But what about the workbook itself? A user could still right-click a sheet tab and unhide your hidden "workings" or "data" sheets, potentially causing confusion or breaking formulas.
To prevent this, you need to apply Workbook Protection. This locks the structure of the workbook, preventing users from adding, deleting, renaming, hiding, or unhiding worksheets.
This next video clearly demonstrates this final, crucial step.
Protect Excel Files - Keep Your Reports Safe
This tutorial from MyOnlineTrainingHub covers the final steps of locking down a professional report.
First, watch the segment on protecting the workbook structure from this timestamp. Notice how this action grays out the "Unhide" option. Next, pay close attention to the important clarification that Excel protection is not a security feature. It's designed to prevent accidental changes, not to secure confidential data. Watch from this part.
After hiding your calculation sheets, applying Review > Protect Workbook is the final touch that makes your financial model robust and ready for distribution.
Conclusion
In this lesson, you have learned the final skill required to produce a professional-grade financial report in Excel. By layering cell, worksheet, and workbook protection, you can create models that are not only accurate and dynamic but also secure from accidental modification.
Key Takeaways:
- Protecting a worksheet is a two-step process: first, unlock the cells you want to be editable, then enable worksheet protection.
- By default, all cells in Excel are set to "Locked," but this property is only activated when you protect the sheet.
- Worksheet Protection controls what users can do inside a sheet (e.g., edit cells, format rows).
- Workbook Protection controls the workbook's structure (e.g., preventing sheets from being unhidden or deleted).
- Excel's protection features are for maintaining report integrity, not for securing sensitive data from determined users.
You have now completed the entire module on building dynamic financial statements. You've taken raw data and transformed it into a fully functional, automated, and protected reporting package.
In our next module, we will shift our focus from building reports to using them for advanced analysis and decision-making. We will begin with Goal Seek, a powerful tool that allows you to work backward to determine the input needed to achieve a specific financial target.