Introduction
In the last lesson, you built a solid foundation for ensuring your code's correctness by writing tests for both expected outcomes and failure conditions using pytest.raises and tmp_path. A robust test suite is the cornerstone of a reliable application. However, code that is correct but inconsistent or hard to read can still be a significant source of bugs and a drain on team productivity.
This lesson addresses the next layer of professional software development: automated code quality enforcement. We will shift our focus from runtime correctness to static analysis—catching style inconsistencies, potential bugs, and code "smells" before the code is even run. Your background in a statically-typed language like Java, where IDEs often enforce strict formatting rules, will provide a good reference point for understanding the value of these tools in the more flexible Python ecosystem.
This lesson delivers on the learning outcome: Automate code formatting and linting using black, ruff, and isort, managed via pre-commit hooks. You will learn how to set up a "safety net" that ensures every line of code committed to your project is clean, consistent, and free of common errors, all without manual effort.
Linters vs. Formatters: Two Sides of Code Quality
In the Python world, we distinguish between two primary types of static analysis tools:
- Formatters: These tools are concerned with style. They parse your code and reprint it according to a strict set of rules, enforcing conventions like line length, quote style, and whitespace. Their goal is to make code look consistent everywhere, eliminating debates over style. The canonical example is
black. - Linters: These tools are concerned with correctness and quality. They analyze your code for programmatic and stylistic problems, flagging potential bugs (like using a variable that doesn't exist), unused code, and deviations from best practices.
A third category, import sorters like isort, specializes in automatically organizing your import statements into clean, standardized groups.
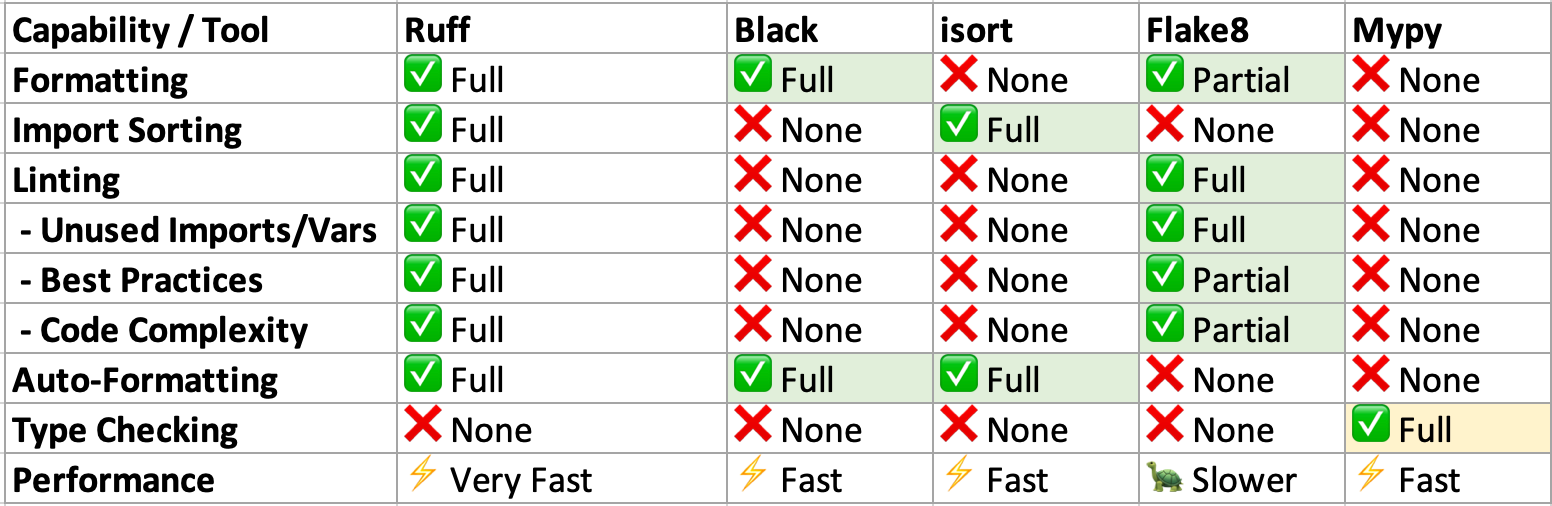
Historically, a Python developer would configure and run these three tools (black, isort, a linter like flake8) separately. This created configuration overhead and could be slow.
The Modern Approach: Ruff, the All-in-One Tool
The modern Python ecosystem has embraced ruff, an extremely fast, Rust-based tool designed to replace the classic trio. It integrates a black-compatible formatter, an isort-compatible import sorter, and an extremely powerful linter into a single, cohesive package.
For a developer moving away from Java-isms, ruff is the perfect tool to adopt. It provides immediate, actionable feedback to help you write more idiomatic Python.
To get a comprehensive overview of what ruff is and what it can do, let's start with a detailed video guide.
Python Tutorial: Ruff - A Fast Linter & Formatter to Replace Multiple Tools and Improve Code Quality
The video 'Python Tutorial: Ruff' by Corey Schafer is an excellent, in-depth guide. It explains why Ruff is so transformative and how it can replace multiple older tools.
Watch the following two segments: Introduction (00:00 - 01:20): Pay close attention to the explanation of what a linter and formatter are and which tools Ruff replaces. Formatting (10:50 - 11:40): This short segment demonstrates the ruff format command, which functions as a black-compatible code formatter.
Automating Quality with pre-commit Hooks
Having powerful tools like ruff is only half the battle. Remembering to run them before every commit is tedious and error-prone. This is where pre-commit comes in.
pre-commit is a framework for managing and maintaining multi-language Git hooks. A Git hook is a script that Git executes before or after events such as commit, push, and receive. pre-commit uses the pre-commit hook to run checks on your code before you're allowed to finalize a commit.
The easy way to keep your repos tidy.
To understand the mechanics and value of pre-commit, this video from the mCoding channel provides a concise and clear explanation.
Watch from the beginning to 03:47. Focus on these key points: The problem pre-commit solves (catching mistakes before they enter the repository). How Git hooks work conceptually. The purpose of the .pre-commit-config.yaml file. The standard workflow: a failing hook modifies files, aborts the commit, and requires you to re-stage and re-commit.
The workflow described in the video is fundamental:
- You run
git commit. pre-committriggers the configured tools (likeruff).rufffinds issues and automatically fixes them (reformatting code, removing unused imports).- Because files were modified,
pre-commitaborts the commit. - You review the automated changes,
git addthe modified files, and rungit commitagain. - This time, the hooks run, find no issues, and the commit succeeds.
This ensures that only clean, quality-checked code ever makes it into your commit history.
Setting Up Your Automated Workflow
Now, let's put theory into practice. We'll set up a project with ruff and pre-commit.
Step 1: Installation
First, install ruff and pre-commit into your project's virtual environment.
pip install ruff pre-commit
Step 2: Configure ruff in pyproject.toml
Modern Python projects use a pyproject.toml file for configuration. Create this file at the root of your project. We'll add a [tool.ruff] section to tell ruff how we want it to behave.
This configuration effectively replaces separate configs for black, isort, and flake8.
# pyproject.toml

[tool.ruff]


# Set a line length, just like you would for Black.
line-length = 88


# Set the minimum Python version to target.
target-version = "py311"

[tool.ruff.lint]


# Enable the same rule sets as Flake8 (F), pycodestyle (E, W), and isort (I).
select = ["E", "W", "F", "I"]


# You can ignore specific rules if needed.
# E501 is "line too long", which is handled by the formatter.
ignore = ["E501"]

[tool.ruff.lint.isort]


# Configure how isort groups your imports.
known-first-party = ["my_project_name"] # Replace with your project's package name

[tool.ruff.format]


# Use double quotes for strings.
quote-style = "double"


# Auto-detect line endings.
line-ending = "auto"
This single configuration block provides rules for linting, formatting, and import sorting. For a complete guide to all the available rules and options, you can refer to the official ruff documentation.
Step 3: Configure pre-commit
Next, create a .pre-commit-config.yaml file, also at the project root. This file tells pre-commit which tools to run.
Ruff Tutorial: A Complete Guide for Python Developers
The following article gives clear examples of how to add various tools to your pre-commit configuration. We will focus on the modern approach using ruff.
Review the YAML snippet under the heading 'Pre-commit Hooks'. This shows the standard way to integrate ruff for both linting and formatting.
Your .pre-commit-config.yaml should look like this. I've added a helpful argument to the linter hook.
# .pre-commit-config.yaml

repos:
  - repo: https://github.com/astral-sh/ruff-pre-commit


    # Find the latest version tag on the ruff-pre-commit GitHub repository
    rev: v0.4.1
    hooks:


      # Run the linter and automatically fix issues.
      - id: ruff
        args: [--fix, --exit-non-zero-on-fix]


      # Run the formatter.
      - id: ruff-format
A note on args:
--fix: Instructsruffto automatically fix any fixable linting errors (like unused imports).--exit-non-zero-on-fix: Ensures that ifrufffixes a file, it still reports a failure, which is what causes the commit to abort as intended.
Step 4: Install the Git Hook
Finally, activate pre-commit for your local repository by running:
pre-commit install
This command installs a small script into your repository's .git/hooks/pre-commit file. Now, every time you run git commit, this script will execute and run the tools defined in your config file.
Exercise: Witness the Automation
It's time to see this system in action.
-
Setup:
- Ensure you have a Git repository initialized (
git init). - Create and activate a virtual environment.
- Run
pip install ruff pre-commit. - Create the
pyproject.tomland.pre-commit-config.yamlfiles with the content provided above. - Run
pre-commit install.
- Ensure you have a Git repository initialized (
-
Create a "Problem" File:
Create a Python file namedmessy_code.pywith the following content. It has formatting issues, an unused import, and poorly sorted imports.# messy_code.py import os from pathlib import Path import sys def my_function( a, b): unused_variable = "I am not used" print( "this is some badly formatted code" ) return a+b x=my_function(1,2) -
Attempt to Commit:
- Stage the file:
git add messy_code.py pyproject.toml .pre-commit-config.yaml - Attempt to commit:
git commit -m "Add messy code"
- Stage the file:
-
Observe the Result:
- You should see output from
ruffindicating it is running. - The commit will fail. The output will show that files were modified.
- Open
messy_code.py. You will see thatruffhas completely cleaned it up: imports are sorted, the unused variable is gone, and the code is beautifully formatted.
Your
messy_code.pyshould now look like this:# messy_code.py def my_function(a, b): print("this is some badly formatted code") return a + b x = my_function(1, 2) - You should see output from
-
Finalize the Commit:
- The changes have been made, but they are not yet staged for the next commit.
- Stage the cleaned file:
git add messy_code.py - Commit again:
git commit -m "Add messy code" - This time, the hooks will run, find nothing to fix, and the commit will succeed.
You have successfully implemented a professional-grade, automated code quality gate.
Conclusion
In this lesson, you have moved beyond simply writing correct code to enforcing consistent, high-quality code across an entire project automatically. This is a critical step in becoming a professional Python developer, as it reduces cognitive load, prevents common errors, and streamlines collaboration.
Key Takeaways:
- Linters vs. Formatters: Linters check for bugs and bad practices, while formatters enforce a consistent visual style.
Ruffas an All-in-One Solution:Ruffis a modern, high-performance tool that consolidates the functionality ofblack,isort, and traditional linters likeflake8into a single, easy-to-configure package.pre-commitfor Automation: Thepre-commitframework automates these quality checks by running them as Git hooks before each commit, ensuring no subpar code enters your version history.- The Standard Workflow: The automated workflow is to commit, let the tools fail and fix the code, review the changes, re-stage, and commit again.
What's Next:
While pre-commit hooks are an essential line of defense on your local machine, they can be bypassed (git commit --no-verify). The ultimate safety net is to run these checks on a neutral, shared server. In the next lesson, we will elevate our workflow by learning how to configure a GitHub Actions workflow to automatically run tests, linting, and type checking on pull requests. This creates a formal, server-side quality gate for your entire team.