Hello! Welcome to the second module of our course.
In the first module, we built a comprehensive theoretical foundation for how diffusion models are trained. We explored the forward and reverse processes, the connection to score-matching, and analyzed various loss function formulations. You now understand that training boils down to teaching a neural network to predict a target—like noise or data —from a noised input.
With training covered, we now shift our focus to the creative part: inference, or sampling. This lesson addresses the learning outcome: implement ancestral sampling with different noise schedules. We will dissect the standard DDPM sampling algorithm, often called ancestral sampling, which generates images by reversing the noising process step-by-step. We will then examine the critical role of the noise schedule in this process and see how different schedules can be implemented to influence the final result.
1. The Reverse Process: From Chaos to Order
The core idea of diffusion-based generation is to start with an image of pure, unstructured noise and progressively denoise it over hundreds or thousands of steps, guided by the trained U-Net model. This iterative reversal is what we call ancestral sampling.
To start, let's get a high-level intuition for this process.
Give me 50 min, I will make Diffusion Model click forever
The video 'Give me 50 min, I will make Diffusion Model click forever' by Zachary Huang provides an excellent, intuitive breakdown of the sampling process. It frames the core sampling formula as a three-step recipe: denoise, correct the scale, and inject chaos.
Please watch the section on the DDPM sampling step (34:15 - 39:18). Pay close attention to the three conceptual steps he identifies. This will give you a strong mental model before we dive into the mathematics and code.
As the video explained, each step in the reverse process, from a noisy image to a slightly cleaner image , involves three key actions:
- Denoise: Use the U-Net to predict the noise and subtract a scaled version of it from the current image .
- Correct Scale: Rescale the resulting image to account for the shrinking effect that occurred during the forward pass.
- Inject Chaos: Add a small amount of new, random noise back into the image. This is the "ancestral" part of the name—each step has a stochastic component, creating a unique generation path.
The complete algorithm, as laid out in the original DDPM paper, is shown on the right side of the image below.
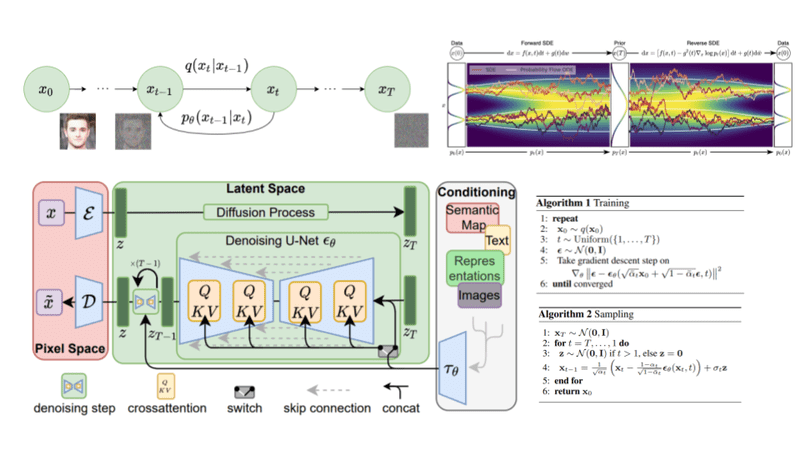
The formula for one step of this process (line 4 in Algorithm 2) is:
where is new Gaussian noise, and is the standard deviation of the noise added at this step. This equation is a direct implementation of the three intuitive steps we just discussed.
2. Implementing the Ancestral Sampling Loop
Now, let's translate this algorithm into code. Since you have a solid ML engineering background, we can go straight to a clean, well-annotated implementation.
The core of the logic resides in two functions:
- A
p_sample_loopfunction that initializes the process with random noise and iterates backward in time. - A
p_samplefunction that executes the formula for a single denoising step.
The Hugging Face blog post 'The Annotated Diffusion Model' provides a very clear and concise PyTorch implementation of the sampling loop. We'll use this as our primary reference.
Please read the section 'Sampling'. Study the p_sample, p_sample_loop, and sample functions. Notice how the p_sample function directly implements the mathematical formula we saw above, and how p_sample_loop orchestrates the process by calling p_sample repeatedly in a reversed loop.
Let's break down the key components from the reading:
-
p_sample_loop(model, shape):- It starts by creating a tensor of pure Gaussian noise,
img = torch.randn(shape, ...). This is our . - It then iterates from
timesteps-1down to0. This is the reverse process. - In each iteration, it calls
p_sampleto get the slightly denoised imageimgfor the next step.
- It starts by creating a tensor of pure Gaussian noise,
-
p_sample(model, x, t, t_index):- This function contains the core logic. It first extracts the necessary pre-calculated schedule values (, , etc.) for the current timestep
t. - It then computes the
model_meanusing the formula, which corresponds to the first term in the equation: . - If
t_index > 0, it samples new noisenoise = torch.randn_like(x)and adds it, scaled by theposterior_variance_t. This is the "inject chaos" step. - If
t_index == 0(the final step), no new noise is added. We just return the mean.
- This function contains the core logic. It first extracts the necessary pre-calculated schedule values (, , etc.) for the current timestep
For a more detailed, line-by-line walkthrough of a similar implementation, the following video is an excellent resource.
Ultimate Guide to Diffusion Models | ML Coding Series | Denoising Diffusion Probabilistic Models
The video 'Ultimate Guide to Diffusion Models' by Aleksa Gordić provides a debugging session-style walkthrough of the sampling loop. This will complement the static code from the article and align with your preference for practical implementation details.
Watch the segment from 01:21:23 to 01:26:55. The narrator steps through the p_sample_loop function, explaining how the initial noise is generated and how the loop progresses backward in time, calling the p_sample function at each step.
With these resources, you now have a complete picture of how ancestral sampling is implemented, from the high-level algorithm to the specific lines of PyTorch code.
3. The Noise Schedule: Architect of the Diffusion Process
We've mentioned the pre-calculated schedule values (, , etc.) several times. These are all derived from the noise schedule, . This schedule is a fundamental hyperparameter that defines the entire diffusion process. It dictates how much noise is added at each forward step, which in turn determines the trajectory the model must learn to reverse.
The original DDPM paper used a simple linear schedule, where increases linearly from a small value to a larger one. However, subsequent research found that other schedules can lead to better results.
Let's return to 'The Annotated Diffusion Model' to see how different schedules are defined in code.
Read the first part of the post, under the heading 'Defining the forward diffusion process'. You'll find Python functions for four different schedules: cosine_beta_schedule, linear_beta_schedule, quadratic_beta_schedule, and sigmoid_beta_schedule. Observe how they all produce a 1D tensor of betas, which is then used to compute all other necessary constants (alphas, alphas_cumprod, etc.).
As you can see, swapping out a noise schedule is as simple as calling a different function to generate the betas tensor. Everything else in the sampling code remains the same.
But what is the practical difference between these schedules? A great way to visualize this is by plotting the Signal-to-Noise Ratio (SNR) over time. The SNR at timestep is defined as . A high SNR means the signal (original image) dominates the noise, while a low SNR means the image is mostly noise.

From the plot, we can draw some key insights:
- Linear Schedule (Blue): The SNR drops relatively quickly and steadily. This means a significant amount of information is lost early in the forward process.
- Cosine Schedule (Orange): The SNR stays high for much longer and then drops more rapidly towards the end. This preserves more of the image structure during the initial forward steps. It has been empirically shown to improve sample quality. The intuition is that the model can spend more of its capacity on removing the last, most difficult bits of noise, rather than having to reconstruct coarse features that were destroyed too early.
The choice of schedule directly impacts the difficulty of the denoising task at each timestep t. A better-tuned schedule can make the learning problem easier for the U-Net and ultimately lead to higher-fidelity generated images.
Test your understanding!
Imagine you are designing a diffusion model for a specific task where preserving fine, high-frequency textures is more important than global structure. Based on the SNR plot, which schedule (Linear or Cosine) would you hypothesize might be more beneficial, and why?
Show answer
The Cosine schedule would be a better hypothesis. Fine textures are high-frequency information, which are typically the first things destroyed by noise. The Cosine schedule's slower initial decay of SNR means that these delicate features are preserved for more timesteps in the forward process. Consequently, during the reverse process, the model has a "clearer" signal to work with for a longer period, potentially allowing it to reconstruct these fine details more accurately. The linear schedule, by contrast, degrades the signal more aggressively early on, forcing the model to hallucinate these textures from a much noisier state.
Conclusion
In this lesson, we demystified the process of generating images with a diffusion model. We moved from the theory of training to the practice of sampling.
Key Takeaways:
- Ancestral sampling is the iterative, step-by-step process of reversing the forward diffusion process, starting from pure noise and ending with a clean image.
- Each sampling step involves using the trained U-Net to predict the noise, using that prediction to estimate a cleaner image, and injecting a small amount of new randomness to ensure sample diversity.
- The noise schedule () is a critical set of hyperparameters that defines the noise level at each step. Its design significantly impacts model performance.
- Schedules like the cosine schedule often outperform the original linear schedule by preserving more signal throughout the forward process, leading to improved sample quality.
- Implementing different schedules is straightforward, typically involving swapping out a single function that generates the initial
betasarray.
Next Lesson Preview:
While ancestral sampling is effective, it is also slow, often requiring 1000 or more sequential model evaluations to generate a single image. This is a major practical limitation. In our next lesson, we will tackle this problem head-on by exploring a more advanced sampling method: Denoising Diffusion Implicit Models (DDIM). You will learn how DDIM generalizes the DDPM process and, most importantly, allows us to generate high-quality images in far fewer steps.