Hello! Welcome back to our course on diffusion models.
In the previous lesson, you mastered the crucial first step of the text-to-3D pipeline: rendering a 2D image from a NeRF given a random camera pose. You now have a differentiable function, g(θ), that produces an image x.
Now, we move to the heart of the matter. How do we use a 2D text-to-image model to "criticize" that rendered image and provide a useful gradient to update the NeRF's parameters θ? This is accomplished with Score Distillation Sampling (SDS).
This lesson focuses on implementing the SDS loss function. You will learn how to take the rendered image, pass it through a pre-trained diffusion model, and calculate a specialized gradient that guides the NeRF towards matching a text prompt—all without backpropagating through the expensive diffusion U-Net.
By the end of this lesson, you will be able to:
- Explain the intuition behind the SDS loss and why it's more efficient than a naive diffusion loss.
- Implement the step-by-step calculation of the SDS loss for a single rendered view.
- Integrate practical considerations like Classifier-Free Guidance (CFG) into the SDS calculation.
1. The Core Idea: Why Not Just Use a Standard Diffusion Loss?
Let's say we have our rendered image x from the NeRF and a text prompt y. A natural first thought might be to use a standard diffusion model training objective:
- Add noise to
xto get a noisy imagex_t. - Ask the diffusion model
ε_θto predict the noiseε_pred = ε_θ(x_t, y, t). - Calculate the mean squared error:
L = ||ε_pred - ε||². - Backpropagate this loss to update the NeRF parameters
θ.
The problem lies in step 4. To compute the gradient ∂L/∂θ, the chain rule requires us to compute ∂L/∂x, which means backpropagating through the entire diffusion model's U-Net (ε_θ). As you know from your ML engineering background, this is computationally prohibitive and can be numerically unstable, especially since the U-Net wasn't trained to have well-behaved gradients with respect to its input image.
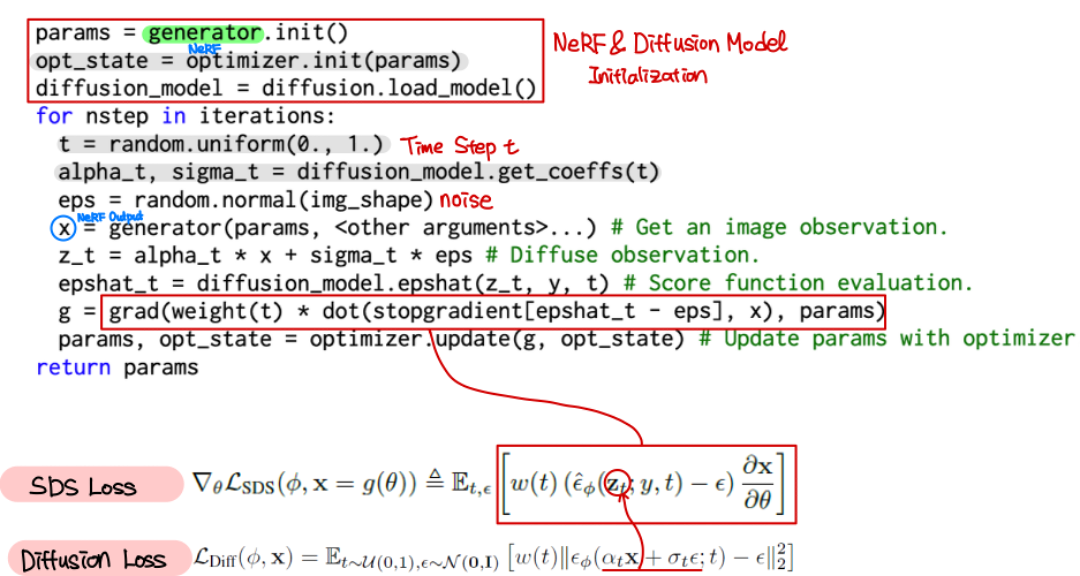
Score Distillation Sampling provides an elegant and efficient solution. It computes a gradient that pushes x towards a region of higher probability according to the diffusion model, but does so without requiring gradients to flow back through the U-Net.
2. The Score Distillation Sampling (SDS) Gradient
The goal of SDS is to find a gradient ∇_θ L that we can use with an optimizer to update our NeRF's parameters θ. The derivation in the original DreamFusion paper shows that this gradient can be formulated as:
Let's break down this equation:
x = g(θ)is our rendered image from the NeRF.x_t = α_t x + σ_t εis the noisy image at timestept.ε_φ(x_t; y, t)is the noise prediction from our pre-trained 2D diffusion modelε_φ.(ε_φ - ε)is the crucial distillation signal. It's the difference between the predicted noise and the actual noise. This vector tells us how to modifyx_tto make it look more like a sample the diffusion model would expect.w(t)is a weighting function that depends on the timestep. It modulates the strength of the gradient. The DreamFusion paper found that a simple uniform weighting (w(t)=1) works well.∂x/∂θis the Jacobian of our NeRF renderer. It translates the "image-space" update direction into a gradient for the NeRF's parametersθ. The beauty of modern ML frameworks like PyTorch is thatautogradhandles this for us automatically.
The key insight is how this is implemented. We treat the noise prediction ε_φ as a fixed constant for the backward pass. We compute it in a forward pass, and then detach() it from the computation graph before using it to define our gradient.
3. Implementing the SDS Loss Function
Now, let's turn theory into practice. Your task is to implement the loss calculation. We will follow the structure of a practical programming assignment, which will prepare you for real-world implementation.
KAIST-Visual-AI-Group/Diffusion-Assignment4-Distillation
The 'Diffusion-Assignment4-Distillation' GitHub repository from the KAIST Visual AI Group provides a clean, practical skeleton for implementing SDS. We will focus on the task of implementing the SDS loss function itself.
First, familiarize yourself with the code structure by reading the 'Code Structure' section. Notice the guidance/sd.py file, which is where our work will be. Then, read the 'Task 1: Score Distillation Sampling (SDS)' section. Pay close attention to the TODO instructions and the provided equation for the SDS gradient ∇_{x⁰} L_{sds}. You'll be implementing the get_sds_loss() function.
As described in the resource, the get_sds_loss() function in guidance/sd.py takes the rendered image (which they call latent_image because it's often done in the VAE's latent space, but for now we can think of it as our x), and the text embedding c. Here is the step-by-step process to implement it:
-
Sample Timestep
t: The theory integrates over allt, but in practice, we sample a singletfor each training step. The DreamFusion paper suggests sampling uniformly from a range that avoids the extremes, liket ~ U(0.02, 0.98), to prevent numerical instability.# t is typically an integer from 0 to T-1 t = torch.randint(int(T * 0.02), int(T * 0.98), (batch_size,), device=device) -
Add Noise (Forward Process): Use the
tand a random noise sampleεto create the noisy imagex_t. You'll need the noise schedule'salphas_cumprodto get the correctα_tandσ_tfor the forward process formula you know well.# Sample random noise noise = torch.randn_like(latents) # Add noise to the latents to get x_t noisy_latents = scheduler.add_noise(latents, noise, t) -
Predict Noise with CFG: This is a critical step. To get a strong signal, we use Classifier-Free Guidance (CFG).
- Run the U-Net twice: once with the text prompt embedding
cand once with a null-text embeddingc_null. - Combine the predictions:
ε_pred = ε_pred_uncond + guidance_scale * (ε_pred_text - ε_pred_uncond). - The DreamFusion paper notes that a very high
guidance_scale(e.g., 100) is often necessary for SDS to prevent overly smooth or averaged-out results.
# Predict the noise for both conditional and unconditional offerings noise_pred_text = unet(noisy_latents, t, encoder_hidden_states=text_embeddings).sample noise_pred_uncond = unet(noisy_latents, t, encoder_hidden_states=null_embeddings).sample # Perform CFG noise_pred = noise_pred_uncond + guidance_scale * (noise_pred_text - noise_pred_uncond) - Run the U-Net twice: once with the text prompt embedding
-
Calculate the SDS Gradient: As per the formula, the gradient direction is simply the difference between the predicted noise and the actual noise. We also apply the
w(t)weighting, which for simplicity is often set to 1 or tied to the noise schedule.# Can be w(t) = 1 or a function of the scheduler's sigmas w_t = 1.0 grad = w_t * (noise_pred - noise) -
Define the Loss for Backpropagation: Here's the implementation trick. The KAIST assignment asks for a scalar
lossto be returned, which is standard in most training loops. We need to define a lossLsuch that its gradient with respect to our inputx(latents) is thegradwe just calculated.A common and effective way to achieve this is to use the
backward()method with agradientargument. You can define a dummy loss (like the sum of the latents) and then specify the gradient manually.# The gradient is what we care about. # We detach it to prevent backprop through the U-Net. target_grad = grad.detach() # To use this gradient in a standard loss.backward() loop, # you can use a custom backward hook or a surrogate loss. # The most direct way is to call backward with the gradient directly. # In a typical training loop, this looks like: latents.backward(gradient=target_grad, retain_graph=True)Since the assignment framework expects a scalar loss value to be returned, a common pattern is to define a "surrogate loss" whose gradient equals our desired gradient. A simple Mean Squared Error loss can achieve this:
# latents is x, our rendered image
# grad is our computed SDS gradient
# We want d(loss)/d(latents) = grad
# Define a target = latents - grad. When we minimize mse(latents, target),
# the gradient w.r.t latents is latents - target = grad.
target = (latents - grad).detach()
loss = 0.5 * F.mse_loss(latents, target, reduction="sum") / latents.shape[0] # batch-wise mean
return loss
This
mse_lossformulation is a stable and effective way to implement the SDS gradient within a standardloss.backward()framework.
Test your understanding!
A fellow engineer suggests a "simplification": instead of calculating grad = w_t * (noise_pred - noise), they propose to set grad = w_t * noise_pred. Why would this lead to poor results or failure to converge?
Show answer
The term noise_pred is the U-Net's estimation of the noise noise that was added to the image. The difference, noise_pred - noise, represents the error in this prediction. This error vector is what points from the noisy sample x_t towards a "cleaner" or more probable version.
If we were to use only noise_pred as the gradient, we would be pushing our image x in a direction that is not correlated with improving its quality. It's like trying to correct a trajectory by only looking at your predicted destination, without comparing it to your actual destination. The subtraction of the actual noise noise is what provides the corrective, "distilled" signal from the model.
Conclusion
In this lesson, you've unpacked the core mechanism of Score Distillation Sampling. You now understand not just the formula, but the practical implementation steps and the critical reasons behind its design.
Key Takeaways:
- SDS avoids the computationally expensive backpropagation through a pre-trained diffusion model's U-Net.
- The core of SDS is the distillation signal,
ε_pred - ε, which is the difference between the predicted noise and the actual added noise. - In practice, the noise prediction
ε_predis calculated using Classifier-Free Guidance (CFG), often with a very high guidance scale, to generate high-quality, prompt-aligned results. - The final SDS gradient is applied to the rendered image
x, and autograd handles the backpropagation to the NeRF parametersθ. - A surrogate loss function (like a specially constructed
mse_loss) is often used to integrate the SDS gradient calculation into standard training loops.
Next Lesson Preview:
You have now implemented the two key components of the text-to-3D pipeline: the differentiable renderer (g(θ)) and the SDS loss function. In the next lesson, you will put it all together. We will construct the full training loop that repeatedly:
- Renders an image from a random viewpoint.
- Calculates the SDS loss against a text prompt.
- Updates the NeRF's weights.
You will see how these simple components, when combined in a loop, can magically sculpt a 3D object out of a randomly initialized NeRF.