Hello! Welcome back to your journey into the world of 3D diffusion models.
In our last lesson, you implemented the Score Distillation Sampling (SDS) loss, the critical "critic" that guides our 3D model. Before that, you mastered how to render a 2D image from a Neural Radiance Field (NeRF). We now have the two essential building blocks:
- A differentiable generator
x = g(θ)that creates an image from a 3D representation. - An efficient loss function
L_SDSthat provides a gradient to align that image with a text prompty.
Today, we assemble these components into a complete, end-to-end training loop. You will learn how to orchestrate these parts to optimize a randomly initialized NeRF, sculpting it into a coherent 3D object that matches a text description. This process is the core of groundbreaking models like Google's DreamFusion.
By the end of this lesson, you will be able to combine these components to run a full text-to-3D training process, taking you from a simple text prompt to a navigable 3D asset.
1. The DreamFusion Training Algorithm: A Bird's-Eye View
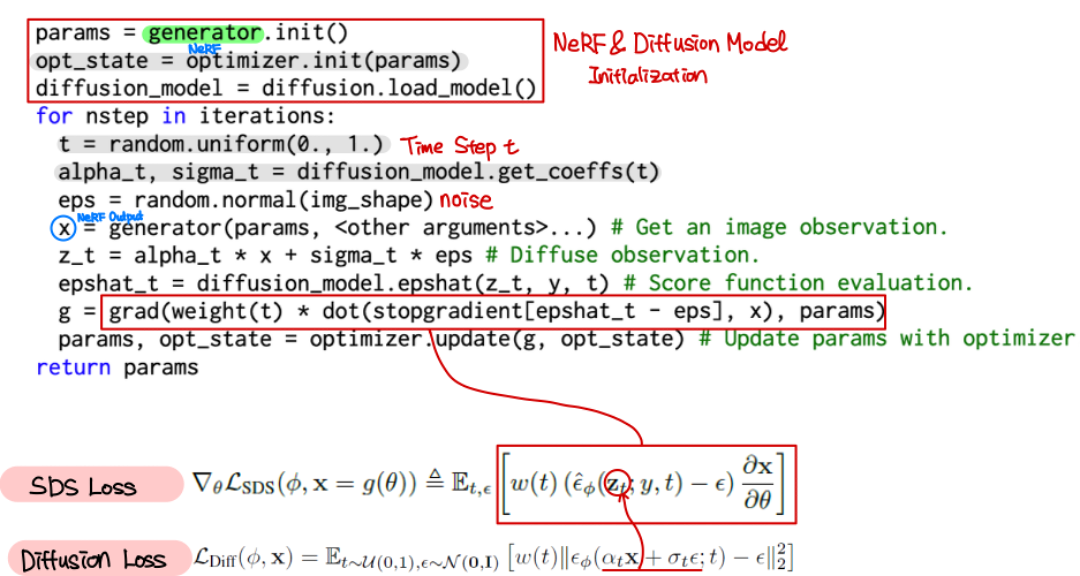
The entire process is an iterative optimization. We start with a NeRF whose weights θ are random noise, and we gradually refine them. The DreamFusion paper outlines a simple yet powerful four-step loop that we'll be implementing.
DREAMFUSION: TEXT-TO-3D USING 2D DIFFUSION
To understand the conceptual framework of our training loop, let's look at the original DreamFusion paper. This section provides a clear, high-level overview of the algorithm.
Please read the section titled 'THE DREAMFUSION ALGORITHM'. Focus on the four enumerated steps that describe a single iteration of the optimization process. This will form the blueprint for our implementation.
As you read, you'll see the core loop is elegantly straightforward: for a set number of iterations, we repeatedly:
- Sample a Random Scene: Choose a random camera angle and lighting for the scene.
- Render an Image: Use the current NeRF
g(θ)to render a 2D viewxbased on the sampled camera. - Compute the SDS Loss: Calculate the loss (and its gradient) by comparing the rendered image
xto the text promptyusing the SDS mechanism you learned previously. - Update the NeRF: Apply the gradient to the NeRF's parameters
θusing an optimizer, nudging the 3D model to better match the prompt.
Let's break down each of these steps from an implementation perspective.
2. Anatomy of the Text-to-3D Training Loop
We will now detail the practical steps required to build this loop. We'll follow the algorithm's structure and incorporate key implementation details from both the original paper and the popular stable-dreamfusion open-source project.
Step 0: Initialization
Before the loop begins, we need to set up our environment:
- NeRF Model: Instantiate your 3D representation. In modern implementations like
stable-dreamfusion, this is often a hash-grid-based NeRF (like the one from NVIDIA's Instant-NGP) for efficiency. The weightsθare initialized randomly. - Optimizer: Initialize an optimizer for the NeRF parameters
θ. While Adam is common, high-performance optimizers like Adan (used bystable-dreamfusion) or Distributed Shampoo (used in the original paper) are often chosen. - Diffusion Prior: Load the pre-trained 2D text-to-image diffusion model. This is typically a model like Stable Diffusion, loaded from a library such as Hugging Face's
diffusers. This model's weights are frozen; we only use it for inference.
Step 1: Random Camera and Light Sampling
At each iteration, we need to view our NeRF from a different angle. This is crucial for building a coherent 3D shape rather than a flat image that only looks good from one direction.
The DreamFusion paper specifies a robust sampling strategy:
- Camera Position: Sample a camera position in spherical coordinates.
- Azimuth
θ_cam: Uniformly sampled from[0°, 360°]. This covers all sides of the object. - Elevation
φ_cam: Sampled from a range like[-10°, 90°]. This allows views from slightly below, at eye level, and from directly above. - Distance: Sampled from a range around the object's bounding sphere, ensuring we get both close-up and wider views.
- Azimuth
- Light Position: Randomly sample a point light source, often positioned near the camera to create varied shading conditions.
This randomness ensures that the NeRF is optimized to look plausible from all angles and under different lighting, forcing it to learn a true 3D geometry.
Step 2: Differentiable Rendering
With a camera pose and light defined, you perform the step from our earlier lesson: render an image x = g(θ).
The stable-dreamfusion implementation renders at a low resolution (e.g., 64x64 or 128x128) during training to keep the process fast. The original paper also mentions a clever trick: sometimes rendering the full shaded color, and other times rendering just the textureless shape or the albedo. This helps disentangle geometry from appearance during learning.
Step 3: Diffusion Loss with View-Dependent Conditioning
This step contains the "magic" of SDS, but with a crucial twist for 3D. A text prompt like "a high-quality photo of a squirrel" usually implies a frontal view. If the camera is looking at the object from behind, the prompt is no longer accurate.
To solve this, we append view-dependent modifiers to the text prompt based on the sampled camera angle:
- If
φ_camis high (e.g., > 60°), append"overhead view". - Based on the azimuth
θ_cam, append"front view","side view", or"back view".
The full prompt given to the diffusion model might become "a high-quality photo of a squirrel, back view". This gives the 2D diffusion model the correct context to judge the rendered image.
With the conditioned prompt, you then execute the SDS loss calculation as you learned in the last lesson:
- Add noise
εto the rendered imagexto getx_t. - Predict the noise
ε_predusing the diffusion U-Net with Classifier-Free Guidance (CFG). - Calculate the gradient
∇_x L ∝ (ε_pred - ε).
Step 4: Optimization
The gradient is now automatically backpropagated through the rendering function g to the NeRF parameters θ (∂x/∂θ). A single optimizer step is taken:
# Pseudocode
loss = compute_sds_loss(rendered_image, prompt_with_view)
loss.backward()
optimizer.step()
optimizer.zero_grad()
This single step slightly improves the NeRF parameters θ so that the next time a similar view is rendered, it will be a little closer to what the diffusion model expects. After thousands of iterations (e.g., 15,000, taking 1-2 hours), these small updates accumulate to form a complete 3D object.
3. Running the Training Loop in Practice
Now, let's see how this theoretical loop translates into a concrete, runnable command. The stable-dreamfusion repository is an excellent open-source implementation of these ideas.
DreamFusion - Text to 3d with Stable Diffusion!
To see this in action, the 'Nerdy Rodent' YouTube channel has a great practical walkthrough of the stable-dreamfusion repository. This video will show you how the training is launched and what the results look like.
Watch the section on local installation and execution (00:01:56 - 00:05:00). Pay attention to the command-line arguments he uses to start the training. Then, watch the section on viewing results (00:05:00 - 00:06:32) to see the final 3D model and how it's exported.
The video demonstrates how to combine all the components using a single Python script. Let's examine the command used to launch the training loop.
ashawkey/stable-dreamfusion: Text-to-3D & Image-to-3D
The stable-dreamfusion GitHub README provides the exact commands to run a text-to-3D optimization. This is the practical culmination of our lesson's goal.
Navigate to the 'Usage' section and find the subsection for 'Text-to-3D'. Look at the first command example under the 'Instant-NGP NeRF Backbone' heading. This single line of code encapsulates the entire training loop we've discussed.
The key command looks like this:python main.py --text "a high quality photo of a hamburger" --workspace trial_hamburger -O
Let's dissect this:
python main.py: This is the main script that contains our full training loop.--text "...": This provides the text promptythat will guide the optimization.--workspace "...": This specifies a directory to save the trained NeRF checkpoints and final renders.-O: This is a shorthand flag for optimization settings. In this repo, it enables the efficient Instant-NGP backbone for the NeRF and enablesfp16mixed-precision training to reduce memory usage and speed up computation.
When you execute this command, you are launching the entire iterative process we've described. The script will loop for thousands of steps, continuously sampling camera views, rendering, calculating SDS loss, and updating the NeRF, until it converges on a 3D representation of a hamburger.
Test your understanding!
You run a text-to-3D training for "an astronaut". After it finishes, you notice the back of the astronaut's helmet is poorly formed and messy. Based on the training loop we've discussed, what is a likely cause of this issue?
Show answer
A likely cause is insufficient or ineffective view sampling and conditioning. Specifically:
- View Sampling: The random camera sampling might not have generated enough views of the back (
θ_camaround 180°). The model wasn't "criticized" on its appearance from behind often enough. - View-Dependent Conditioning: Perhaps the prompt modification
"..., back view"was not descriptive enough for the 2D diffusion model to provide a strong, clean gradient for what the back of an astronaut helmet should look like. The 2D model might have less training data for back views of astronauts compared to front views.
This leads to a situation where the NeRF's geometry is well-optimized for the front and sides, but remains close to its random initialization on the back.
Conclusion
Congratulations! You have now assembled the entire text-to-3D training pipeline. You've seen how to combine a differentiable 3D representation (NeRF) with a 2D diffusion model prior (Stable Diffusion) inside an optimization loop to generate a 3D asset from scratch.
Key Takeaways:
- The text-to-3D training process is an iterative optimization loop that refines a randomly initialized NeRF.
- Each iteration involves sampling a random camera view, rendering an image, calculating the SDS loss against a prompt, and updating the NeRF's weights.
- View-dependent prompt conditioning (e.g., adding "side view") is a critical technique to ensure 3D consistency.
- Practical implementations like
stable-dreamfusionuse highly efficient NeRF backbones (Instant-NGP) and optimizers to make this process feasible on consumer hardware.
Next Lesson Preview:
As you might have guessed from the mini-exercise, getting perfect results from this process is not always straightforward. Often, the generated 3D models suffer from strange artifacts. In the next lesson, we will dive into debugging, focusing specifically on two common failure modes: the Janus problem (where an object has multiple "fronts") and other geometric inconsistencies. You will learn why these happen and explore strategies to mitigate them.