Hello! Welcome to your lesson on diffusion model guidance.
In our last session, we equipped our U-Net with the ability to handle class conditioning and, crucially, trained it with "label dropout." This means we now have a single model that has learned to make two kinds of predictions:
- A conditional prediction, when given a class label.
- An unconditional prediction, when given a null label.
Today, we will leverage this dual capability to implement one of the most impactful techniques in modern diffusion models. Our learning outcome is to explain the mechanism of classifier guidance and implement classifier-free guidance (CFG). We'll start by understanding an earlier method that uses an external classifier, which will provide the theoretical foundation for the more modern and widely used "classifier-free" approach.
1. The Two Flavors of Guidance
At its core, "guidance" is about steering the generative process. Instead of letting the model generate a random image, we want to direct it to produce an image that adheres to a specific condition, like a class label or a text prompt.
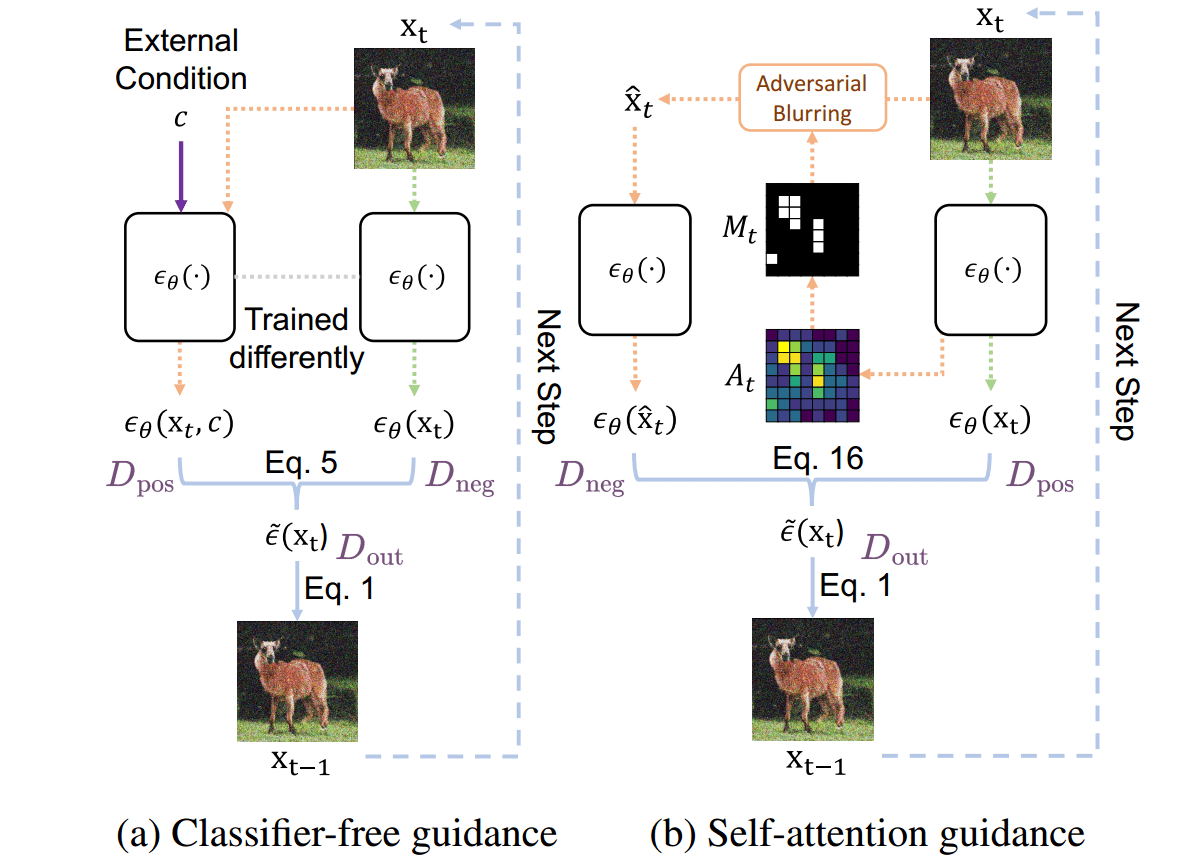
The diagram below illustrates the two main approaches we'll discuss. Pay attention to panel (a), Classifier-free guidance, as that will be our primary implementation goal.
2. Classifier Guidance: Steering with an External Expert
Before CFG became standard, the primary method for guidance involved using a second, separate model: a classifier.
The core idea is this:
- You have your main diffusion model, which is an expert at generating plausible images (denoising).
- You have a separate classifier model, which is an expert at identifying the class of an image. Importantly, this classifier must be trained on noisy images, so it can function at any step of the diffusion process.
At each sampling step, you use the gradient of the classifier to "nudge" the generation. The diffusion model makes a prediction for the denoised image, and then you adjust that prediction by moving it slightly in the direction that most increases the probability of the target class, according to the classifier.
This is mathematically derived from Bayes' theorem, where the reverse process is guided by the classifier's belief .
DDPM - Diffusion Models Beat GANs on Image Synthesis (Machine Learning Research Paper Explained)
To understand the mathematical intuition behind classifier guidance, this video from Yannic Kilcher provides an excellent deep dive. It explains how the gradients of a noisy image classifier are used to shift the mean of the reverse process distribution.
Watch the segment from 40:34 to 48:26. Focus on how the final guided distribution is a combination of the original denoising distribution and a term derived from the classifier's gradients. Given your ML background, the Taylor expansion argument should provide a solid theoretical underpinning.
Why isn't this the standard anymore?
While effective, classifier guidance has significant practical drawbacks:
- Training Overhead: It requires training and maintaining a separate, noise-aware classifier model.
- Architectural Complexity: The classifier must be compatible with the intermediate noisy images produced by the diffusion model.
- Adversarial Risk: The process can sometimes over-optimize for the classifier's belief, leading to images that fool the classifier but appear unnatural or distorted to a human eye.
This led researchers to ask: can we get the benefits of guidance without the classifier?
3. Classifier-Free Guidance (CFG): Guiding with the Model Itself
Classifier-Free Guidance is an elegant solution that eliminates the need for a second model. It leverages the dual-purpose model we built in the last lesson—one trained with conditioning dropout.
The key insight is that the difference between the model's conditional prediction and its unconditional prediction represents the direction of the guidance.
- Unconditional Prediction (): This is the noise the model thinks should be removed to create any plausible image. It's the model's learned prior over the data distribution.
- Conditional Prediction (): This is the noise the model thinks should be removed to create an image of a specific class or condition .
The vector pointing from the unconditional to the conditional prediction, , is essentially the "guidance signal" learned implicitly by the model.
CFG combines these predictions to create a new, guided estimate of the noise, :
Here, is the guidance scale (also often denoted as ).
- If , we get purely unconditional generation: .
- If , we get the standard conditional generation: .
- If , we extrapolate along the guidance direction, amplifying the condition. This pushes the generation to be more like the target class than what the model might have produced with .
Diffusion Models | PyTorch Implementation
Let's watch a practical overview of CFG. This video from the Outlier channel explains the concept and how it's implemented in the training and sampling loops.
Watch from 17:43 to 19:25. The first part (until 18:51) recaps the training-time label dropping we covered last lesson. The second part (from 18:51) introduces the sampling-time formula and shows how to implement it with torch.lerp (which is equivalent to the formula above).
4. Implementing CFG in the Sampling Loop
Now for the practical part. Implementing CFG involves modifying your sampler (e.g., DDIM, DPM-Solver) to compute and use the guided noise estimate at each step.
The following resource provides a step-by-step guide to this modification.
Hands-on Practical: Implementing Classifier-Free Guidance
This hands-on guide from APXML breaks down the implementation of CFG into clear, manageable steps. It provides pseudocode and a PyTorch-like example, which will be our blueprint.
Read the first three sections, from the start down to the end of the 'Implementation Example'. Focus on the logic within the ddim_sample_loop_cfg function. Note the efficient strategy of duplicating the input x_t and batching the conditional and unconditional inputs for a single model pass.
To summarize the key implementation steps within your sampling loop for a single batch:
-
Duplicate Inputs: For a batch of size
B, you need to prepare inputs for a single, larger forward pass.- The noisy image tensor
x_t(shape[B, C, H, W]) is duplicated to create a tensor of shape[2*B, C, H, W]. - The timestep tensor
tis similarly duplicated. - The condition tensor
cand the null condition tensornull_care concatenated to form a conditioning tensor of shape[2*B, ...].
- The noisy image tensor
-
Single Forward Pass: Pass these concatenated tensors through your U-Net in one go.
noise_pred_combined = model(torch.cat([x_t] * 2), ..., torch.cat([c, null_c])) -
Split Predictions: Split the output from the model back into two parts.
noise_pred_uncond, noise_pred_cond = noise_pred_combined.chunk(2) -
Apply CFG Formula: Use the guidance scale to compute the final noise prediction.
predicted_noise = noise_pred_uncond + guidance_scale * (noise_pred_cond - noise_pred_uncond) -
Proceed with Sampler: Use this
predicted_noisein the rest of your sampler's logic (e.g., to predict and compute in a DDIM step).
This approach roughly doubles the inference cost per step, as you're effectively doing two forward passes, but the improvement in control and quality is almost always worth it.
For an alternative implementation view within a full class structure, you can refer to the get_img_latents method in the article "How to Generate Images from Text using Stable Diffusion" (LINK), which you can find in the provided resources.
Test your understanding!
You are given a simplified sampling step function that currently performs only conditional prediction. Your task is to modify it to implement Classifier-Free Guidance.
import torch

def sampling_step(model, x_t, t, condition, null_condition, guidance_scale):
    """
    Performs one step of denoising.
    x_t: The current noisy image tensor, shape [B, C, H, W]
    t: The current timestep
    condition: The conditional embedding, shape [B, embed_dim]
    null_condition: The unconditional (null) embedding, shape [B, embed_dim]
    guidance_scale: The guidance scale 's'
    """

    # --- Current implementation (conditional only) ---
    # predicted_noise = model(x_t, t, condition)

    # --- YOUR MODIFICATION HERE ---
    # Implement CFG to calculate 'predicted_noise'
    # You should use x_t, t, condition, null_condition, and guidance_scale

    predicted_noise = None # Replace this

    # --- END OF MODIFICATION ---

    # (The rest of the sampler logic would use predicted_noise)
    return predicted_noise
Fill in the --- YOUR MODIFICATION HERE --- block to correctly calculate predicted_noise using the efficient single-pass CFG method.
Show answer
Here is the modified code block:
    # --- YOUR MODIFICATION HERE ---
    # 1. Prepare batched inputs for the model
    latent_model_input = torch.cat([x_t] * 2)
    time_input = torch.cat([t] * 2) # Assuming t is a tensor of shape [B]
    condition_input = torch.cat([null_condition, condition])

    # 2. Perform a single forward pass
    with torch.no_grad():
        noise_pred_combined = model(latent_model_input, time_input, condition_input)

    # 3. Split the predictions
    noise_pred_uncond, noise_pred_cond = noise_pred_combined.chunk(2)

    # 4. Apply the CFG formula
    predicted_noise = noise_pred_uncond + guidance_scale * (noise_pred_cond - noise_pred_uncond)
This implementation follows the efficient pattern of creating a doubled batch, performing a single model call, and then combining the split results using the CFG formula.
5. The Impact of the Guidance Scale
The guidance scale is a powerful hyperparameter that you will frequently tune. It controls the trade-off between how strictly the model adheres to the condition and the overall diversity/quality of the output.
- Low Scale (e.g., 1-4): Produces diverse and often high-quality images, but they might not follow the condition (e.g., class label or text prompt) very closely.
- Medium Scale (e.g., 5-10): This is often the sweet spot, providing a good balance between condition adherence and image quality. Most text-to-image models default to a value in this range (e.g., 7.5).
- High Scale (e.g., 11-20+): Forces the model to adhere very strictly to the condition. This can be useful, but often leads to image saturation, strange artifacts, and a sharp drop in diversity, as the model is pushed far beyond the distributions it saw during training.
Diffusion Models | PyTorch Implementation
To see the effect of CFG visually, this segment from the Outlier video compares generations with and without guidance.
Watch from 20:52 to 21:50. Observe the qualitative difference between the samples generated without CFG and those generated with it. This highlights why it has become a standard technique.
Conclusion
You have now explored the theory behind guidance and the practical implementation of Classifier-Free Guidance, a cornerstone of modern conditional diffusion models.
Key Takeaways:
- Classifier Guidance uses an external, noise-aware classifier's gradients to steer generation but is complex and less common now.
- Classifier-Free Guidance (CFG) achieves superior results without a second model by leveraging a diffusion model trained with conditioning dropout.
- The CFG formula, , extrapolates from the unconditional prediction in the direction of the conditional one.
- The implementation is efficient, requiring a single forward pass on a doubled batch at each inference step.
- The guidance scale () is a critical hyperparameter for balancing fidelity to the condition against sample quality and diversity.
Next Lesson Preview:
Knowing how to implement CFG is the first step. The next is mastering its use. In our next lesson, we will focus on how to tune the CFG scale and diagnose common artifacts arising from guidance. You will learn to identify the visual signatures of a guidance scale that is too high or too low, enabling you to debug and refine your generations for optimal quality.