Hello! Welcome to your next lesson on U-Net conditioning.
In our previous lessons, we've explored several ways to inject information into the U-Net. We started with conditioning on the diffusion timestep , then moved to the powerful but complex mechanism of cross-attention for guiding generation with text embeddings.
Today, we'll focus on a simpler, yet highly effective, form of conditioning that is a cornerstone of many important diffusion models. Our goal is to implement class conditioning using learned embeddings. We will learn how to guide the diffusion model to generate an image of a specific class (e.g., a 'cat' or a 'car' from the CIFAR-10 dataset) by feeding it a class label.
This lesson bridges the gap between unconditional models and the more complex attention-based conditioning, reinforcing the core principles of how external information can steer the generation process.
1. The Core Idea: From Class Index to Learnable Embedding
Just as we couldn't feed the raw timestep integer directly into our U-Net, we can't simply use a class index like 3 as a direct input. The model needs a richer, higher-dimensional representation that it can learn to associate with the visual features of that class.
The standard solution is to use a learnable embedding layer. In PyTorch, this is torch.nn.Embedding. It acts as a simple lookup table:
- It is initialized as a matrix of size
(num_classes, embedding_dim). - When you pass it an integer (the class index), it returns the corresponding row from the matrix—a dense vector representing that class.
- Crucially, these vectors are parameters of the model and are updated via backpropagation during training. The model learns to create meaningful representations for each class.
The diagram below illustrates this concept. The class label is fed into an "Embed Net" (which in our case is the nn.Embedding layer) to produce a conditioning vector . This vector, along with the time embedding, is then used to condition the U-Net.
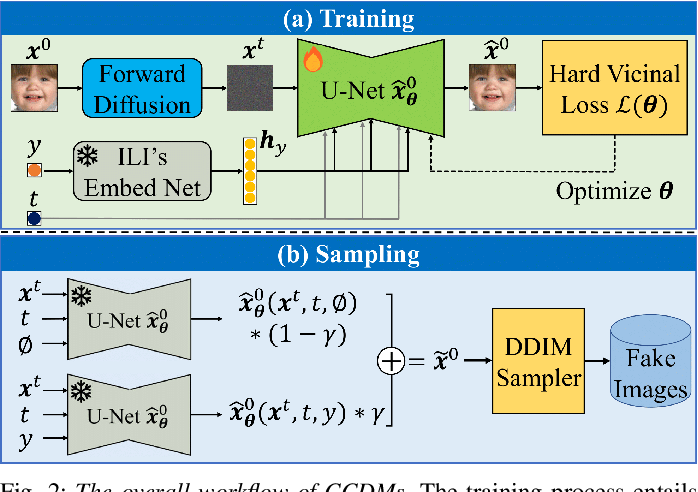
2. Integration Strategy 1: Additive Conditioning
Once we have our class embedding vector, how do we inject it into the U-Net? The most common and straightforward method is to add it to the timestep embedding.
Think of the sinusoidal timestep embedding as creating a "conditioning bus" that is already wired to various blocks within the U-Net. By simply adding our class embedding to the time embedding, we are placing our new conditioning signal onto this existing bus. It's an efficient way to distribute the class information throughout the network.
The following video provides a very clear and concise walkthrough of the code changes required to implement this.
Diffusion Models | PyTorch Implementation
Let's watch a practical demonstration of integrating class embeddings by adding them to the timestep embeddings. This video from the Outlier channel shows the necessary modifications to the U-Net and the training loop.
Watch from 16:54 to 18:06. Focus on these three key changes: Adding nn.Embedding for the labels in the U-Net's __init__. In the forward pass, looking up the label embedding and adding it to the time embedding. Passing the labels from the data loader to the model in the training loop.
To summarize the key modifications for this additive approach:
-
In the U-Net's
__init__method:- Accept a
num_classesargument. - Define the embedding layer:
self.label_emb = nn.Embedding(num_classes, time_emb_dim). The embedding dimension should match the timestep embedding dimension to allow for addition.
- Accept a
-
In the U-Net's
forwardmethod:- Accept an optional
labelsargument. - Compute the time embedding as usual.
- If labels are provided, compute the label embedding:
label_emb = self.label_emb(labels). - Add the two embeddings:
time_emb = time_emb + label_emb.
- Accept an optional
-
In the training loop:
- Ensure your data loader yields both images and their corresponding class labels.
- Pass the labels batch to the model during the forward pass:
output = model(x, t, labels).
3. Enabling Unconditional Generation: Dropping Labels
A powerful conditional model should ideally also be capable of generating images unconditionally. This capability is the foundation for an important technique called Classifier-Free Guidance (CFG), which we will cover in the next lesson.
To train a single model to do both, we use a simple but effective trick during training: we randomly "drop" the conditioning information for a fraction of the training samples. This forces the model to learn to denoise the image even when no class label is provided.
There are two common ways to implement this "label dropout":
- Add a "null" class: Augment your dataset to have
K+1classes, where the last class represents "unconditional." During training, randomly replace a certain percentage of true labels with this null class index. - Use a zero vector (for one-hot encoding): If you represent your labels as one-hot vectors, dropping the label can be implemented by simply passing an all-zero vector. This is an elegant way of telling the model "no class information is available for this sample."
The following video explains this concept and then provides a complete code walkthrough.
Stable Diffusion from Scratch in PyTorch | Conditional Latent Diffusion Models
Let's explore the 'why' and 'how' of label dropping. This clip from the ExplainingAI channel discusses the strategy and its importance for enabling unconditional generation.
Watch from 04:05 to 07:04. Pay close attention to the two approaches discussed for unconditional training: using a k+1-th null class versus using an all-zero vector. Understanding this concept is key for the next lesson on CFG.
Now, let's see how this is put into practice in an end-to-end implementation.
Stable Diffusion from Scratch in PyTorch | Conditional Latent Diffusion Models
The same video provides a detailed code walkthrough that incorporates the label-dropping mechanism.
Watch from 10:51 to 15:05. This demonstrates the practical steps: Adding conditioning info to a config file, including a cond_drop_prob. Modifying the dataset to return class labels. In the training loop, randomly 'dropping' labels by replacing them with a null/zero representation before passing them to the model.
4. Integration Strategy 2: Multiplicative Modulation
An alternative to adding the class embedding to the time signal is to use it to directly modulate the feature maps within the U-Net. A common way to do this is with Feature-wise Linear Modulation (FiLM), where the conditioning embedding is used to predict a scaling factor () and a shifting factor () that are applied to the normalized feature maps: output = (γ * normalized_features) + β.
A simpler variant just uses scaling. This allows the class information to control the "gain" of different features at various points in the network, potentially offering more fine-grained control than simple additive conditioning.
The Neuromatch tutorial provides a great implementation of this multiplicative scaling approach.
Tutorial 3: Image, Conditional Diffusion and Beyond
Let's examine an alternative to additive conditioning. This Neuromatch tutorial implements a U-Net where the class embedding is used to multiplicatively scale the activations in the network's residual blocks.
In the 'Bonus: Train Conditional Diffusion for MNIST' section, study the UNet_Conditional class. In the __init__ method, note the self.cond_embed layer and the series of self.y_mod layers. Then, in the forward method, see how the y_embed is passed through a y_mod layer and then multiplied with the feature map (e.g., h2 = h2 * self.y_mod2(y_embed)).
Choosing between additive and multiplicative conditioning is an architectural decision. Additive is simpler and often works very well. Multiplicative modulation can offer more expressive control over features and is a common pattern in conditional generative models.
Test your understanding!
You are given the forward method from the UNet_Conditional class in the Neuromatch resource (LINK). A snippet is shown below:
def forward(self, x, t, y = None):
    # Obtain the Gaussian random feature embedding for t
    embed = self.act(self.time_embed(t))
    y_embed = self.cond_embed(y)

    # Encoding path
    h1 = self.conv1(x) + self.t_mod1(embed)
    h1 = self.act(self.gnorm1(h1))

    h2 = self.conv2(h1) + self.t_mod2(embed)
    h2 = h2 * self.y_mod2(y_embed) # <-- Multiplicative modulation
    h2 = self.act(self.gnorm2(h2))
    # ... and so on
How would you modify this code to use the additive conditioning strategy we saw in the first video (i.e., adding the class embedding to the time embedding)? You can ignore the y_mod layers for this exercise.
Show answer
The modification is quite simple. Instead of creating and using y_embed separately, you would add it to embed right after the time embedding is created. The rest of the network then uses this combined embedding.
def forward(self, x, t, y = None):
    # Obtain the Gaussian random feature embedding for t
    embed = self.act(self.time_embed(t))

    # --- MODIFICATION START ---
    # Add class embedding to time embedding if 'y' is provided
    if y is not None:
        y_embed = self.cond_embed(y)
        embed = embed + y_embed
    # --- MODIFICATION END ---

    # Encoding path
    h1 = self.conv1(x) + self.t_mod1(embed) # 'embed' now contains time + class info
    h1 = self.act(self.gnorm1(h1))

    h2 = self.conv2(h1) + self.t_mod2(embed) # 'embed' now contains time + class info
    # h2 = h2 * self.y_mod2(y_embed) # <-- This line is removed
    h2 = self.act(self.gnorm2(h2))
    # ... and so on
This change redirects the class information through the existing time modulation layers (t_mod1, t_mod2, etc.) instead of requiring separate y_mod layers.
Conclusion
In this lesson, you've learned how to add class conditioning to your diffusion model, a fundamental step towards creating more controllable generative systems.
Key Takeaways:
- Learned Embeddings: Class indices are mapped to dense, learnable vectors using an
nn.Embeddinglayer. - Integration Strategies: These embeddings can be injected into the U-Net either by adding them to the timestep embeddings or by multiplicatively modulating the feature maps.
- Label Dropping: Randomly dropping class labels during training is a crucial technique that forces the model to learn to generate unconditionally. This is the key prerequisite for classifier-free guidance.
Next Lesson Preview:
We have now perfectly set the stage for one of the most significant improvements in diffusion model sampling. With a model trained to make both conditional and unconditional predictions, we can combine these at inference time to amplify the conditioning signal. In the next lesson, we will explain the mechanism of classifier guidance and implement classifier-free guidance (CFG). You'll see how this technique dramatically improves sample quality and adherence to the given condition.