Hello! Welcome to your next lesson on U-Net architecture.
In our last session, we opened up the U-Net and saw how to condition it on the diffusion timestep, , using sinusoidal positional embeddings. This allows a single model to adapt its behavior across the entire denoising process.
Today, we'll build on that by integrating two powerful attention mechanisms that are central to modern diffusion models like Stable Diffusion. Our goal is to integrate self-attention and cross-attention mechanisms to handle spatial dependencies and external conditioning. We will explore:
- Self-attention, to allow different parts of the image to communicate with each other, overcoming the local limitations of convolutions.
- Cross-attention, the key mechanism that allows us to inject external information, like a text prompt, to guide the image generation process.
Understanding these mechanisms is crucial, as they form the bridge between unconditional and the highly controllable, text-guided models you're aiming to master.
1. Handling Spatial Dependencies with Self-Attention
Convolutional layers are excellent at detecting local patterns, but their receptive field is inherently limited. To model long-range dependencies—for instance, ensuring a person's left eye is stylistically consistent with their right eye, even if they are far apart in the feature map—we need a mechanism that can relate any pixel to any other pixel. This is the role of self-attention.
A Refresher on Self-Attention
You're likely familiar with self-attention from Transformers. In the context of a U-Net, we treat the pixels of a feature map as a sequence. For each pixel, self-attention calculates a weighted average of all other pixels in the feature map, where the weights determine "relevance."
For a thorough, from-scratch refresher on the mechanics of scaled-dot product attention, the following resource by Sebastian Raschka is an excellent read. It builds the entire mechanism in PyTorch, from embeddings to the final context vector.
Understanding and Coding the Self-Attention Mechanism
Let's review the mechanics of self-attention. This article provides a step-by-step implementation that will be a great refresher on how queries, keys, and values work together.
Please read from the start up to the end of the section 'Computing the Attention Scores'. This covers converting inputs to embeddings, defining Q, K, V weight matrices, and computing the final context vector for a single attention head. This will solidify the core concepts before we integrate them.
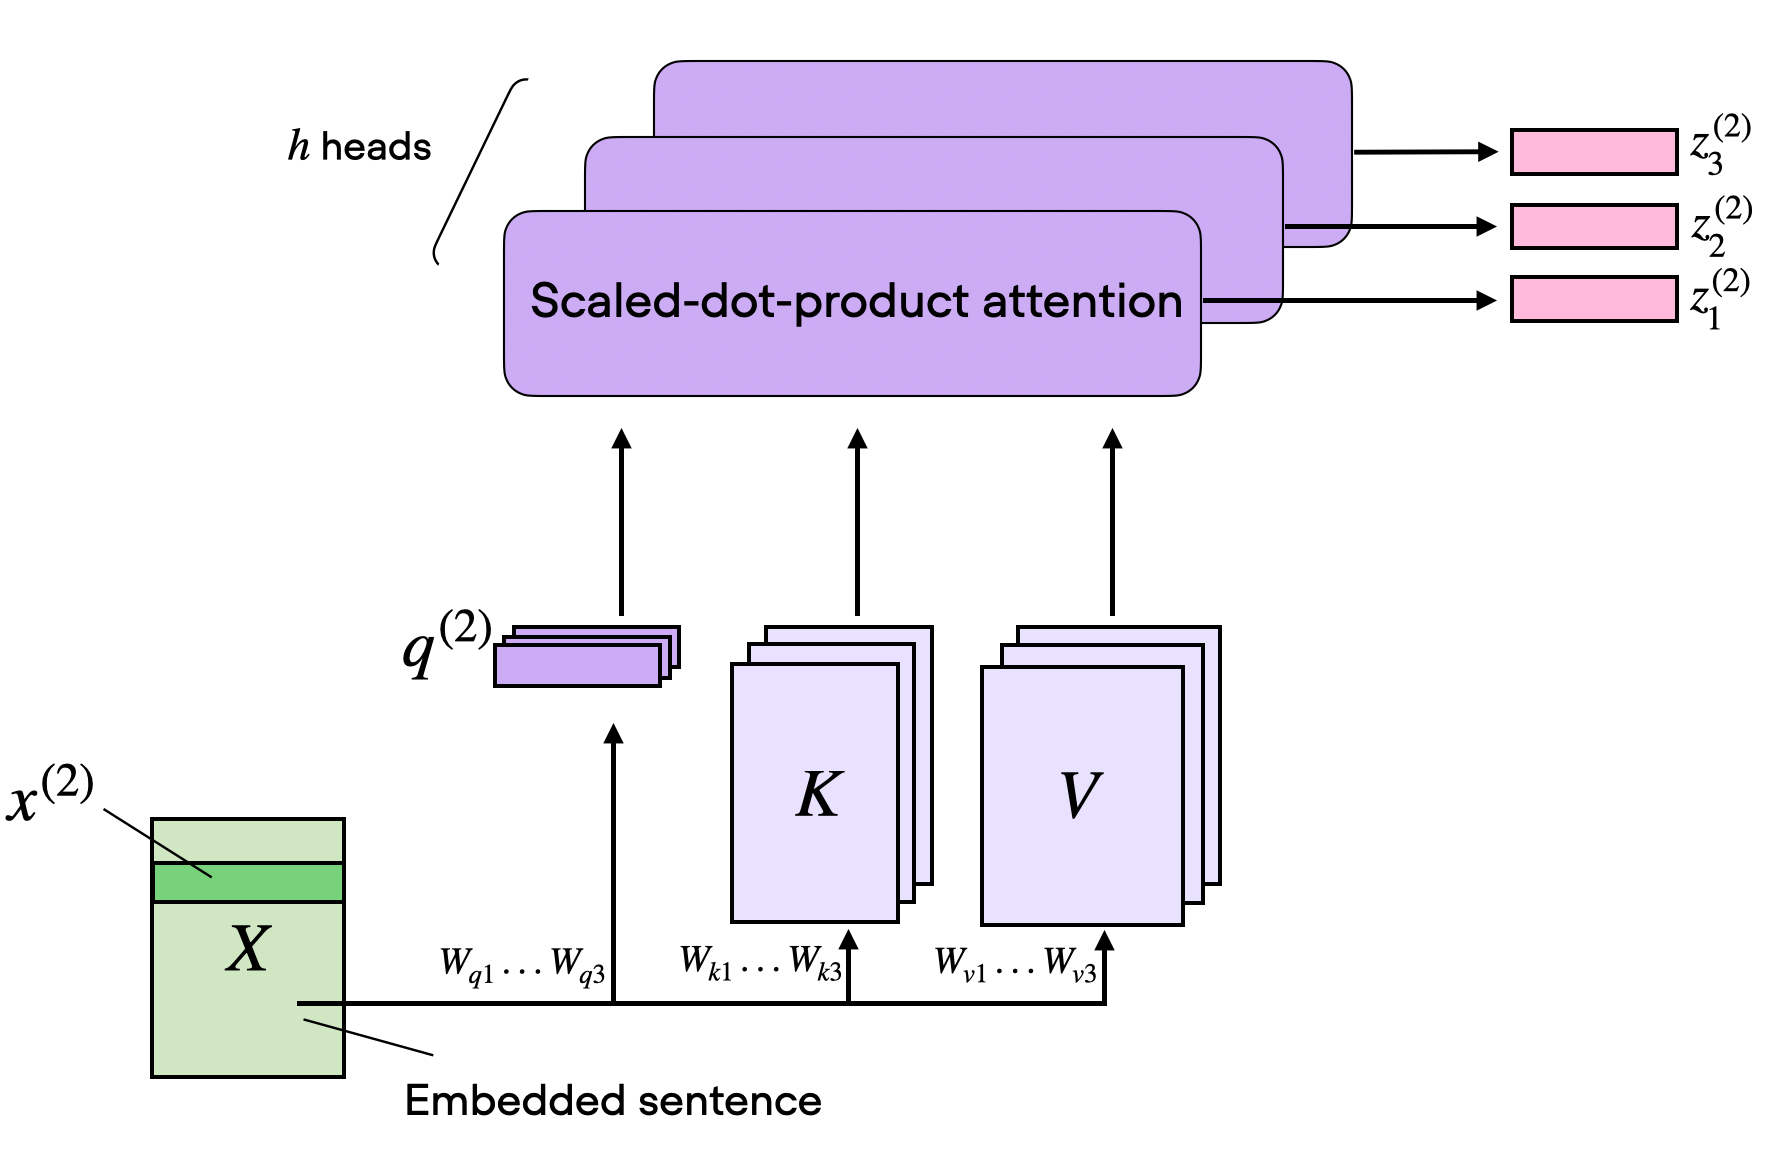
In short, for each element in our input sequence (i.e., each "pixel" in our flattened feature map x), we generate three vectors:
- Query (): "What am I looking for?"
- Key (): "What do I contain?"
- Value (): "What information do I offer?"
By taking the dot product of a query from one pixel with the keys from all other pixels, the model computes an attention score, determining how much focus to place on every other pixel. These scores are then used to create a weighted sum of the value vectors, producing an output that enriches the original pixel's representation with context from the entire image.
2. Integrating Self-Attention into the U-Net
Self-attention is computationally intensive ( where is the sequence length, i.e., height × width). Therefore, it's typically applied only at the lower-resolution bottleneck layers of the U-Net, where the feature maps are smaller.
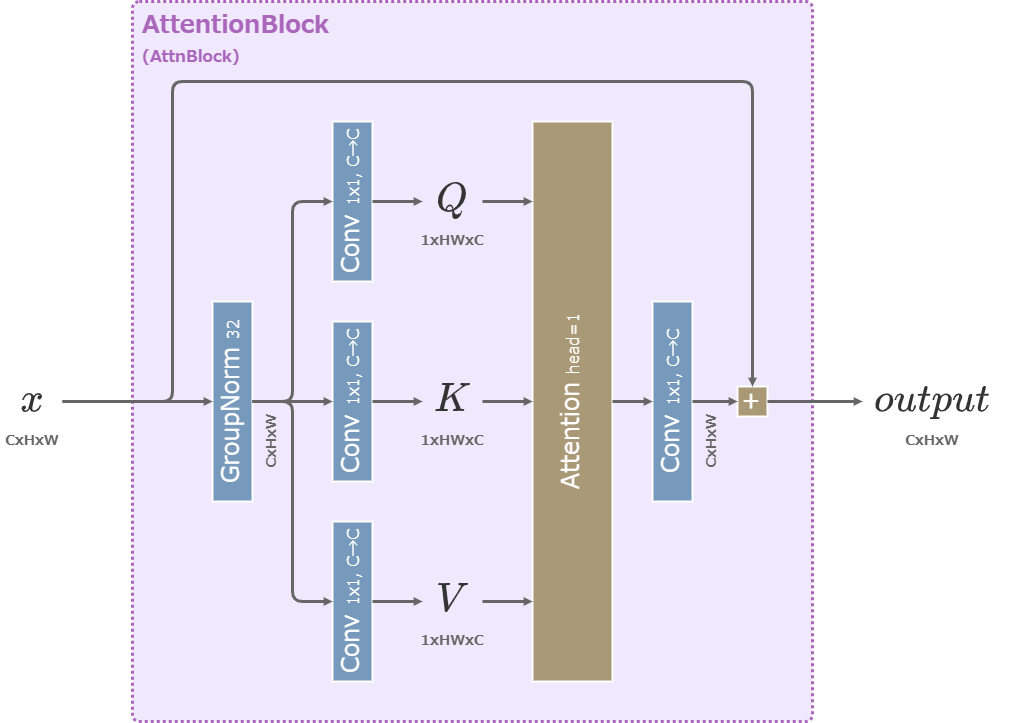
The following video provides a concise visual recap of how self-attention works within the U-Net, before moving on to cross-attention.
Stable Diffusion from Scratch in PyTorch | Conditional Latent Diffusion Models
This clip from the ExplainingAI channel gives a clear, animated recap of self-attention in the context of a U-Net feature map.
Watch from 31:22 to 34:53. Focus on how the queries, keys, and values are all derived from the same source: the image's feature map cells.
3. External Conditioning with Cross-Attention
Self-attention is about internal communication within the image. Cross-attention is about external communication, allowing the U-Net to listen to an outside source, such as a text prompt. This is the core mechanism behind text-to-image models.
The mechanics are almost identical to self-attention, with one crucial difference:
- The Query () vector still comes from the image feature map. Each pixel is still asking a question.
- The Key () and Value () vectors now come from the external context.
For text-to-image, the external context is the sequence of embeddings from a text encoder like CLIP or a T5 variant. Each word (or token) in the prompt becomes a source for a key and a value.
This way, a pixel's query can "attend" to the words in the prompt. A pixel in a region that should become a "red car" can learn to focus on the "red" and "car" token embeddings to gather the right information for its color and texture.
This video from ExplainingAI gives an excellent explanation of this transition from self- to cross-attention.
Stable Diffusion from Scratch in PyTorch | Conditional Latent Diffusion Models
Let's now see how cross-attention differs from self-attention. This video explains it perfectly.
Watch from 34:53 to 39:26. Pay close attention to the key change: Queries come from the feature map, but Keys and Values come from the text token embeddings. This is the central idea of cross-attention.
4. Implementation and Integration
In practice, self-attention and cross-attention are often implemented within a single, flexible CrossAttention module and combined within a TransformerBlock. This block can then be inserted into the U-Net architecture.
The CrossAttention Module
A well-designed attention module can perform both self- and cross-attention. The logic is simple: if a context tensor is provided, use it to generate Keys and Values (cross-attention). If not, use the input tokens tensor for Keys and Values (self-attention).
The following blog post provides a clean, professional implementation of the components we need.
Let's examine a PyTorch implementation. This blog post breaks down the attention mechanism used in Stable Diffusion into modular classes.
Please study the code for the following classes: 1. CrossAttention: Note how context_dim is used to differentiate between self- and cross-attention. See how einops.rearrange is used for efficient tensor reshaping for multi-head attention. 2. TransformerBlock: Observe how it sequentially combines self-attention (attn1) and cross-attention (attn2) with residual connections. 3. SpatialTransformer: This is the wrapper that integrates the TransformerBlock into a 2D convolutional network. It handles the reshaping from a 2D feature map [B, C, H, W] to a sequence [B, T, C] and back.
Putting It All Together in the U-Net
The SpatialTransformer module is the component that gets inserted into the U-Net, typically replacing a standard ResNetBlock at certain resolutions.
- A
ResNetblock processes the feature map with convolutions. - A
SpatialTransformerblock then takes that feature map and the text conditioning, refines it using self- and cross-attention, and outputs an updated feature map. - The U-Net alternates between these blocks.
The code walkthrough in the ExplainingAI video shows exactly how these new layers are added to the U-Net's downsampling blocks.
Stable Diffusion from Scratch in PyTorch | Conditional Latent Diffusion Models
To see how the code changes are made in a complete U-Net, let's return to the ExplainingAI video.
Watch from 39:26 to 44:04. This section demonstrates the practical code changes: adding the cross-attention layer to the U-Net blocks and passing the context (text embeddings) through the forward pass. This directly connects the TransformerBlock concept to the full model.
Test your understanding!
You are examining the forward method of the TransformerBlock class from the Demystifying Diffusion Models resource (LINK). The code is:
def forward(self, x, context = None):
    # Self-attention block
    x = self.attn1(self.norm1(x)) + x
    # Cross-attention block
    x = self.attn2(self.norm2(x), context = context) + x
    # Feed-forward block
    x = self.ff(self.norm3(x)) + x
    return x
- What is the source of the Query, Key, and Value for
self.attn1? - What is the source of the Query, Key, and Value for
self.attn2? - Why are there residual connections (
+ x) after each sub-block? What common issue in deep networks do they help mitigate?
Show answer
- For
self.attn1(Self-Attention): Theattn1layer is initialized without acontext_dim. Therefore, its Query, Key, and Value are all derived from its single input, which is the normalized feature mapself.norm1(x). - For
self.attn2(Cross-Attention): Theattn2layer is initialized with acontext_dim. The Query is derived from its first input,self.norm2(x). The Key and Value are derived from its second input,context. - Residual Connections: The
+ xoperations are residual (or skip) connections. They are critical for training very deep networks. They help mitigate the vanishing gradient problem by providing a "shortcut" for the gradient to flow back through the network during backpropagation. This makes it easier for the model to learn an identity mapping if a block is not needed, improving training stability and performance.
Conclusion
Today, we've unlocked two of the most important mechanisms in modern diffusion U-Nets. These transform the model from a simple denoiser into a sophisticated, context-aware generative system.
Key Takeaways:
- Self-Attention is used within the U-Net to model long-range spatial relationships in the image feature map, allowing any pixel to attend to any other pixel.
- Cross-Attention is the key to external conditioning. It allows the image features (Queries) to attend to an external context like text embeddings (Keys and Values), infusing the generation process with semantic guidance.
- These are implemented practically using flexible
Attentionmodules combined intoTransformerBlocks, which are then placed at lower-resolution stages of the U-Net. - The overall flow within such a block is typically: Self-Attention -> Cross-Attention -> Feed-Forward Network, with normalizations and residual connections throughout.
Next Lesson Preview:
We've now seen two powerful forms of conditioning: timestep embeddings and cross-attention on text. In the next lesson, we will look at a simpler, yet very effective, conditioning method: implementing class conditioning using learned embeddings. This is a foundational technique used in models like ADM (Abe et al., 2021) and is a great building block before we tackle even more advanced guidance methods.