Hello! Welcome to the first lesson of our third module, "U-Net Architecture and Conditioning."
In the previous module, we treated the U-Net model as a "black box" that takes a noised image and a timestep to predict the added noise (or the related target ). We focused on what happens outside the model: the samplers, schedules, and guidance that steer the generation process. Now, it's time to open that black box.
This lesson begins our deep dive into the U-Net architecture itself. Our learning outcome is to implement sinusoidal positional encodings for timestep conditioning and integrate them into the U-Net. We'll explore why the model needs to know the timestep, how we can represent this information effectively, and exactly how this conditioning signal is fed into the network's layers.
1. Why Does the U-Net Need Timestep Information?
The core of a diffusion model is a single neural network (our U-Net) that is used at every step of the reverse process. This means the same set of weights is responsible for predicting the noise in a slightly noisy image (e.g., at ) and a nearly pure-noise image (e.g., at ).
The network must adapt its behavior based on the noise level. A raw integer timestep t is not an ideal input for a neural network. Neural networks thrive on continuous, high-dimensional inputs where small changes in input correspond to small changes in output. A simple integer doesn't have this property in a way the network can easily leverage. The difference between t=1 and t=2 is not necessarily the same "semantic distance" as between t=901 and t=902. We need a more powerful way to encode this positional information.
Diffusion models from scratch in PyTorch
To understand the role of the U-Net and the necessity of timestep conditioning, let's watch a brief overview. This video from DeepFindr provides a great introduction to the U-Net's structure and the problem of conditioning on time.
Please watch from 15:48 to 20:30. Pay close attention to the explanation of why the model needs to know which timestep it's on (starting around 18:30) and the introduction of positional embeddings as the solution.
2. Sinusoidal Positional Encodings
As the video mentioned, the solution comes from the original Transformer paper ("Attention Is All You Need"). We can map the scalar integer timestep into a high-dimensional vector using a set of sine and cosine functions of varying frequencies.
The formula for an embedding of dimension for a timestep is:
where indexes the dimensions of the embedding vector from to .
This method has several desirable properties:
- Uniqueness: Every timestep gets a unique encoding vector.
- Continuity: For nearby timesteps and , their embeddings and will be close in Euclidean space, making it easier for the network to generalize.
- Extrapolation: The periodic nature of sine and cosine allows the model to potentially generalize to timesteps longer than those seen during training.
The result is a rich, high-dimensional representation of time. Let's visualize what these embeddings look like.
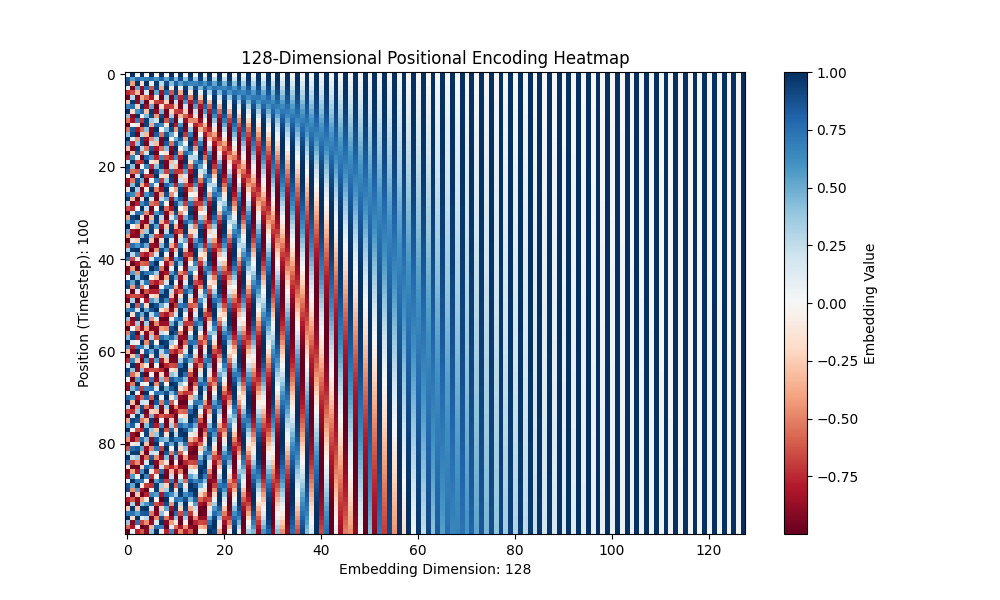
3. Implementation in PyTorch
Now, let's translate the theory into a practical PyTorch module. The Hugging Face blog post "The Annotated Diffusion Model" provides a very clean and standard implementation.
Let's study the code for the SinusoidalPositionEmbeddings module. This is a self-contained component that you can reuse in any diffusion model.
Please read the section 'Position embeddings' and carefully examine the SinusoidalPositionEmbeddings class implementation.
Let's break down the forward method of this module. It's a clever and efficient way to implement the formulas above:
half_dim = self.dim // 2: We calculate separate sine and cosine components for each half of the embedding dimension.embeddings = math.log(10000) / (half_dim - 1): This calculates the logarithmic term from the denominator of the formula.embeddings = torch.exp(torch.arange(half_dim, device=device) * -embeddings): This creates the vector of different frequencies/wavelengths (1 / 10000^(2i/d)).embeddings = time[:, None] * embeddings[None, :]: This uses broadcasting to apply all frequencies to all timesteps in the batch simultaneously, calculating the argument for the sine and cosine functions.embeddings = torch.cat((embeddings.sin(), embeddings.cos()), dim=-1): Finally, it computes the sine and cosine and concatenates them to form the final embedding vectors.
4. Integrating Embeddings into the U-Net
Now that we have a time embedding vector for each image in our batch, how do we use it? We need to inject this information into the U-Net's processing pipeline.
The standard approach involves two steps:
- Projection: The sinusoidal embedding is first passed through a small Multi-Layer Perceptron (MLP), typically
Linear -> Activation -> Linear. This allows the model to learn a more suitable representation of the time information. - Injection: This learned time embedding is then broadcast and added to the intermediate feature maps inside the U-Net. This is usually done within each residual block of the U-Net's encoder and decoder.
The diagram below gives a high-level view of how the time embedding is incorporated into a residual block.

Let's watch a short video that walks through the code for this integration process.
Diffusion Models | PyTorch Implementation
The following clips from Outlier's PyTorch implementation video demonstrate how to project the time embedding and add it into the downsampling and upsampling blocks of the U-Net.
First, watch from 10:51 to 11:22 to see the integration in a downsample block. Then, watch from 11:22 to 11:41 to see the equivalent process in an upsample block. Notice the use of a linear layer to project the time embedding to the correct dimension before addition.
An Alternative: Feature-wise Linear Modulation (FiLM)
While simple addition is common, a more powerful technique is to use the time embedding to generate scale and shift parameters that modulate the feature maps. This is a form of FiLM (Feature-wise Linear Modulation).
Instead of h_out = h_in + time_emb, we do h_out = h_in * scale + shift.
The scale and shift are produced by the time embedding MLP. This gives the time conditioning more expressive power, as it can dynamically scale and shift activations at each block, rather than just adding a bias.
The ResnetBlock implementation in "The Annotated Diffusion Model" uses exactly this more advanced technique.
Let's revisit the 'Annotated Diffusion Model' blog post to see a more advanced integration method.
First, look at the ResnetBlock class. Notice the mlp which takes time_emb_dim as input. In the forward pass, see how time_emb is passed to this MLP and then chunk(2, dim=1) is used to create scale_shift. This is the FiLM technique. Then, briefly scan the full Unet class to see how time_mlp is defined and how the resulting embedding t is passed to every block in the downs and ups stacks.
Test your understanding!
You are building a U-Net. You have implemented the SinusoidalPositionEmbeddings module which outputs a 128-dimensional embedding. Inside one of your ResnetBlocks, the image feature map x has a shape of (batch_size=16, channels=256, height=32, width=32).
Write a short PyTorch code snippet (assuming nn is imported) that shows how you would process a batch of timestep embeddings t_emb (shape [16, 128]) and add them to x.
Show answer
First, you need an MLP to project the time embedding to the same number of channels as the image feature map. Then, you reshape it for broadcasting and add it.
import torch
import torch.nn as nn

# Assuming these are defined elsewhere
# t_emb = sinusoidal_embedding_module(timesteps) -> shape [16, 128]
# x = some_conv_layer(input) -> shape [16, 256, 32, 32]

# 1. Define the projection MLP (this would be part of the block's __init__)
time_mlp = nn.Sequential(
    nn.Linear(128, 256),
    nn.ReLU(),
    nn.Linear(256, 256)
)

# 2. Process the time embedding (this happens in the forward pass)
t_emb_projected = time_mlp(t_emb) # shape: [16, 256]

# 3. Reshape for broadcasting and add to the feature map
# Add new dimensions for height and width to match x
t_emb_reshaped = t_emb_projected[:, :, None, None] # shape: [16, 256, 1, 1]
output = x + t_emb_reshaped # Broadcasting adds the embedding to each pixel

# 'output' now has shape [16, 256, 32, 32] and is conditioned on the timestep
This is the core mechanism for injecting time information into the model.
Conclusion
In this lesson, we took our first major step inside the U-Net. We've replaced a key "magic" component with a concrete, understandable, and implementable mechanism.
Key Takeaways:
- The U-Net in a diffusion model needs to be conditioned on the timestep
tbecause its weights are shared across the entire denoising trajectory. - We encode the scalar timestep
tinto a high-dimensional vector using sinusoidal positional encodings, a technique borrowed from Transformers that provides a unique and continuous representation for each timestep. - This time embedding vector is first projected through a small MLP.
- The projected embedding is then injected into each residual block of the U-Net, either by direct addition to the feature maps or by generating scale and shift parameters to modulate them (FiLM).
Next Lesson Preview:
Now that we understand how to condition the U-Net on time, we can extend this idea to other forms of conditioning. The U-Net architecture is not just a stack of residual blocks; it crucially relies on attention mechanisms. In our next lesson, we will integrate self-attention and cross-attention mechanisms. Self-attention will help the model capture long-range spatial dependencies within the image, and cross-attention will be our gateway to powerful external conditioning, such as text prompts.