Hello! Welcome back to our course on diffusion models.
In our last lesson, we mastered Low-Rank Adaptation (LoRA), an incredibly efficient method for teaching a model a new concept by training a small set of new adapter weights. This approach is powerful because it's fast, memory-efficient, and produces tiny, portable files that can be easily shared and combined.
But what if maximum fidelity to your subject is the absolute priority, and you're willing to trade some of that efficiency and flexibility to achieve it? This brings us to another foundational technique for model personalization. Today, your goal is to implement a concept-learning technique (e.g., DreamBooth) to inject a new subject into a model.
DreamBooth takes a different philosophical approach than LoRA. Instead of adding new layers, it fine-tunes the weights of the existing pre-trained model to integrate a new subject. This process results in a full model checkpoint, and as you'll learn, this comes with its own set of powerful advantages and important trade-offs.
Let's begin by looking at a high-level overview of the DreamBooth system.
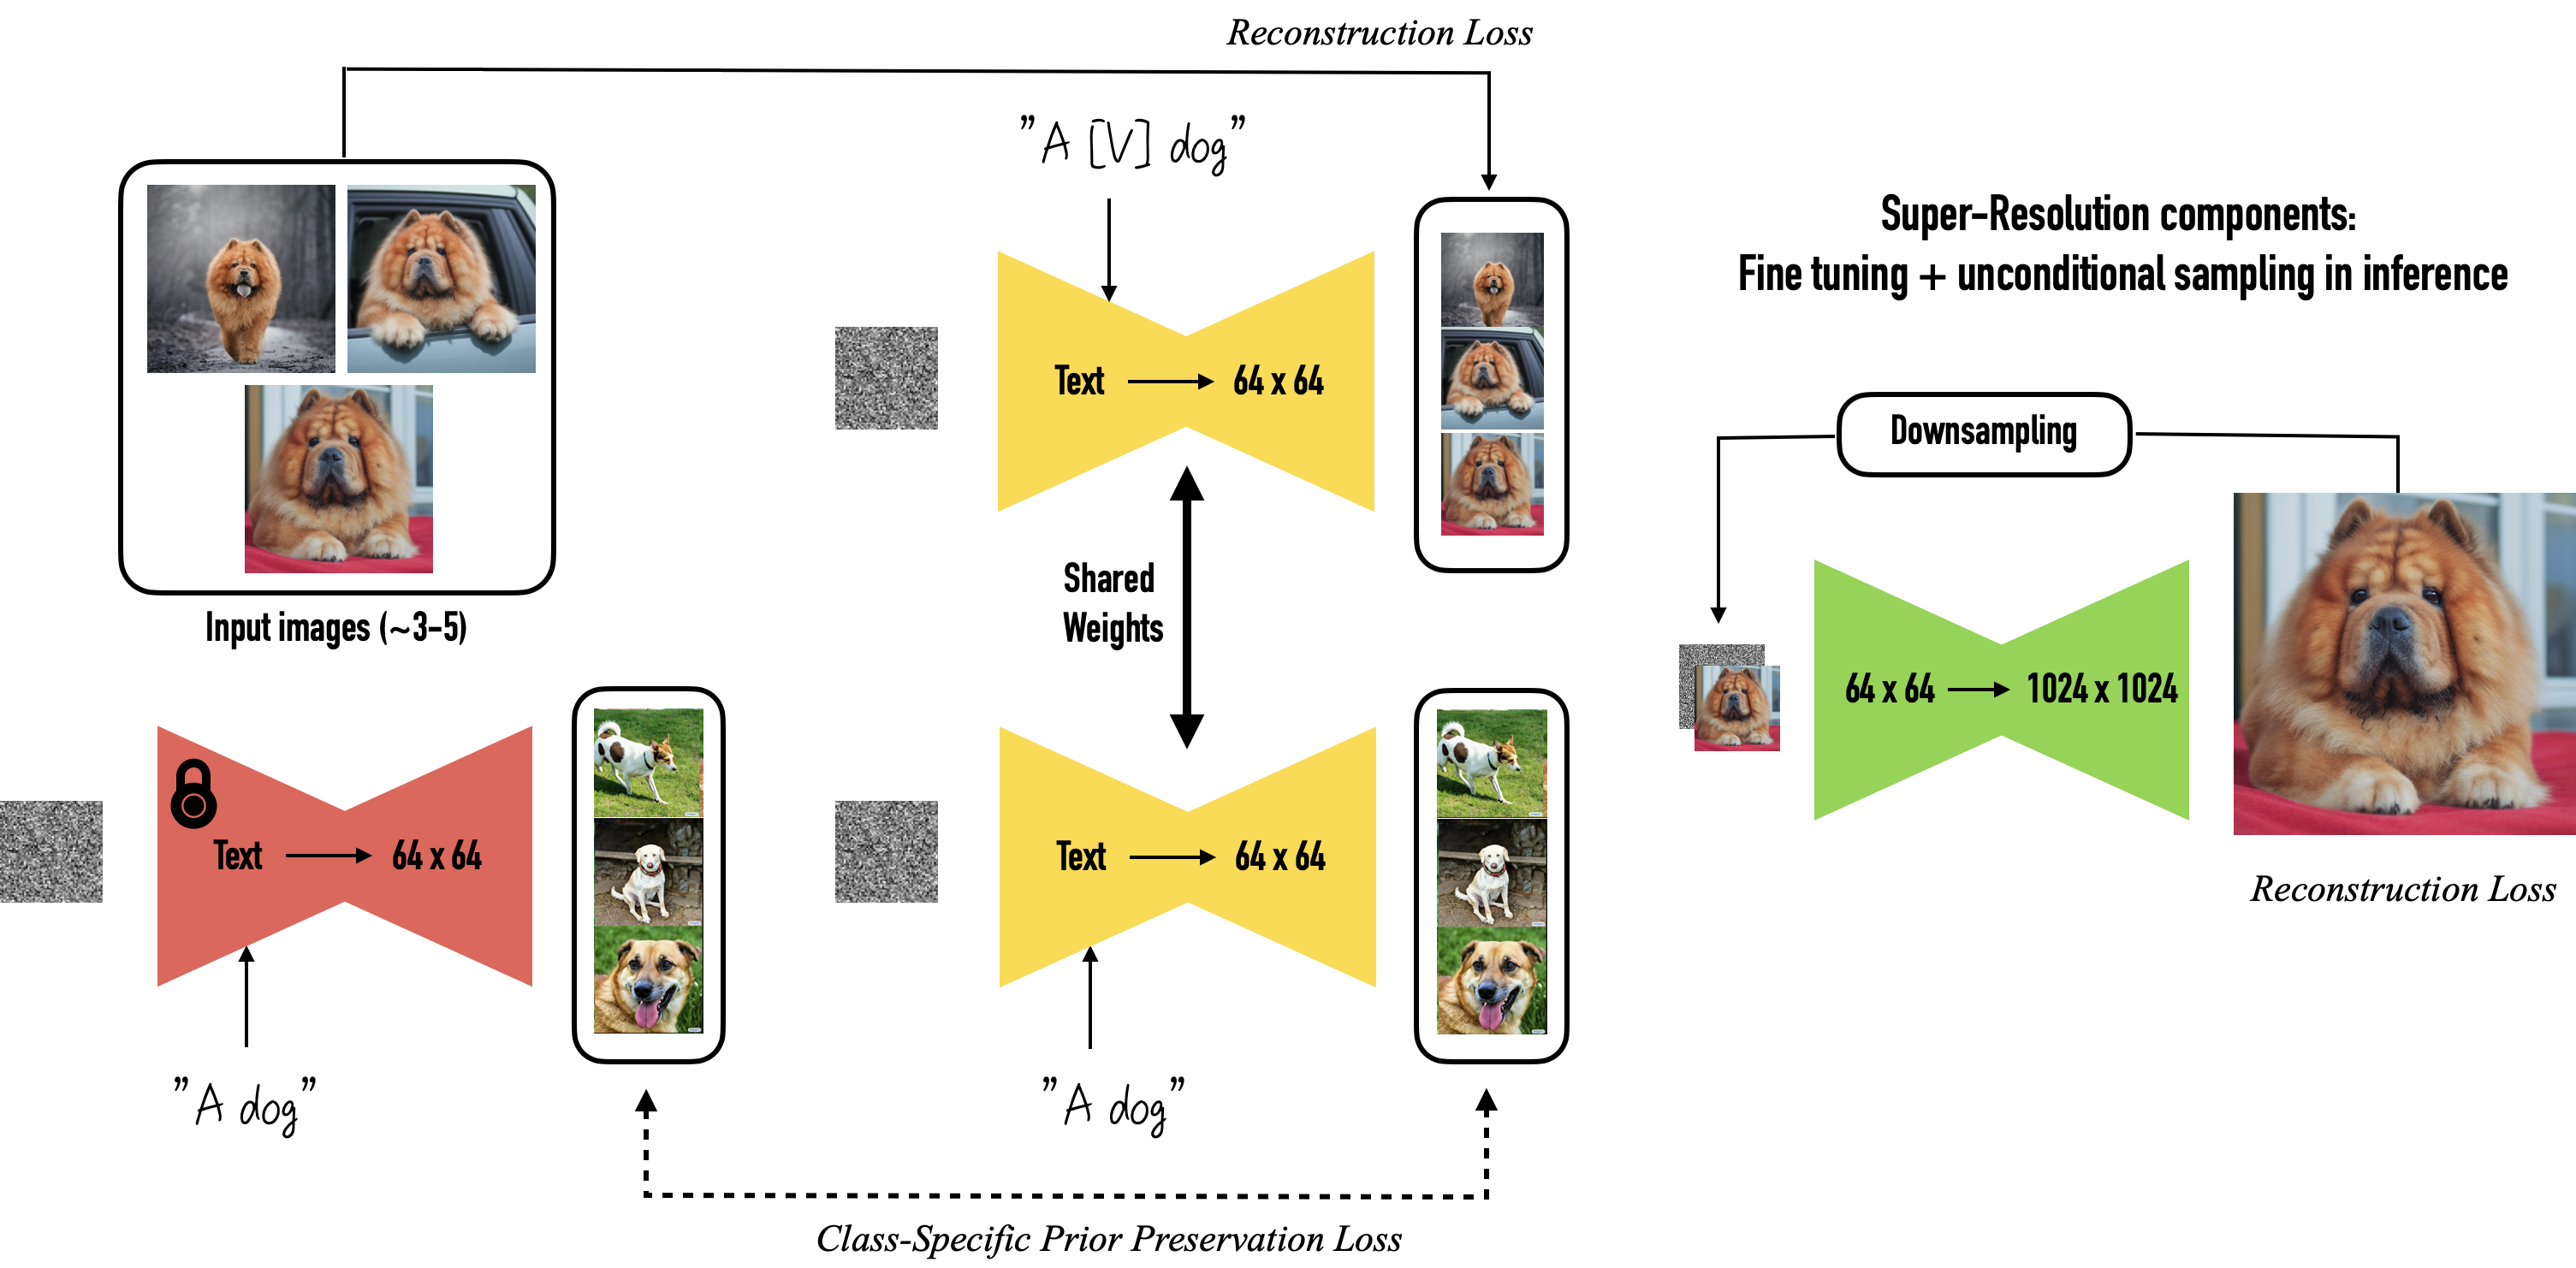
Part 1: The Core Mechanics of DreamBooth
DreamBooth was introduced by Google Research and is built on two clever ideas that allow it to integrate a new subject with just 3-5 images, while avoiding common fine-tuning pitfalls.
-
Binding a Concept to a Unique Identifier: The first step is to associate your new subject with a unique, rare token in the model's vocabulary. You create a text prompt like
"a photo of a [V] dog", where[V]is a rare token (e.g.,sks,zwx, etc.) anddogis the class of the subject. The model is then fine-tuned on your handful of images paired with this specific prompt. This forces the model to bind the visual features of your subject to the new unique identifier[V]. -
Prior Preservation Loss: Fine-tuning a massive model on just a few images of a single subject can lead to two problems: overfitting (the model only generates copies of your training images) and catastrophic forgetting or "language drift" (the model forgets what the general class looks like; for example, it might only be able to generate your dog when prompted for "a dog").
To prevent this, DreamBooth uses a prior preservation loss. While training on your specific subject, the model is also asked to generate images of the general class using a simpler prompt (e.g.,
"a photo of a dog"). It then uses these self-generated images as a regularization set, training on them simultaneously. This ensures the model preserves its "prior" knowledge of the general class, preventing it from collapsing its understanding of "dog" to mean only your specific dog.
For a clear visual explanation of these two components and how they fit into the training loop, the following video segment is excellent.
Personalized Image Generation (using Dreambooth) explained!
The video 'Personalized Image Generation (using Dreambooth) explained!' by DeepFindr provides a concise and clear explanation of the two key components of DreamBooth.
Watch the section from 06:06 to 07:59. Focus on how the narrator explains the use of a rare token and the purpose of the prior preservation loss in preventing catastrophic forgetting.
The combination of a unique identifier and prior preservation loss is what makes DreamBooth so effective. It allows for deep integration of a new concept into the model's weight space while maintaining the model's generative diversity.
Part 2: Implementing DreamBooth with diffusers
Now, let's get practical. As a machine learning engineer, the most direct and robust way to implement DreamBooth is by using the official training script provided by Hugging Face in their diffusers library. This script handles the entire process, from data loading to the training loop, and is configured via command-line arguments.
The official documentation provides a clear guide on how to use this script. We will walk through the key parts.
This Hugging Face documentation for DreamBooth training is your primary resource. It details the script's parameters and provides a step-by-step guide to launching a training job.
Please review the following sections of the documentation: Introduction: Familiarize yourself with the initial setup, particularly the accelerate config step. Script parameters: Read through this section carefully. Pay special attention to the parameters for prior preservation loss (--with_prior_preservation, --class_data_dir, --class_prompt). Train text encoder: Understand the purpose and VRAM implications of this crucial flag. Launch the script: Study the example accelerate launch command. This is the template you will use for your own training runs.
The Anatomy of a DreamBooth Training Command
Based on the documentation, a typical DreamBooth training command looks like this. Let's break down the most important arguments you'll need to configure:
export MODEL_NAME="runwayml/stable-diffusion-v1-5"
export INSTANCE_DIR="./my-concept-images"
export CLASS_DIR="./prior-preservation-images"
export OUTPUT_DIR="./my-dreambooth-model"

accelerate launch train_dreambooth.py \
  --pretrained_model_name_or_path=$MODEL_NAME \
  --instance_data_dir=$INSTANCE_DIR \
  --class_data_dir=$CLASS_DIR \
  --output_dir=$OUTPUT_DIR \
  --with_prior_preservation --prior_loss_weight=1.0 \
  --instance_prompt="a photo of sks person" \
  --class_prompt="a photo of a person" \
  --resolution=512 \
  --train_batch_size=1 \
  --gradient_accumulation_steps=1 \
  --learning_rate=5e-6 \
  --lr_scheduler="constant" \
  --lr_warmup_steps=0 \
  --num_class_images=200 \
  --max_train_steps=800 \
  --train_text_encoder
--instance_data_dir: Path to your 3-5+ images of the subject.--instance_prompt: The prompt with your unique identifier (e.g., "a photo of sks person").--with_prior_preservation: The flag that enables the regularization technique.--class_prompt: The prompt for the general class (e.g., "a photo of a person").--num_class_images: How many regularization images to generate and use.--class_data_dir: Where these generated images will be stored.--train_text_encoder: A critical flag. Training the text encoder alongside the U-Net often yields higher-quality results, especially for faces, as it helps the model better understand the new token. However, as the documentation notes, this significantly increases VRAM requirements.--learning_rate&--max_train_steps: Key hyperparameters. DreamBooth requires a lower learning rate than LoRA (e.g.,5e-6to2e-6). The number of steps depends on your dataset size and learning rate.
To see this script in action, the same DeepFindr video provides a great walkthrough in a Google Colab environment.
Personalized Image Generation (using Dreambooth) explained!
This segment demonstrates the practical application of the train_dreambooth.py script. It's a great way to see all the pieces you just read about come together in a real training run.
Watch the segment from 07:59 to 14:12. Notice how the command-line arguments discussed in the documentation are configured for the training job. You don't need to replicate the code, just follow the process.
Part 3: DreamBooth vs. LoRA - A Practical Comparison
You now understand two distinct methods for concept injection: LoRA and DreamBooth. An expert needs to know not just how to implement them, but when to choose one over the other. The core trade-off is between Fidelity & Storage (DreamBooth) and Efficiency & Composability (LoRA).
Let's use a resource that explicitly compares them.
Ultimate Finetuning Guide For Stable Diffusion (Dreambooth, LoRA, Textual Inversion, Hypernets) 2023
The video 'Ultimate Finetuning Guide' provides an excellent high-level comparison of the most popular fine-tuning techniques.
Watch the comparison section from 09:02 to 11:07. Pay attention to the attributes used for comparison: training speed, file size, result quality, and compatibility/composability.
Here is a summary of the key differences, combining insights from the video and our technical understanding:
| Feature | DreamBooth | LoRA (Low-Rank Adaptation) |
|---|---|---|
| Method | Fine-tunes the entire U-Net and (optionally) Text Encoder weights. | Freezes original model and injects small, trainable "adapter" layers. |
| Trainable Params | Hundreds of millions to over a billion. | A few million (often <1% of the original model). |
| Output | A full model checkpoint. | A small file containing only the adapter weights. |
| File Size | Large (e.g., 2 GB - 7 GB). | Tiny (e.g., 1 MB - 200 MB). |
| Training | Slower, requires more VRAM (especially with text encoder training). | Faster, requires less VRAM (especially with QLoRA). |
| Fidelity | Generally higher, as it deeply integrates the concept into the model. | Good, but can sometimes be less "strong" than a full fine-tune. |
| Composability | Not composable. One concept per model. Cannot easily mix and match. | Highly composable. Can apply multiple LoRAs (e.g., a character + a style) at once. |
| Best Use Case | Creating a high-fidelity model of a single, specific subject or style. | Efficiently creating many concepts, styles, or poses that can be mixed and matched. |
Test your understanding!
You are tasked with creating custom generative assets for a video game studio. They have two main requirements:
- Create a model that can generate variations of the game's main character, "Zephyr," with extremely high fidelity, for use in promotional art.
- Create a set of "art style" modifiers that artists can apply to any generation (e.g., "gothic oil painting style," "cyberpunk anime style"). These styles need to be easily swappable.
Which technique, DreamBooth or LoRA, would you use for each requirement, and why?
Show answer
-
Main Character "Zephyr": DreamBooth is the ideal choice here. The requirement is for extremely high fidelity of a single subject. DreamBooth's full fine-tuning approach excels at this, deeply baking the character's likeness into a dedicated model. The large file size is an acceptable trade-off for top-tier quality in a professional setting.
-
Art Style Modifiers: LoRA is the perfect solution for this. The key requirements are that the styles be swappable and applicable to any generation. You would train a separate, small LoRA file for each art style. Artists could then load the base model and dynamically apply one or more style LoRAs during inference. This is far more flexible and storage-efficient than creating a massive DreamBooth model for every single style.
Conclusion
You have now implemented and analyzed two of the most important concept-learning techniques in modern diffusion models. You understand not just their internal mechanics but also their practical trade-offs, which is essential for making informed engineering decisions.
Key Takeaways:
- DreamBooth fine-tunes the full model weights (U-Net and Text Encoder) to associate a new concept with a unique identifier.
- It uses prior preservation loss to prevent catastrophic forgetting, ensuring the model retains knowledge of the general class.
- The result is a large, high-fidelity model checkpoint that is not easily composable with other concepts.
- The choice between DreamBooth and LoRA is a classic engineering trade-off: DreamBooth for fidelity and deep integration, LoRA for efficiency, flexibility, and composability.
Next Lesson Preview:
So far in this module, we've focused on teaching a model new visual concepts. However, the quality of our generations also depends critically on how the model understands our text prompts. In our next lesson, we will move to a new module and dive into the text encoder, the component responsible for this understanding. We'll analyze the impact of different text encoders, like CLIP and the more powerful T5, on generation quality and see how they influence the model's ability to follow complex prompts.