Hello! Welcome to the sixth module of our course, where we shift our focus from customizing models to manipulating and editing images at inference time.
In the previous modules, you mastered techniques like LoRA and DreamBooth to teach a pre-trained model new concepts. These methods involve fine-tuning the model's weights. Now, we'll explore powerful techniques that leverage a pre-trained model without any re-training, starting with image-to-image translation.
Today's learning outcome is to implement SDEdit for image-to-image translation using diffusion. SDEdit is a foundational technique that allows you to transform a "guide" image—like a rough sketch, a colored scribble, or a composition of images—into a photorealistic output. It's powerful because of its simplicity and the fact that it requires no task-specific training.
Part 1: The Core Idea of SDEdit
The fundamental challenge in guided image synthesis is balancing two competing goals:
- Faithfulness: The output image must respect the structure and content of the user's input guide.
- Realism: The output image must look photorealistic, as if generated by the model's learned distribution.
Traditional GAN-based methods often struggle to achieve this balance without complex, task-specific training or brittle inversion techniques. SDEdit offers an elegant solution by leveraging the inherent properties of the diffusion process.
The core intuition, as described in the SDEdit paper and its accompanying repository, is to "hijack" the reverse generation process of a diffusion model.
sdedit: guided image synthesis and editing & PyTorch implementation
To start, let's get the high-level intuition from the original authors. Please read the abstract of the SDEdit paper and the overview from their GitHub repository.
First, read the Abstract from the SDEdit paper. Then, read the 'Overview' section in the SDEdit GitHub repository (resource ID LINK). Focus on the core idea of adding noise to an input and then denoising it.
As you've read, the process is conceptually straightforward:
- Start with a guide image, . This can be anything from a simple line drawing to a detailed composition.
- Add noise. Apply the forward diffusion process to for a specific number of timesteps, . This corrupts the image, smoothing out unrealistic details (like sharp brush strokes) but preserving the overall structure. The result is a noisy image, .
- Denoise. Use the pre-trained diffusion model to run the reverse process, starting from instead of pure random noise. The model denoises the image, filling in realistic details and textures while being guided by the structure of .
This process is visualized quite well in the following diagram.

This "noise-and-denoise" cycle is the heart of SDEdit. The key to controlling the output lies in deciding exactly how much noise to add in the first step.
Part 2: The Realism-Faithfulness Trade-off
The most important hyperparameter in SDEdit is , which represents the starting time for the reverse diffusion process. In a DDPM context, you can think of this as the number of noising steps applied to the guide image. This parameter directly controls the trade-off between realism and faithfulness.
- Low : A small amount of noise is added. The resulting image will be very faithful to the guide but may retain some of its unrealistic artifacts (e.g., looking like a sketch).
- High : A large amount of noise is added. The guide's structure becomes faint, so the model has more creative freedom. The output will be more realistic but less faithful to the original guide. If is at its maximum (e.g., ), the process is equivalent to unconditional generation from pure noise.
The authors of SDEdit studied this trade-off empirically. The following resource visualizes this relationship perfectly.
sdedit: guided image synthesis and editing
The section 'Procedure' from the SDEdit paper provides a detailed explanation of the realism-faithfulness trade-off and the role of the hyperparameter t0.
Read the 'Procedure' section (Section 3) of the paper, up to but not including the sub-section 'Choice of t0'. Pay close attention to Figure 3, which is also shown below, as it clearly illustrates the trade-off.
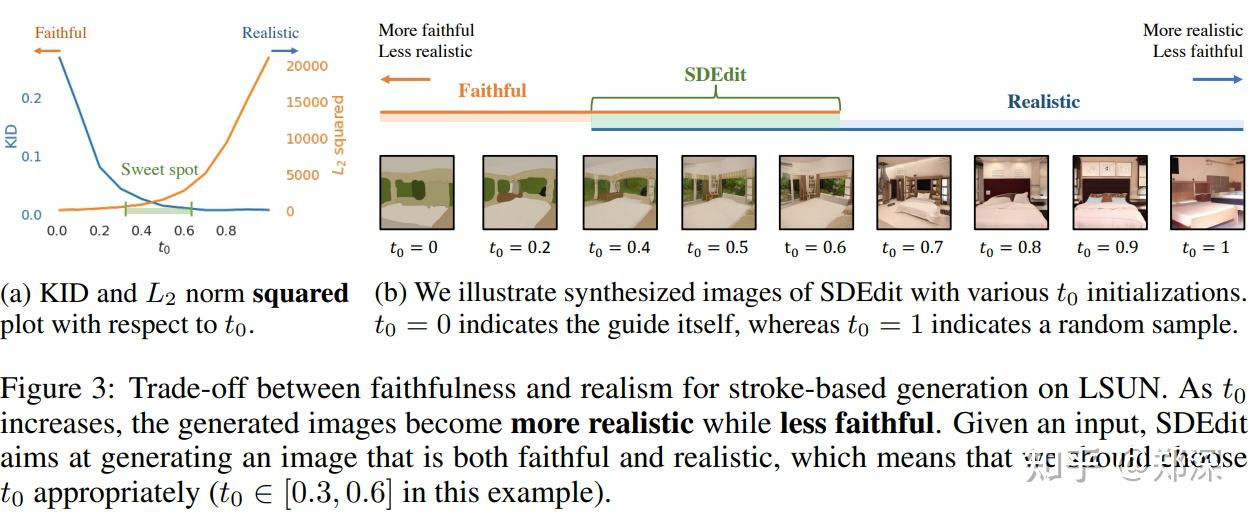
As an engineer, is your primary knob for tuning the output. If a user complains your image-to-image results are "too random," you should decrease . If they say the results "look too much like the input sketch," you should increase . The paper suggests that for many tasks, a value of corresponding to 30-60% of the total timesteps is a good starting point.
Test your understanding!
You are using SDEdit to generate a photorealistic portrait from a simple black-and-white line drawing. Your first result is highly realistic but looks like a completely different person than the one suggested by your drawing.
Which hyperparameter should you adjust, and in which direction (increase or decrease)? Why?
Show answer
You should decrease the starting timestep, .
The problem is a lack of faithfulness to the guide image. A high value means too much noise was added initially, effectively erasing the structural information from your line drawing. By decreasing , you add less noise, forcing the reverse diffusion process to start from a point that is much closer to your guide image, thus preserving its structure more faithfully.
Part 3: Implementing the SDEdit Algorithm
Now let's connect the theory to a practical implementation. Since your background is with DDPMs, we'll focus on the algorithm for VP-SDE (Variance Preserving SDE), which is the continuous-time formulation that closely corresponds to DDPMs.
The paper provides detailed pseudocode in its appendix. The most relevant algorithm for image editing is the one that includes masking, as this allows you to specify which parts of an image to edit and which to preserve.
sdedit: guided image synthesis and editing
The appendix of the SDEdit paper contains the specific algorithms for implementation. We'll focus on the version for VP-SDEs with masking, which is most applicable to practical image editing.
Please review Appendix C.2, 'DETAILS ON STOCHASTIC DIFFERENTIAL EDITING'. Focus on Algorithm 5: Guided image synthesis and editing with mask (VP-SDE). We will break down its key steps next.
Let's dissect Algorithm 5 step-by-step, translating it into the DDPM concepts you're familiar with:
Require:
- : The guide image (what you called
x0in your previous DDPM work). - : A binary mask where 1 indicates the region to be edited.
- : The starting timestep for the reverse process.
- : The number of denoising steps to take (from down to 0).
Key Steps:
-
Initialization (The Noising Step):
The linex ← [(1 − Ω) ⊙ pα(t0)x0 + Ω ⊙ pα(t0)x + p1 − α(t0)z]might look complex, but it's just the standard DDPM forward process applied to the guide imagexto get the noisy image at timestep . You know this formula as . In SDEdit, we're simply setting to be our guide image and running this forward for steps. -
The Denoising Loop (
for n ← N to 1 do):
This is the core reverse diffusion loop. It iterates from timestep down to 0. -
Masked Update:
Inside the loop, the update rule is split into two parts:- Unedited Region (
(1 − Ω) ⊙ ...): For the parts of the image you don't want to change, the algorithm essentially reconstructs them from a noised version of the original image (x0). This ensures these regions remain pristine and unchanged in the final output. - Edited Region (
Ω ⊙ ...): For the parts you do want to change, the algorithm performs a standard DDPM reverse step:1/√1−β(t)∆t(x + β(t)∆tsθ(x, t)) + pβ(t)∆t z. Here,sθ(x, t)is the score, which in a DDPM is proportional to the noise predicted by your U-Net.
- Unedited Region (
This masked update is what makes SDEdit a powerful tool for editing rather than just synthesis. You can, for example, draw a mask around a person's shirt in a photo, provide a guide image with the shirt colored blue, and SDEdit will change only the shirt's color while keeping the rest of the image intact.
In a practical codebase like the official SDEdit repository, these parameters are controlled via command-line arguments. For example:
python main.py --config church.yml --sample -i images --npy_name lsun_edit --sample_step 3 --t 500 --ni
Here, --t 500 sets the number of noising steps, which is the practical equivalent of setting . The --npy_name argument points to the data, which the repository specifies as an array of [image, mask], corresponding to and .
Conclusion
In this lesson, you've learned how to implement SDEdit, a versatile and efficient method for image-to-image translation that requires no model re-training.
Key Takeaways:
- SDEdit is an inference-time editing technique that works by adding a controlled amount of noise to a guide image and then using a pre-trained diffusion model to denoise it.
- The core of SDEdit is the realism-faithfulness trade-off, which is controlled by the hyperparameter (the starting timestep for denoising).
- Increasing leads to more realistic but less faithful results, while decreasing it does the opposite.
- The algorithm can be extended with masking to protect specific regions of an image, enabling targeted edits.
Next Lesson Preview:
SDEdit with a mask is a general form of what is commonly known as inpainting. In our next lesson, we will dive deeper into this specific application. You will learn to apply more specialized inpainting techniques with diffusion models for tasks like object removal and replacement, building directly on the principles of noise, guidance, and masking that you've explored today.