Hello! Welcome to your next lesson in our module on image manipulation.
In our previous session, we explored SDEdit, focusing on how adding noise to a guide image and then denoising it allows for powerful image-to-image translation. We specifically touched on using a mask to limit edits to a certain region. Today, we'll dive deep into that concept with inpainting, a specialized technique for filling in masked portions of an image.
Your learning outcome for this lesson is to apply inpainting techniques with diffusion models for object removal and replacement. We'll cover the two primary methods for inpainting and then walk through a practical implementation, focusing on the key parameters you'll need to control the final output.
A Quick Recap: From SDEdit to Inpainting
Remember the masked editing algorithm from SDEdit? The core idea was to apply the reverse diffusion process only to the masked regions while preserving the unmasked areas. Inpainting builds directly on this principle but refines it for more seamless and high-fidelity results. We'll explore two main families of inpainting techniques:
- Training-Free Inpainting: An iterative method that works with any standard diffusion model.
- Fine-Tuned Inpainting: A more advanced approach that uses models specifically trained for the inpainting task.
Part 1: Training-Free Inpainting (The "RePaint" Method)
The simplest way to perform inpainting is to extend the logic from SDEdit. At each step of the reverse diffusion process, we can force the known, unmasked regions of the image to stay consistent with the original image, while letting the model generate new content for the masked region.
Here's the process:
- Take the original image and a mask.
- Start the reverse diffusion process from pure noise.
- At each denoising step :
a. Predict the denoised image using the U-Net.
b. Noise the original image up to step to get a "ground truth" noisy version, .
c. Combine them: use the generated pixels from inside the mask, and the ground truth pixels from outside the mask. - Repeat until you reach step 0.
This iterative "resampling" ensures the generated content remains consistent with the unmasked surroundings.
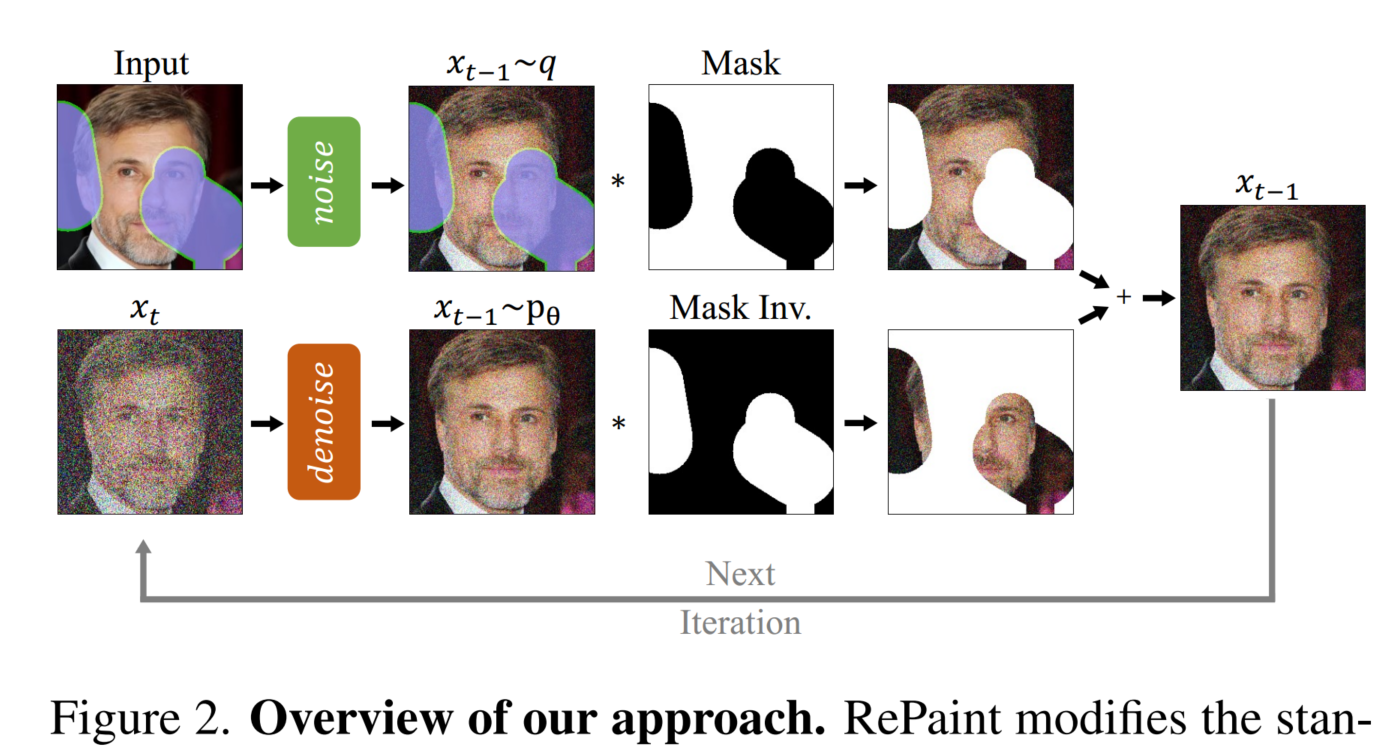
This technique is clever because it requires no changes to the model architecture. However, as the model was not explicitly trained to harmonize the boundary between the generated and original pixels, this method can sometimes produce visible seams or artifacts at the mask's edge.
Stable Diffusion from Scratch in PyTorch | Conditional Latent Diffusion Models
For a conceptual overview of this training-free method and its potential drawbacks, please watch the following segment from the video 'Stable Diffusion from Scratch in PyTorch'.
Watch the segment from 26:50 to 28:45. The video explains this general inpainting approach and highlights the issue of disharmony between generated and original pixels, which motivates the need for fine-tuned models.
Part 2: Fine-Tuned Inpainting Models
To overcome the limitations of the training-free approach, specialized inpainting models are trained. The key innovation is in the model's architecture. Instead of just receiving the noisy latent image and the timestep , the U-Net is given additional information.
Specifically, the input to the U-Net is modified to be a concatenation of:
- The noisy latent image .
- The VAE-encoded masked original image.
- The mask itself (downsampled to the latent resolution).
By providing the model with the context of the surrounding pixels (via the masked image) and the exact location of the hole (via the mask), it learns to generate content that seamlessly blends with the existing image.
SDXL inpainting with HuggingFace Diffusers
The article 'SDXL inpainting with HuggingFace Diffusers' explains this architectural modification in detail for the SDXL model. This is the core mechanism that makes modern inpainting so effective.
Read the section 'Modifications in SDXL inpainting Architecture'. Focus on the paragraph that describes the additional input channels for the U-Net: 'For inpainting, the UNet has 5 additional input channels (4 for the encoded masked-image and 1 for the mask itself)...'. This directly explains the architectural change.
This fine-tuning approach is what powers most high-quality inpainting tools and libraries, including the diffusers pipelines we'll use next.
Part 3: Practical Application with HuggingFace Diffusers
Now, let's translate this theory into practice. We'll use the diffusers library to perform both object replacement and removal.

Step 1: Setting up the Pipeline
First, you need an initial image, a mask specifying the area to edit, and an inpainting pipeline. The AutoPipelineForInpainting class in diffusers makes it easy to load a pre-trained, fine-tuned inpainting model.
import torch
from diffusers import AutoPipelineForInpainting
from diffusers.utils import load_image, make_image_grid

# Use a GPU if available
device = "cuda" if torch.cuda.is_available() else "cpu"
generator = torch.Generator(device).manual_seed(42) # for reproducibility

# Load initial image and mask
image_url = "https://raw.githubusercontent.com/CompVis/latent-diffusion/main/data/inpainting_examples/overture-creations-5sI6fQgYIuo.png"
mask_url = "https://raw.githubusercontent.com/CompVis/latent-diffusion/main/data/inpainting_examples/overture-creations-5sI6fQgYIuo_mask.png"

init_image = load_image(image_url).resize((512, 512))
mask_image = load_image(mask_url).resize((512, 512))

# Load a fine-tuned inpainting model
pipeline = AutoPipelineForInpainting.from_pretrained(
    "runwayml/stable-diffusion-inpainting",
    torch_dtype=torch.float16,
    variant="fp16"
).to(device)
Step 2: Object Replacement
To replace an object, you provide a text prompt describing the new content you want to appear in the masked area. The strength parameter is crucial here. It controls how much noise is added to the masked region of the original image, similar to the hyperparameter from SDEdit.
strength = 1.0: The masked area is completely replaced. This is ideal for object replacement.strength < 1.0: The model will try to blend the new content with the original content in the masked area.
# Prompt for the new object
prompt = "a cat sitting on a park bench"

# Generate the image
image = pipeline(
    prompt=prompt,
    image=init_image,
    mask_image=mask_image,
    strength=1.0, # Replace the content entirely
    guidance_scale=7.5,
    num_inference_steps=50,
    generator=generator
).images[0]

# Display the original, mask, and result
make_image_grid([init_image, mask_image, image], rows=1, cols=3)
Test your understanding!
You are trying to replace a person's red t-shirt with a blue one. You set strength=1.0, but the final image shows a blue t-shirt with some of the original red fabric's texture bleeding through. What is a likely cause and how would you fix it?
Show answer
The likely cause is that even with strength=1.0, the model is still being subtly influenced by the latent representation of the original masked content. Another possibility is that the guidance_scale is too low, giving the model more creative freedom than desired.
To fix this, you could first try increasing the guidance_scale to make the model adhere more strictly to the "blue t-shirt" prompt. If that doesn't work, you could try a different inpainting model or a different seed, as the stochastic nature of the process can lead to varied results.
Step 3: Object Removal
Object removal is a special case of inpainting where you want to fill the masked region with plausible background content. The most effective way to do this is to simply describe the background in your prompt.
Let's use a practical example from a UI-based tool to illustrate the different modes.
Stable Diffusion Inpainting Tutorial
This video provides a great practical demonstration of object removal versus modification. Pay attention to how the 'Masked content' setting is changed for different tasks.
Watch the segments from 6:45 to 7:43 and 7:43 to 9:00. The first part shows object removal (removing a boat) by setting the masked content to 'fill'. The second part shows adding a new object by setting it to 'latent noise'. In a code-based diffusers pipeline, setting strength=1.0 and using a background prompt achieves a similar effect to the 'fill' mode.
In diffusers, to remove an object, you would keep strength=1.0 and change the prompt to describe the background. For example, to remove the man from the bench in our previous example:
prompt = "a park bench" # Describe the background
image = pipeline(prompt=prompt, image=init_image, mask_image=mask_image, strength=1.0).images[0]
Step 4: Refining the Output
Achieving perfect results often requires some fine-tuning. Here are two common techniques.
1. Mask Blurring:
A sharp, binary mask can sometimes create a hard edge in the final output. Blurring the mask slightly can help the model create a smoother transition.
2. Preserving Unmasked Areas:
During the diffusion process, even unmasked areas can undergo slight changes. To ensure they remain identical to the original, you can do a final post-processing step where you paste the unmasked part of the original image back onto the generated output.
Inpaint Images: AI Photo Restoration
The article 'Inpaint Images: AI Photo Restoration' provides excellent code examples for these refinement techniques using diffusers.
First, read the section 'Blurring the Masked Area' to see how to use pipeline.mask_processor.blur. Then, read 'Preserving the Unmasked Area' to understand how pipeline.image_processor.apply_overlay works as a post-processing step to guarantee fidelity in the unmasked regions.
Here's how you might apply the overlay in code:
# Assuming 'inpainted_image' is the output from the pipeline
final_image = pipeline.image_processor.apply_overlay(
    mask_image=mask_image,
    original_image=init_image,
    inpainted_image=image
)
This ensures pixel-perfect preservation of the areas you didn't want to change.
Conclusion
In this lesson, you've learned how to apply diffusion models for inpainting, a powerful technique for object removal and replacement.
Key Takeaways:
- Inpainting can be done with training-free methods (like RePaint) or with more robust fine-tuned models.
- Fine-tuned models achieve better results by modifying the U-Net architecture to accept the masked image and the mask itself as conditioning.
- In practice, you can use the
diffusersAutoPipelineForInpaintingto easily work with these models. - The
strengthparameter is key to controlling whether you replace (strength=1.0) or modify (strength<1.0) the content within the mask. - Object removal is achieved by masking the object and prompting for the background.
- Techniques like mask blurring and overlaying the original image can help refine the final output and eliminate artifacts.
Next Lesson Preview:
Now that you can fill in holes inside an image, what about extending an image outwards? In the next lesson, we will explore outpainting, a technique that uses the same underlying principles as inpainting to expand an image's canvas and generate new content beyond its original borders.