Hello! Welcome back to our journey toward diffusion model expertise.
In our last few lessons, we've focused on controlling and analyzing pre-trained models. We learned to steer generation with negative prompts, re-weight concepts with cross-attention manipulation, and finally, to debug prompt alignment by visualizing the attention maps themselves. This has given us a deep understanding of how a model interprets our text prompts.
But what if we want to teach the model a completely new concept it has never seen before—a specific person, object, or artistic style? The traditional approach, full fine-tuning, is incredibly resource-intensive, requiring vast amounts of VRAM and resulting in massive, multi-gigabyte model files. This is impractical for most.
Today, we'll learn the elegant and efficient solution to this problem. Our learning outcome is to implement Low-Rank Adaptation (LoRA) to efficiently fine-tune a text-to-image model on a custom dataset. You'll discover how LoRA allows you to inject new knowledge into massive models by training only a tiny fraction of new parameters, making custom fine-tuning accessible and practical.
Part 1: What is LoRA and Why Does It Work?
Low-Rank Adaptation (LoRA) is a technique from the broader family of Parameter-Efficient Fine-Tuning (PEFT) methods. The core insight is that when we fine-tune a large pre-trained model, the change in the model's weights has a "low intrinsic rank." In simpler terms, the update doesn't need to be a complex, full-dimensional transformation; a much simpler, low-rank update will suffice.
Instead of changing the original weights , LoRA keeps them frozen and learns a small "delta" or "residual" , which is added to the original weights during inference.
The "low-rank" magic comes from how is represented. Instead of a large matrix, it's decomposed into two much smaller, "thin" matrices, and .
Here, if is a matrix, we introduce a small integer called the rank, , where and . Then, becomes an matrix and becomes an matrix. We only train the parameters in and , which is a tiny fraction of the parameters in .
This is beautifully illustrated in the following diagram.
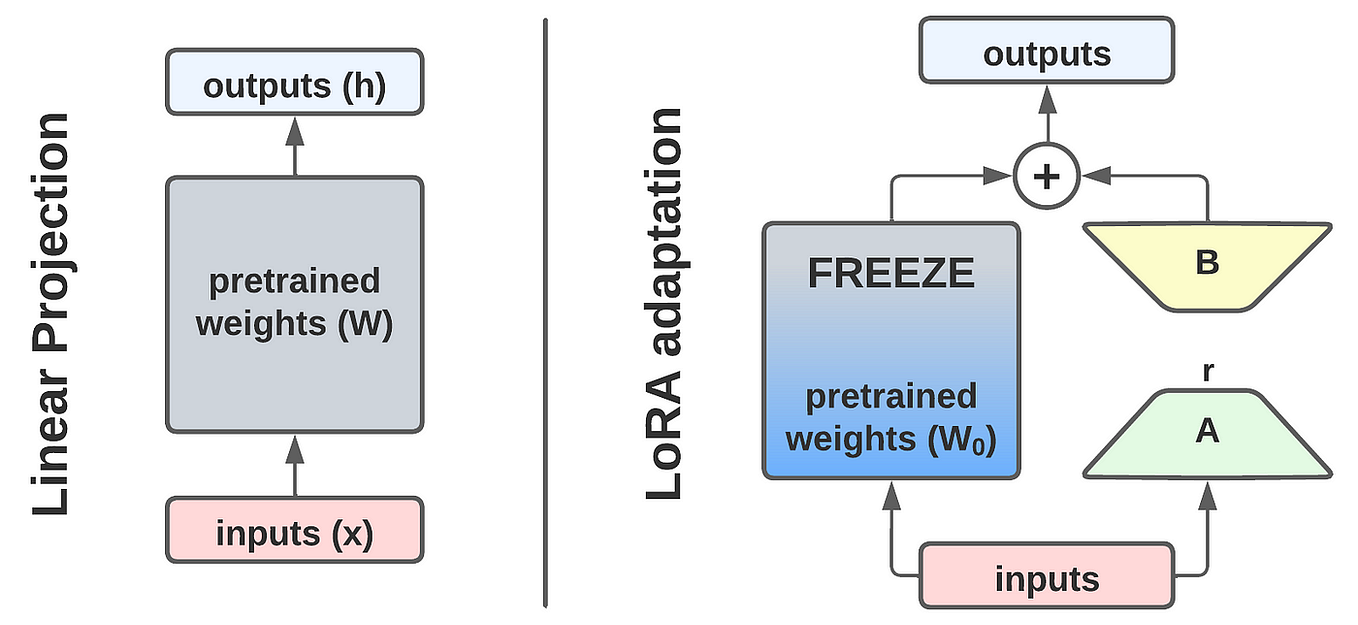
To solidify the core concepts of LoRA, let's turn to a great article that breaks it down.
Implementing LoRA from Scratch
This article, 'Implementing LoRA from Scratch', provides one of the clearest explanations of the mechanics behind LoRA. Focus on understanding the decomposition and the key hyperparameters.
Please read the 'How LoRA works' section. Pay close attention to the matrix decomposition diagram and the example calculation that shows the massive reduction in trainable parameters. Also, take note of the explanation of the alpha parameter and its role in decoupling the rank r from the learning rate.
Two key hyperparameters you'll constantly encounter are:
- Rank (
r): This determines the "capacity" of the LoRA adapter. A higher rank allows the adapter to capture more detailed information but increases the number of trainable parameters and the final file size. - Alpha (
α): This is a scaling factor. The final output is calculated as . As the reading mentions, a common practice is to setalphato the same value asr. This convention helps stabilize training, allowing you to changerwithout needing to re-tune the learning rate. During inference, you can treatalphaas a weight to control the strength of the LoRA's effect.
Part 2: Implementing LoRA with the PEFT Library
While implementing LoRA from scratch by manually replacing layers is a great learning exercise (as outlined in the second half of the article you just read), in any practical application you'll use a dedicated library. The standard for this is Hugging Face's PEFT (Parameter-Efficient Fine-Tuning) library.
The process of adapting a model with PEFT is straightforward and follows a clear set of steps. This workflow is so common it can be distilled into what the author of the previous resource calls the "Five Commandments of Low-Rank Adaptation."
The Five Commandments of Low-Rank Adaptation
- Utilize LoRA for efficient fine-tuning.
- Employ the PEFT library for implementation.
- Extend LoRA adaptations to all linear layers. (While the original paper focused on attention layers, it's now common practice to adapt all linear layers in the UNet and text encoder).
- Keep biases and layer norms trainable.
- Apply Quantized-LoRA (QLoRA) to conserve VRAM. (QLoRA loads the base model in a lower precision, e.g., 4-bit, to drastically reduce memory usage, while still performing the LoRA training in higher precision).
Let's see how these commandments translate into a practical code workflow.
from transformers import AutoModelForCausalLM, BitsAndBytesConfig
from peft import LoraConfig, get_peft_model
import torch

# Commandment 5: Use QLoRA. Define quantization config.
bnb_config = BitsAndBytesConfig(
    load_in_4bit=True,
    bnb_4bit_quant_type="nf4",
    bnb_4bit_compute_dtype=torch.float16,
)

# Load the base model with quantization
model_id = "runwayml/stable-diffusion-v1-5" # A placeholder, you'd use a text-to-image model
base_model = AutoModelForCausalLM.from_pretrained(
    model_id,
    quantization_config=bnb_config,
    device_map="auto",
)

# Commandment 2 & 3: Define the LoRA configuration using PEFT
lora_config = LoraConfig(
    r=16, # Rank
    lora_alpha=32, # Alpha
    target_modules=["q_proj", "v_proj"], # Target layers, often all linear layers
    lora_dropout=0.05,
    bias="none", # Commandment 4: Or 'all' or 'lora_only'
    task_type="CAUSAL_LM", # Adjust for the task
)

# Wrap the base model to create the PEFT model
lora_model = get_peft_model(base_model, lora_config)

# You can now train `lora_model` as you would any other PyTorch model.
# Only the LoRA parameters (and any other specified trainable params) will be updated.

# After training, save the adapter
lora_model.save_pretrained("./my-awesome-lora")
This code snippet encapsulates the modern, efficient way to set up a LoRA fine-tuning task. It's clean, declarative, and leverages best practices like quantization out of the box.
For a more detailed walkthrough of using the PEFT library, including how to handle different modules and save/load models, the following section of the "Implementing LoRA from Scratch" article is an excellent guide.
Implementing LoRA from Scratch
This section bridges the gap from theory to standard practice, showing you how to use the PEFT library to achieve our goals.
Read 'Possible Improvements' and 'A Step-by-Step Guide to PEFT Implementation'. Focus on how the code specifies target_modules, how modules_to_save is used to keep layer norms trainable, and the simple save_pretrained and from_pretrained API.
Part 3: A Practical Fine-tuning Workflow
Now that you understand the theory and the code implementation, let's walk through the entire end-to-end process of fine-tuning a model on a custom dataset. While you can write the training loop yourself, many practitioners use specialized GUIs like Kohya SS, which provide a streamlined workflow and expose all the necessary hyperparameters.
Understanding this workflow is crucial for an expert, as it represents how most custom LoRAs in the community are created.
Ultimate Tutorial - How to Create Realistic Human LoRAs in Kohya SS [Win 10] [RTX 5090] [32 GB]
This comprehensive video tutorial by Tech Byte Tips uses Kohya SS to train a LoRA of a person. It covers every stage from data collection to final evaluation, providing invaluable practical insights into the choices you need to make.
This video is dense with practical details. I recommend watching it in segments: Dataset Preparation (01:07 - 13:19): Watch this to understand the importance of image quality, variety, resolution, and the physical folder structure required for training. Captioning (13:19 - 21:01): See how images are captioned and how a unique trigger word (instance prompt) is defined. This word will be used to invoke your trained concept. Parameter Configuration (21:01 - 35:26): This is the most critical part. Pay close attention to the settings for learning rate, network rank (r), and network alpha (α). Notice the trade-offs discussed regarding VRAM and quality. Evaluation (48:21 - 1:05:04): Finally, observe how the multiple saved epochs are systematically tested using an XYZ plot in an inference UI like Automatic1111. This is a key step to find the best-performing version of your LoRA.
Let's summarize the key stages from the video, connecting them back to our technical understanding:
- Dataset Curation: You need a small (15-50 images) but high-quality and varied dataset of your concept. For a person, this means different angles, lighting, clothing, and expressions.
- Captioning & Trigger Word: Each image needs a corresponding text file with captions describing its content (e.g.,
a photo of sks_dog, sitting on grass, daytime). The unique identifier (sks_dogin this case) is the trigger word or instance prompt. The rest of the description is the class prompt (dog). This teaches the model to associate the new visual features with the new trigger word, while still understanding it belongs to the general class. - Hyperparameter Tuning: This is where your engineering judgment comes in.
- Learning Rate: As noted in the
cloneofsimo/loraGitHub repo, LoRA can tolerate much higher learning rates than full fine-tuning. Values around1e-4are a good starting point. - Rank () and Alpha (): The video recommends a high rank (128) for a realistic person. For a style, a lower rank (e.g., 16-64) is often better to avoid overfitting. The
alphais often set to half the rank or equal to the rank. - Epochs & Batch Size: You typically train for 10-20 epochs, saving the LoRA file at the end of each one.
- Learning Rate: As noted in the
- Evaluation: It's rare that the final epoch is the best one. Some epochs might be undertrained (concept isn't clear), while later ones might be overtrained (loses flexibility, produces artifacts). The systematic XYZ plot method is the professional way to compare all saved epochs against various prompts to find the "sweet spot" that gives the best balance of fidelity and flexibility.
Test your understanding!
You've trained a LoRA for a specific cartoon art style. You used a network rank of 128 and a learning rate of 1e-4.
When you test the resulting LoRA epochs, you find that the early epochs don't capture the style at all, while the later epochs capture the style perfectly but are completely "overcooked"—they ignore all structural parts of your prompt (e.g., a castle on a hill becomes a stylistic blob) and have harsh, burnt-looking artifacts.
What are two different hyperparameters you could adjust in your next training run to find a better balance, and what would you change them to? Explain your reasoning.
Show answer
-
Lower the Network Rank (
r): A rank of128is very high and captures a lot of detail. This is often good for photorealistic subjects but can easily overfit on a more abstract concept like an art style. By memorizing the style too strongly, it loses the ability to apply it flexibly to different structures.- Action: Reduce the rank significantly, for example, to
32or even16. - Reasoning: A lower rank creates a "bottleneck" that forces the model to learn a more compressed, generalized representation of the style rather than memorizing the training images. This should result in a LoRA that is more flexible and less prone to ignoring the prompt's structure.
- Action: Reduce the rank significantly, for example, to
-
Lower the Learning Rate: The
1e-4learning rate might be too aggressive, causing the model to overfit very quickly. The fact that later epochs are "overcooked" suggests the model learned too much, too fast.- Action: Reduce the learning rate, for example, to
5e-5or2e-5. - Reasoning: A lower learning rate will cause the model to take smaller, more cautious steps during optimization. This gives you a wider "window" of usable epochs. The point of overfitting will be reached more slowly, likely providing several well-balanced epochs before the model becomes overcooked.
- Action: Reduce the learning rate, for example, to
Conclusion
Congratulations! You've now mastered one of the most impactful and widely used techniques in the generative AI ecosystem. LoRA is the key that unlocks true personalization for massive diffusion models.
Key Takeaways:
- LoRA is a parameter-efficient fine-tuning (PEFT) method that freezes a model's original weights and trains a small set of new, low-rank weights () for a specific task or concept.
- This approach yields tiny model files (1-100 MB) and makes fine-tuning accessible on consumer hardware, especially when combined with quantization (QLoRA).
- The Hugging Face PEFT library is the industry standard for implementing LoRA in code.
- A practical fine-tuning workflow involves curating a small, high-quality dataset; creating captions with a unique trigger word; carefully selecting hyperparameters like rank (), alpha (), and learning rate; and systematically evaluating the saved epochs to find the best one.
Next Lesson Preview:
We've just learned how to efficiently adapt a model for a new concept using LoRA. However, LoRA is just one of several techniques for personalization. In our next lesson, we will implement DreamBooth, another popular method. We'll explore how it differs from LoRA—by creating a new token in the model's vocabulary and fine-tuning more of the model—and analyze the trade-offs between these two powerful approaches to understand when to use each.