Hello! In our last lesson, we explored outpainting, a technique for extending image boundaries by filling in masked regions. This gave you control over the region of generation. Today, we'll take a significant leap forward into a more sophisticated form of conditioning that gives you control over the very structure of the generated image.
This lesson introduces ControlNet, a groundbreaking architecture that allows you to guide diffusion models using structural inputs like edge maps, human poses, or depth information. Your learning outcome is to apply ControlNet for structure-guided image generation. We will explore the elegant architectural solution that makes ControlNet so effective and then dive into its practical application using the diffusers library.
Part 1: The Core Problem and the ControlNet Solution
Imagine you want to fine-tune a massive, pre-trained model like Stable Diffusion to generate images based on a specific structural guide, like a line drawing. A naive approach would be to continue training the model on pairs of line drawings and corresponding images. However, this poses a major risk.
ControlNet with Diffusion Models | Explanation and PyTorch Implementation
To understand why a new approach was needed, let's start with this video from ExplainingAI. It clearly articulates the problem of 'catastrophic forgetting' that ControlNet was designed to solve.
Watch the first 4 minutes (00:00 - 04:09). Focus on the core problem: why fine-tuning a massive pre-trained model on a smaller, specialized dataset can degrade its original capabilities.
As the video explains, fine-tuning on a small dataset can cause the model to overfit and "forget" the vast knowledge it acquired during its initial training on billions of images. This would sacrifice the model's quality and diversity for the sake of the new conditioning.
ControlNet provides a brilliant solution to this problem without altering the original model's weights. The key ideas are:
- Duplicate and Freeze: The weights of the pre-trained model's encoder blocks (e.g., the U-Net's downsampling blocks) are cloned. The original blocks are locked (frozen), preserving all their learned knowledge. The new copy is trainable and will learn to process the structural condition.
- Zero Convolutions: The trainable copy is connected back to the frozen model using special 1x1 convolution layers where all weights and biases are initialized to zero.
At the beginning of training, these "zero convolution" layers output nothing but zeros. This means the ControlNet adds no information, and the output is identical to the original, frozen model. This provides a perfectly stable starting point. As training progresses, the weights of the zero convolutions and the trainable copy are updated, allowing the model to gradually learn to incorporate the structural guidance without corrupting the powerful base model.
This diagram from the original paper illustrates the architecture beautifully.
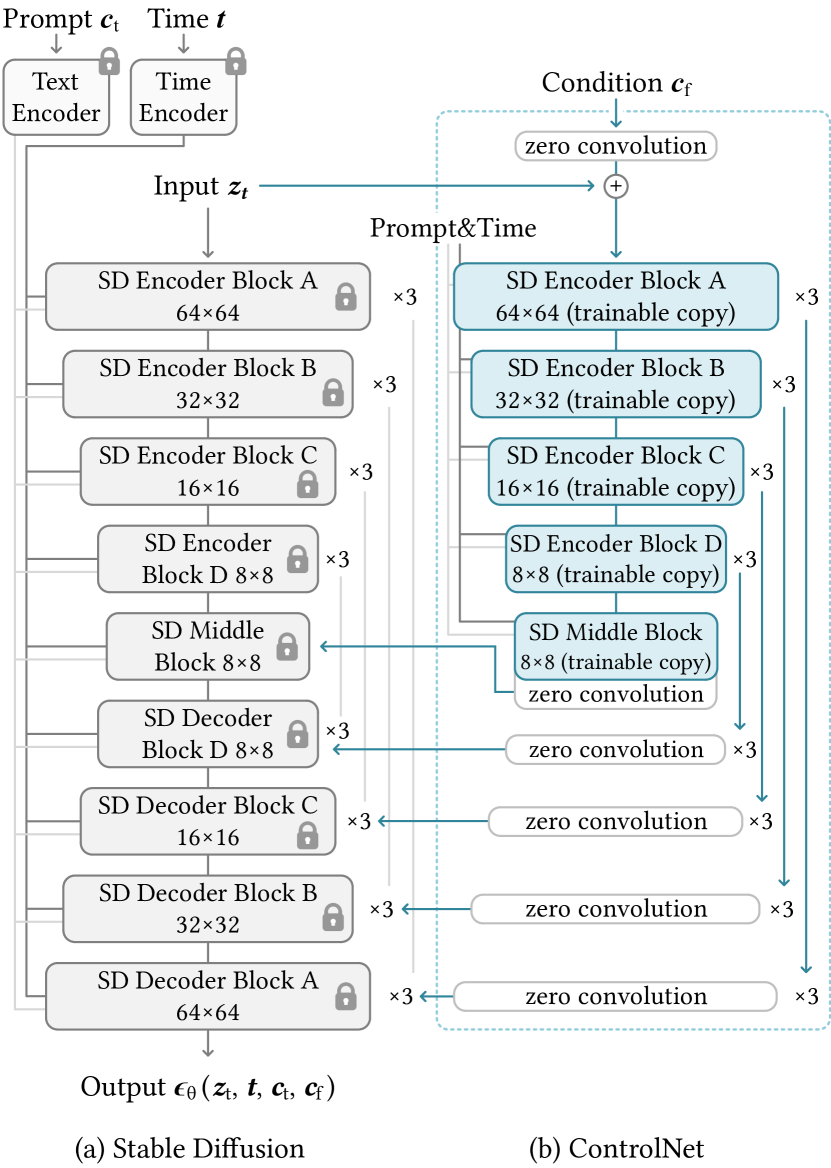
To solidify your understanding of this core mechanism, let's return to the ExplainingAI video.
ControlNet with Diffusion Models | Explanation and PyTorch Implementation
The next segment of the video provides an excellent animated breakdown of how the locked copy, trainable copy, and zero convolutions work together.
Watch from 04:09 to 07:05. This part visualizes the concepts we just discussed and is crucial for understanding the flow of information within a ControlNet block.
Part 2: Integrating ControlNet into a U-Net
Now, let's place this concept within the familiar U-Net architecture of a diffusion model.
The trainable copy only mirrors the encoder and middle blocks of the U-Net. The conditioning input (e.g., a Canny edge map) is first processed by a small "hint block" and then fed into the trainable copy.
The outputs from each block of the trainable copy are then added to the outputs of the corresponding frozen blocks. These combined outputs are what get passed to the U-Net's decoder via the skip connections. This effectively injects the structural guidance at every level of the U-Net's feature hierarchy.
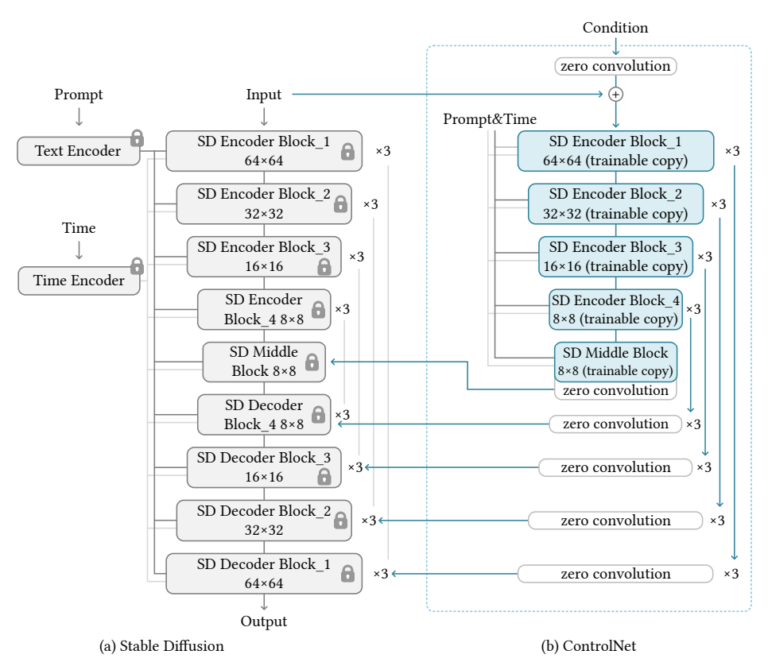
Test your understanding!
Why are the zero convolutions so critical for the stability and effectiveness of ControlNet training? What would likely happen during the initial training steps if, instead of zero convolutions, these layers were initialized with random weights?
Show answer
If the connecting layers were initialized with random weights, they would introduce significant, noisy signals into the frozen, production-ready diffusion model from the very first step. This would be like adding random noise to the carefully learned feature maps of the U-Net, immediately degrading the output quality. The model would have to spend a significant part of the training process learning to suppress this noise before it could even begin to learn the desired conditioning. Zero convolutions prevent this by ensuring that at the start of training, the ControlNet contributes nothing, allowing for a smooth and stable learning process that builds upon the frozen model's capabilities rather than fighting against them.
Part 3: Practical Application with diffusers
With the theory in place, let's move to the practical application. Using ControlNet involves two main components:
- The Pre-processor: A model that converts a standard image into the specific format the ControlNet was trained on (e.g., Canny edges, a depth map, human pose keypoints).
- The ControlNet Pipeline: The
diffuserslibrary provides a convenientStableDiffusionControlNetPipelinethat handles the integration.
There are many types of ControlNet models, each specializing in a different form of structural guidance.
To get a sense of the variety of control you can achieve, this 'ControlNet MasterClass!' video provides a great visual overview of different pre-processor outputs.
Watch from 02:07 to 06:15. Don't worry about the ComfyUI specifics; just observe the different types of conditioning maps produced: Canny (edges), Human Pose (skeletons), Depth (foreground/background), and Normal Maps (surface detail).
Now, let's see how to implement this in code. The following tutorial provides clear, hands-on Python code for using ControlNet with diffusers.
How to Control Generated Images by Diffusion Models via ...
The article 'How to Control Generated Images by Diffusion Models via ...' gives practical code examples for applying several types of ControlNet models. It's a great resource for translating the concepts into working Python code.
Please read the sections 'Open-pose' and 'Canny'. Focus on the key steps in the code: Loading the pre-processor model (e.g., OpenposeDetector or cv2.Canny). Loading the corresponding ControlNetModel. Passing the controlnet model to the StableDiffusionControlNetPipeline during initialization. Using the pre-processor on an input image to create the control_image. Calling the pipeline with a prompt and the control_image.
Let's synthesize the information from that article into a typical workflow using a Canny edge ControlNet.
First, install the necessary libraries:
pip install -qU diffusers transformers accelerate controlnet_aux opencv-python-headless
Then, the core Python script looks like this:
import torch
import cv2
from PIL import Image
import numpy as np
from diffusers import StableDiffusionControlNetPipeline, ControlNetModel, UniPCMultistepScheduler
from diffusers.utils import load_image

# 1. Load the base image
image_url = "https://huggingface.co/lllyasviel/sd-controlnet-canny/resolve/main/images/bird.png"
original_image = load_image(image_url)

# 2. Use the pre-processor (Canny)
image_np = np.array(original_image)
low_threshold = 100
high_threshold = 200
canny_image = cv2.Canny(image_np, low_threshold, high_threshold)
# Convert back to a 3-channel PIL image
canny_image = canny_image[:, :, None]
canny_image = np.concatenate([canny_image, canny_image, canny_image], axis=2)
control_image = Image.fromarray(canny_image)

# 3. Load the ControlNet model and pipeline
controlnet = ControlNetModel.from_pretrained(
    "lllyasviel/sd-controlnet-canny", torch_dtype=torch.float16
)
pipe = StableDiffusionControlNetPipeline.from_pretrained(
    "runwayml/stable-diffusion-v1-5", controlnet=controlnet, torch_dtype=torch.float16
)

# Optional: Improve performance
pipe.scheduler = UniPCMultistepScheduler.from_config(pipe.scheduler.config)
pipe.enable_model_cpu_offload()

# 4. Generate the image
prompt = "a majestic eagle, high detail, photorealistic"
negative_prompt = "monochrome, lowres, bad anatomy, worst quality, low quality"

generated_image = pipe(
    prompt,
    negative_prompt=negative_prompt,
    image=control_image, # Note: we pass the control_image here
    num_inference_steps=20,
).images[0]

generated_image.save("eagle_from_canny.png")
This script precisely follows the steps you reviewed in the article, providing a concrete template for structure-guided generation. You can easily adapt it for other ControlNet types (like OpenPose or Depth) by swapping the pre-processor and the ControlNetModel checkpoint.
Conclusion
In this lesson, we moved beyond regional control and into the powerful domain of structural control with ControlNet. You've seen how its clever architecture robustly adds new conditioning capabilities to massive pre-trained models without compromising their original power.
Key Takeaways:
- The Problem: Simple fine-tuning of large diffusion models on small, specialized datasets can lead to catastrophic forgetting, degrading the model's overall quality and diversity.
- The Architecture: ControlNet solves this by creating a trainable copy of the model's encoder while keeping the original weights frozen. This allows it to learn new conditions without altering the powerful base model.
- Zero Convolutions: These special layers connect the trainable and frozen copies. By starting with zero weights, they ensure a stable training process, only gradually introducing the learned condition.
- Practical Workflow: Applying ControlNet involves a two-step process: first, use a pre-processor (e.g., Canny, OpenPose) to create a structural map from a reference image, then feed this map and a text prompt into the
StableDiffusionControlNetPipeline.
Next Lesson Preview:
So far, our image editing has been guided by either masks (inpainting/outpainting) or structural maps (ControlNet). In our next lesson, we will explore another paradigm: instruction-based editing. We will adapt an instruction-based image editing pipeline (e.g., InstructPix2Pix), which learns to perform edits based on natural language commands like "turn the horse into a zebra" or "make it winter." This will open up a new avenue for intuitive and flexible image manipulation.