Hello! In our last lesson, you successfully put your Hugo project under version control with Git and pushed it to a remote repository on GitHub. This was a crucial step in establishing a professional development workflow.
This lesson builds directly on that foundation. Our goal is to connect your Git repository to an automated deployment platform (Netlify) and configure the build settings. This process, often called Continuous Deployment (CD), is the bridge between the code on your machine and a live website accessible to the world.
For someone who manages complex digital projects and coordinates cross-functional teams, this is where the magic happens. You'll create a system where code updates are automatically built and published, eliminating manual, error-prone deployment steps. This automates the final handoff, allowing you and your team to focus on creating content and features.
From Code to Live Site: Understanding Continuous Deployment
Before we start clicking buttons, let's clarify the concept. Continuous Deployment is an automated process that takes the code from your version control system (GitHub), builds it into a functional website, and deploys it to a hosting server every time you push an update.
The workflow looks like this:
- You make changes to your site locally.
- You
git pushthose changes to yourmainbranch on GitHub. - A service like Netlify detects this push.
- Netlify automatically runs your build command (e.g.,
hugo) in a clean environment. - It takes the output (your
publicfolder) and publishes it to its global network. - Your site is live with the new changes.
This automated pipeline is the industry standard for modern web development. Let's set it up.
Step 1: Connecting Netlify to Your GitHub Account
First, we need to create a Netlify account and authorize it to access your GitHub repositories. Netlify is a popular platform for hosting static sites, known for its generous free tier and ease of use.
Host your site for free, with version control, staging, and more using Netlify
The video 'Host your site for free...' by Kevin Powell provides a clear, general overview of connecting a service like Netlify to GitHub. This will familiarize you with the initial login and authorization flow.
Watch from 03:05 to 04:01. Go to Netlify.com and sign up using your GitHub account. The video walks you through this exact process, which makes the connection between the two services seamless.
Once you've signed up and are logged into your Netlify dashboard, you're ready to deploy your first site.
Step 2: Importing and Configuring Your Hugo Project
Now we'll tell Netlify which repository to build and how to build it. The following video provides a complete, Hugo-specific walkthrough of this entire process, from selecting the repository to seeing the final deployed site.
Hugo Tutorial | Create a Blog from Scratch & Deploy on Netlify
In 'Hugo Tutorial | Create a Blog from Scratch & Deploy on Netlify', the creator demonstrates the exact steps to deploy a Hugo site. We'll focus on the Netlify-specific part.
Watch from 01:08:33 to 01:11:32. Follow along in your own Netlify account. The key actions are: clicking 'New site from Git', choosing GitHub, authorizing, and selecting your Hugo project's repository.
After you select your repository, Netlify will present you with the build configuration screen. This is the most critical step.
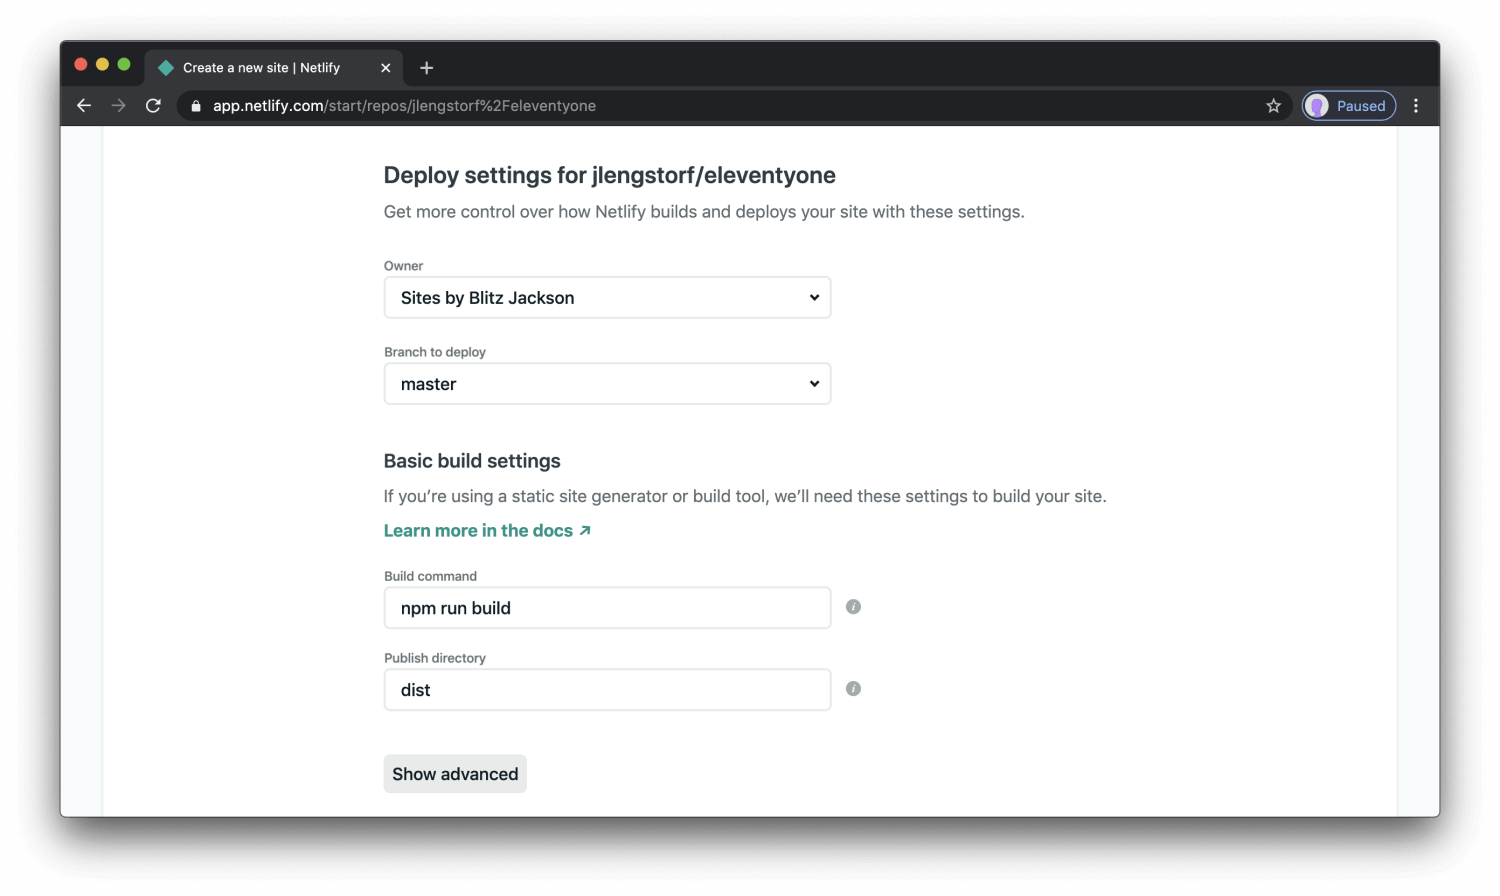
Here are the settings you need for a standard Hugo project:
- Branch to deploy:
main(ormaster, depending on your repository's default). This tells Netlify to only build and deploy changes that are pushed to this primary branch. - Build command:
hugo --gc --minifyhugois the basic command to build your site.--gc(garbage collection) cleans up unused cache files.--minifyoptimizes your HTML, CSS, and JS files for faster loading.
- Publish directory:
public- This tells Netlify where to find the generated static site after the build command runs. For Hugo, this is always the
publicdirectory.
- This tells Netlify where to find the generated static site after the build command runs. For Hugo, this is always the
These settings are also summarized concisely in the HugoBlox deployment guide.
Hosting & Deployment Guide | HugoBlox Docs
The 'Hosting & Deployment Guide' from HugoBlox Docs provides a quick, clear reference for the essential Netlify build settings for a Hugo project.
Find the section titled 'Netlify'. Look at step 3, 'Configure Build'. It confirms the exact 'Build Command' and 'Publish Directory' we are using.
Once you've entered these settings, click Deploy site. Netlify will now pull your code from GitHub, run the build command, and deploy the contents of the public folder. You'll be taken to a dashboard where you can see the deployment progress. In a minute or two, your site will be live at a randomly generated Netlify URL!
Test your understanding!
A colleague pushes code to a new branch called feature/new-homepage in your GitHub repository. Will the main, live website be updated? Why or why not?
Show answer
No, the live site will not be updated. We configured Netlify's "Branch to deploy" setting to main. This means only commits pushed to the main branch will trigger a production deployment. Pushes to other branches will be ignored by this specific deployment rule (though Netlify can be configured to create separate "deploy previews" for other branches, as you saw in one of the videos).
Step 3: A More Robust Method with netlify.toml
Setting build configurations in the UI works, but a more professional and robust method is to define them in a configuration file within your repository itself. This file is named netlify.toml.
Why use netlify.toml?
- Version Controlled: Your build settings are now part of your Git history.
- Portable: Anyone who clones your repository has the build settings.
- Explicit Dependencies: You can lock in specific versions of tools, like Hugo, preventing unexpected build failures.
Let's create this file in the root of your local Hugo project.
The official Hugo documentation provides an excellent example of a netlify.toml file that specifies not only the build command but also the exact Hugo version to use.
Read the 'Procedure' section. Create a file named netlify.toml in your project's root directory and copy the contents of the first code block into it.
Your netlify.toml file should look similar to this:
[build.environment]
HUGO_VERSION = "0.124.1" # Use the version you have locally

[build]
publish = "public"
command = "hugo --gc --minify"
Crucially, you should change HUGO_VERSION to match the version you are using for local development. You can find your local version by running hugo version in your terminal. This prevents a common issue where Netlify's default Hugo version is different from yours, causing the build to fail or render incorrectly.
Now, add, commit, and push this new file to your GitHub repository:
git add netlify.toml
git commit -m "feat: Add Netlify build configuration"
git push
Netlify will detect this push and start a new build, this time using the settings from your netlify.toml file.
Step 4: Witnessing the Automated Workflow
This is the moment everything comes together. With the connection established, every git push to your main branch will now automatically update your live site.
Hugo Tutorial | Create a Blog from Scratch & Deploy on Netlify
Let's watch this automated workflow in action. The end of the 'Hugo Tutorial' video demonstrates exactly what happens after you push a change to a site that's connected to Netlify.
Watch from 01:13:41 to 01:15:33. The video shows making a local change, pushing it to GitHub, and then observing in the Netlify dashboard as a new build is automatically triggered and deployed. Try this yourself: make a small change to your hugo.toml title or a content file, then git push and watch your Netlify dashboard.
Conclusion
You have now successfully implemented a complete Continuous Deployment pipeline. Your Hugo project, managed in a Git repository on GitHub, is now automatically built and deployed by Netlify whenever you push an update. This powerful, automated workflow is the backbone of modern web development, freeing you up to focus on what matters most: creating and refining your site's content and structure.
Key Takeaways:
- Continuous Deployment (CD) automates the process of building and publishing your site from a Git repository.
- Netlify is a platform that connects to your GitHub account to enable CD for static sites like Hugo.
- The three critical build settings are the branch to deploy (
main), the build command (hugo --gc --minify), and the publish directory (public). - Using a
netlify.tomlfile in your repository is the best practice for managing build settings and locking theHUGO_VERSIONto prevent build failures.
Preview of the next lesson:
Your site is now live and updating automatically. But what happens when a deployment fails? In our final lesson, we will learn how to trigger, verify, and troubleshoot an automated deployment from a Git push. You'll learn how to read deployment logs and diagnose common issues, completing your skill set for managing a site from initial idea to live deployment and maintenance.