Hello! Welcome to the final module of our course. In the last two lessons, we dove deep into debugging, first by learning Hugo's built-in debugging tools and then by applying them to fix common errors in AI-generated code, particularly those related to scope and context. You're now well-equipped to refine the code that your "vibe coding" workflow produces.
This lesson shifts our focus from code to project management. Our learning outcome is to set up version control for the Hugo project using Git and push it to a remote repository.
As someone who manages complex digital projects and coordinates with various teams, you understand the critical need for a single source of truth and a complete history of all changes. Version control with Git provides exactly that for your codebase. It's the foundation for collaboration, safe experimentation, and—crucially for our next steps—automated deployment.
Today, we'll walk through the fundamental Git workflow, from initializing a repository for your Hugo project to pushing it to GitHub, setting the stage for bringing your site to life on the web.
What is Version Control? The Git Mental Model
Before we type any commands, it's essential to understand the core concepts of Git. Think of it as an advanced "undo" and "save" system for your entire project, not just a single file. It allows you to save snapshots of your project (called "commits"), view the history of those snapshots, and even revert to older versions if a change introduces a problem.
This short video provides an excellent visual overview of the key concepts and the journey your code takes.
How Git Works: Explained in 4 Minutes
The video 'How Git Works: Explained in 4 Minutes' from ByteByteGo clearly illustrates the four locations where your code exists in a Git workflow. Understanding this is key to making sense of the commands we'll use.
Watch from 00:35 to 02:40. Pay close attention to the explanation of the four zones—Working Directory, Staging Area, Local Repository, and Remote Repository—and the commands that move code between them.
To summarize the video's key points:
- Working Directory: Your project folder where you actively edit files.
- Staging Area: A holding area where you gather the changes you want to include in your next "snapshot".
- Local Repository: The saved history of all your snapshots (commits) on your own machine.
- Remote Repository: A copy of your repository hosted on a server (like GitHub), which serves as a backup and a central point for collaboration and deployment.
Our goal today is to move your Hugo project through these first three areas and then "push" it to the fourth.
Step-by-Step: Putting Your Hugo Project on GitHub
We will now follow a structured, hands-on process to get your Hugo project under version control. These steps are standard practice for almost any web development project.
Step 1: Create a Remote Repository on GitHub
Before we do anything locally, let's set up the destination. Your remote repository on GitHub will be the central hub for your project's code.
If you don't already have one, create a free account at GitHub. Then, create a new repository.
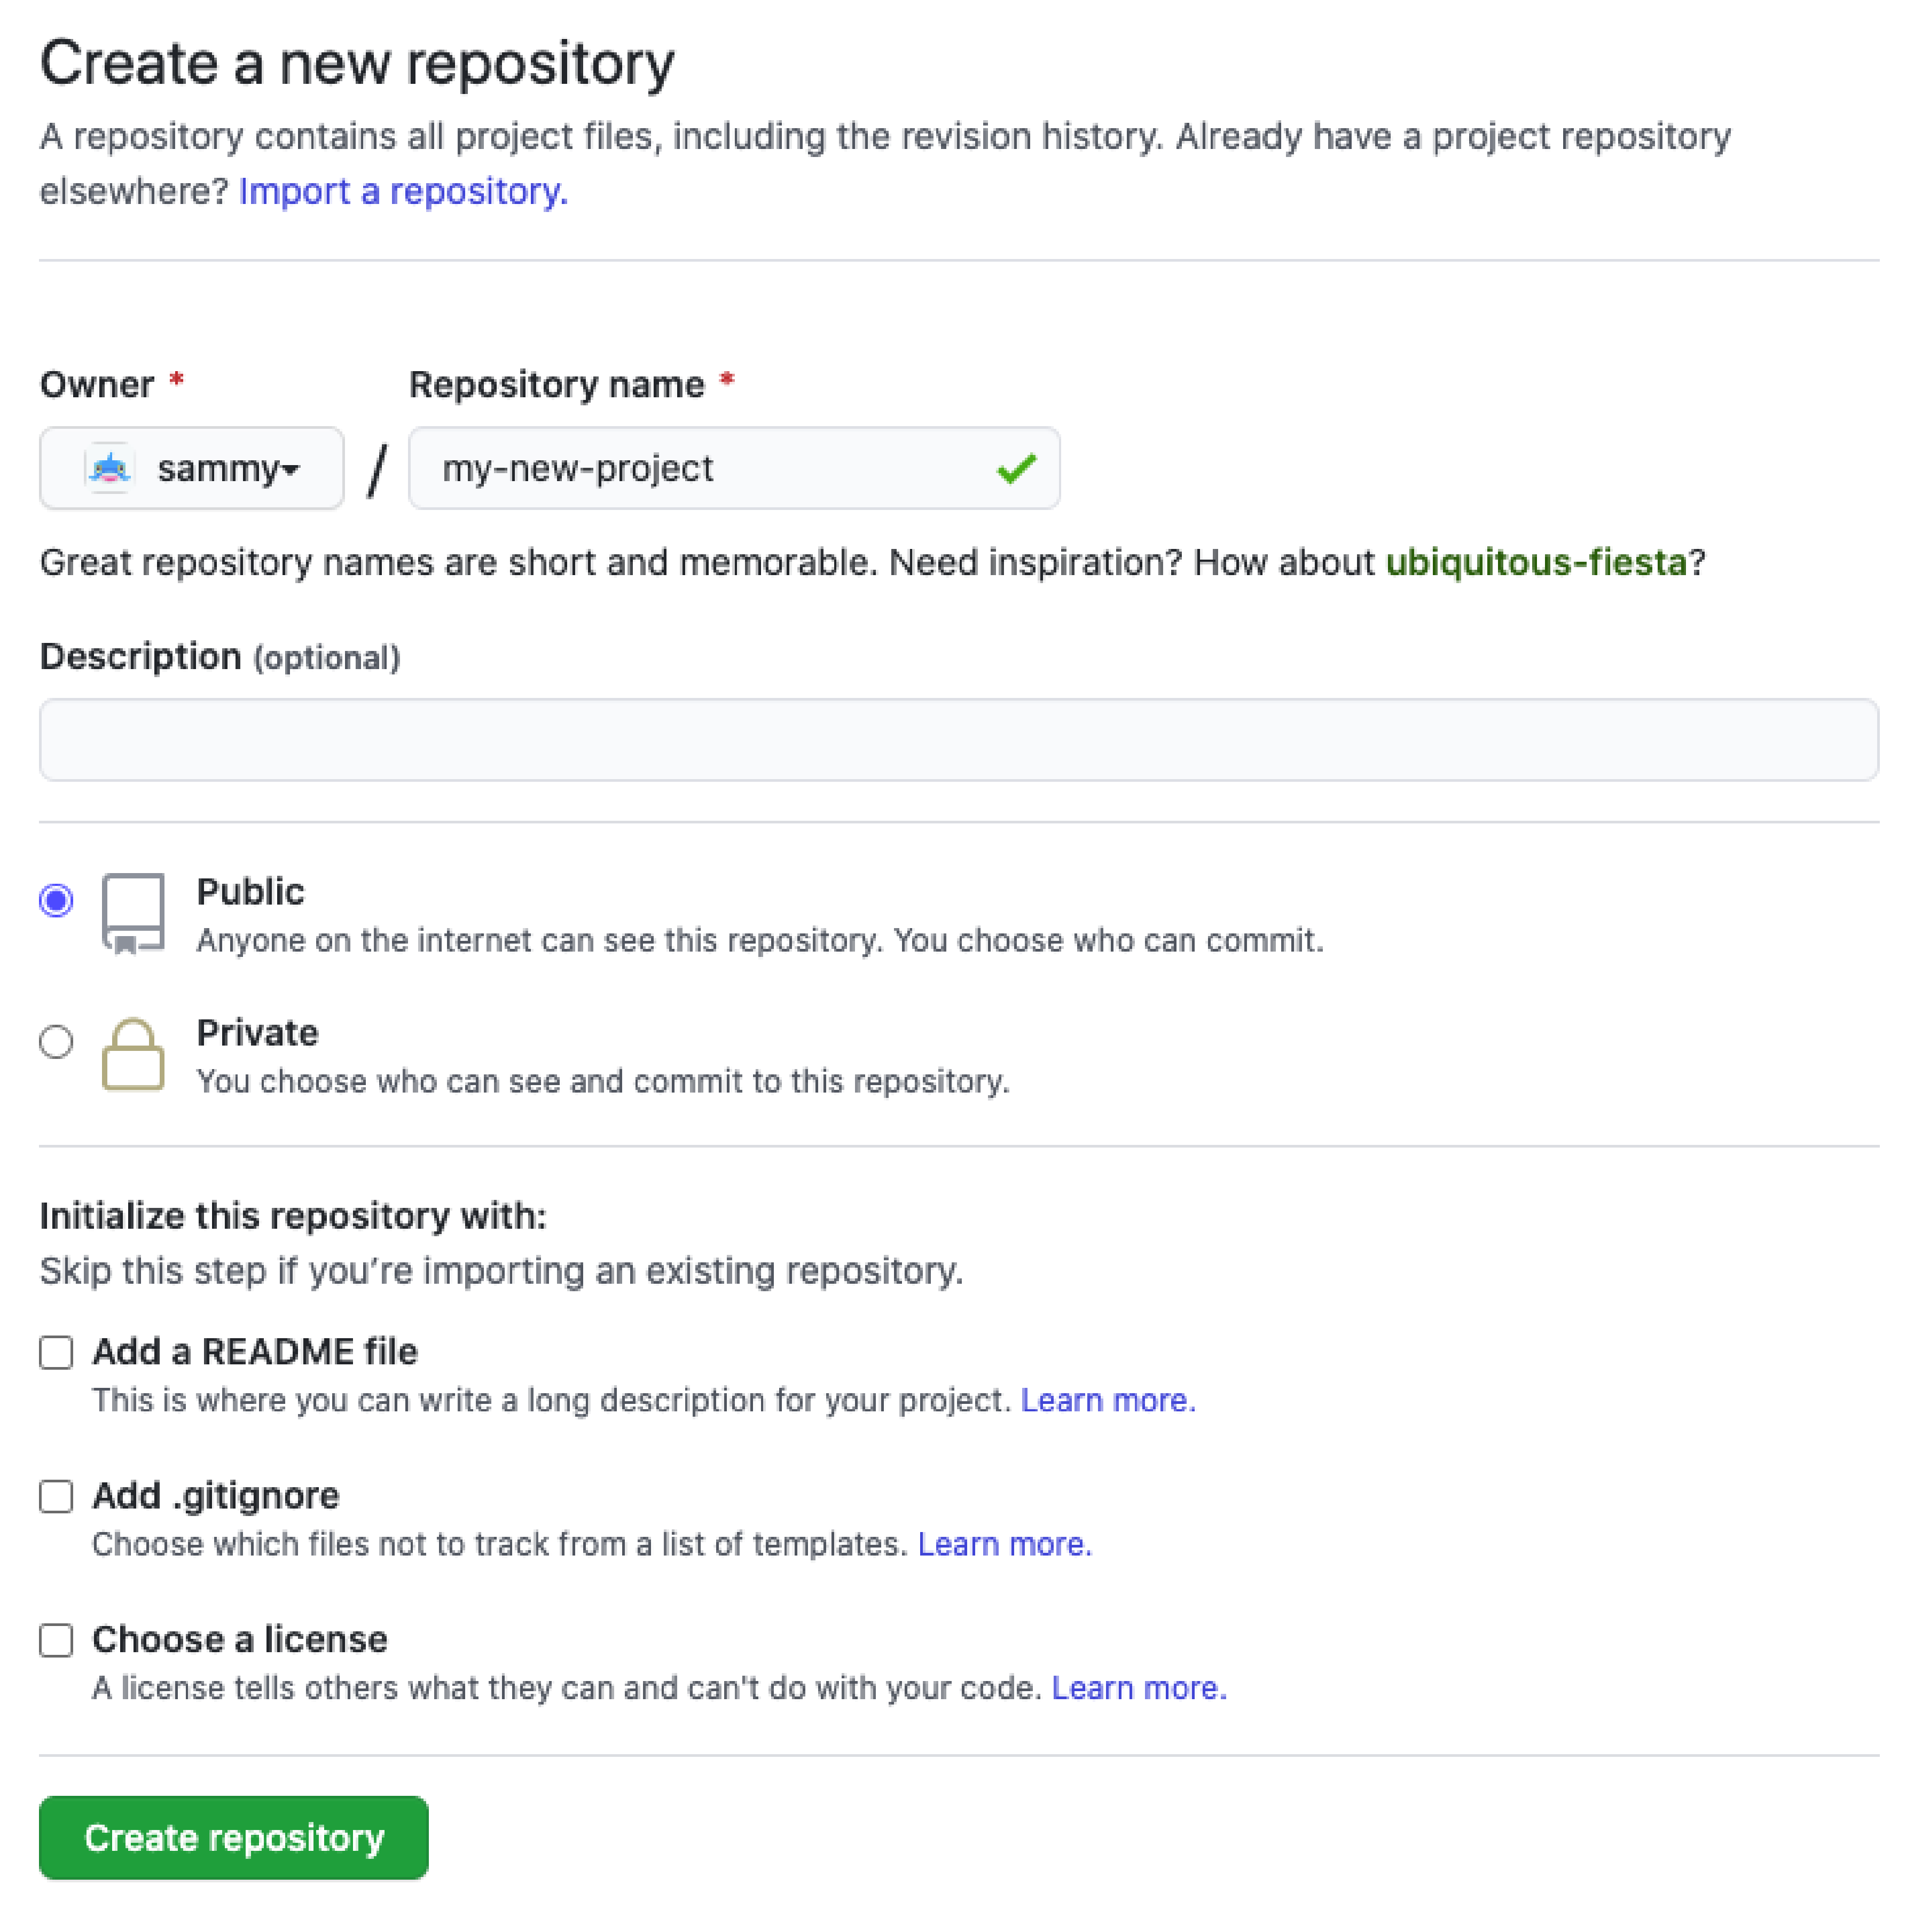
Follow these settings:
- Repository name: Choose a name for your project (e.g.,
hugo-vibe-site). - Description: (Optional) A brief description of your project.
- Public/Private: Choose
Publicif you're okay with the code being visible to anyone, orPrivateif you want to control access. For a personal project,Privateis often a good starting point. - Initialize this repository with: Do not check any of these boxes (Add a README, Add .gitignore, Choose a license). We will create these files ourselves locally to ensure they are tailored for a Hugo project.
Click "Create repository". GitHub will then show you a page with some instructions, including a URL for your new repository. Keep this page open.
Step 2: Initialize a Git Repository in Your Local Project
Now, open your terminal or command line and navigate into your Hugo project's root directory. Once you're there, run the following command:
git init
This command initializes an empty Git repository in your project folder. It creates a hidden .git directory where Git will store all of its tracking information, including the entire history of your project.
Step 3: Create a .gitignore File
Your Hugo project generates certain files and folders that should not be part of your version control history. The public directory, for example, contains the final compiled website, which is rebuilt every time. Tracking it would bloat your repository with redundant data. The .gitignore file tells Git which files and folders to ignore.
Everything I learned about Hugo: Building ...
The blog post 'Everything I learned about Hugo: Building ...' provides a practical, real-world example of setting up version control for a Hugo site, including a perfect .gitignore file.
Locate section 1.8, 'Setup version control (GIT)'. Find the code block that defines the contents of the .gitignore file. We will use this exact content.
Create a new file in the root of your Hugo project named .gitignore (note the dot at the beginning) and add the following content from the resource:
# Generated files by hugo
/public/
/resources/_gen/
/assets/jsconfig.json
hugo_stats.json
.hugo_build.lock

# Other common files to ignore
node_modules
.DS_Store
This ensures your repository stays clean and only tracks the source files needed to build your site.
Step 4: Add and Commit Your Files
Now we'll create our first snapshot. This is a two-step process corresponding to the "Staging Area" and "Local Repository" from the video.
-
Stage your files: Tell Git you want to track all files that aren't ignored.
git add .The
.means "all files and folders in the current directory". This moves your project files from the Working Directory to the Staging Area. -
Commit the staged files: Save the snapshot to your local repository with a descriptive message.
git commit -m "Initial commit of Hugo project"The
-mflag allows you to provide a commit message directly. Good commit messages are crucial for understanding the project's history, a practice that aligns well with your experience in project management and clear communication.
Step 5: Connect Your Local and Remote Repositories
Your local repository doesn't yet know about the remote repository you created on GitHub. Let's connect them.
Go back to the GitHub repository page you left open. Copy the repository URL (make sure to select the SSH or HTTPS version, HTTPS is often easier to start with).
Then, run this command in your terminal, replacing <YOUR_REPOSITORY_URL> with the URL you just copied:
git remote add origin <YOUR_REPOSITORY_URL>
This command tells your local repository that there is a remote location named origin (the standard name for the main remote) at the specified URL.
Step 6: Push Your Code to GitHub
The final step is to "push" the commits from your local repository up to the remote repository on GitHub.
git push -u origin main
Let's break this down:
git push: The command to send commits to a remote.origin: The name of the remote we want to push to.main: The name of the local branch we are pushing. (Note: Older repositories might usemasteras the default branch name).-u: This is shorthand for--set-upstream. It's a one-time setup that links your localmainbranch with themainbranch onorigin. In the future, you'll only need to rungit push.
After running this, refresh your GitHub repository page. You should now see all your Hugo project files!
Test your understanding!
You've just run hugo to build your site, which created the public directory. You then run git status and see that the public directory is not listed as a new or modified file. Why is that?
Show answer
The public directory is ignored by Git because we added the line /public/ to our .gitignore file. This is the correct behavior, as we don't want to track the generated site files in our version control system, only the source code used to create them.
This entire workflow is summarized perfectly in the prerequisites section of Hugo's own documentation on deploying to GitHub Pages.
The official Hugo documentation provides a concise checklist that mirrors the steps we've just taken. It's a great reference to confirm the standard procedure.
Look at the 'Prerequisites' section. You'll see that steps 3 through 6 outline exactly what we just did: create a GitHub repo, git init locally, connect the remote, and finally commit and push.
Conclusion
Congratulations! You have successfully placed your Hugo project under version control with Git and established a remote repository on GitHub. This is a monumental step in professional web development. It not only backs up your work but also creates a definitive project history and, as we'll see next, enables powerful automation.
Key Takeaways:
- Git is a version control system for tracking changes in a project's history.
- The fundamental workflow is to add files to a staging area, commit them to your local repository, and push them to a remote repository like GitHub.
- The
.gitignorefile is essential for Hugo projects to prevent generated folders like/publicand/resourcesfrom being tracked. - Setting up a remote repository on GitHub provides a central backup and the foundation for collaboration and automated deployment.
Preview of the next lesson:
With your code now living on GitHub, we can connect it to an automated deployment service. In our next lesson, we will connect your Git repository to a platform like Netlify or Vercel and configure the build settings. This will create a workflow where every time you git push a change, your website will be automatically rebuilt and published online.
This diagram gives a conceptual preview of the kind of automated pipeline we're about to build.
