Hello! Welcome to the fifth module of our course. We're about to tackle one of the most exciting and powerful aspects of your "vibe coding" workflow: building a complex, dynamic homepage.
In our last lesson, you learned how to create section-specific list layouts. This gave you control over the design of pages like /blog or /services by overriding the default templates. We were still working within the conventional Hugo structure, where content lives in the content folder and is organized into sections.
Today, we're shifting gears to focus on the homepage. A homepage is unique; it's not just a list of posts but a carefully constructed mosaic of different content blocks—a hero banner, a features section, testimonials, a call-to-action, and more. For our purpose, managing this complexity requires a different approach than just creating a markdown file.
Our learning outcome for this lesson is to model a multi-section homepage structure in a Google Sheet and sync it to a Hugo data file. This is the foundational step for creating a homepage that is both powerful and easily updatable by non-technical team members, a key advantage you'll appreciate from your experience managing cross-functional teams.
We will cover:
- The strategy of using Google Sheets as a content source for a homepage.
- How to design a spreadsheet schema to represent different homepage sections.
- The process of making this data available to Hugo by syncing it to the
datadirectory.
Why Use a Google Sheet for Your Homepage?
For a content-heavy section like a blog, markdown files in the content directory are perfect. But for a modular homepage, where you want to reorder sections, tweak copy, and change calls-to-action on the fly, a different system is needed. Using a Google Sheet as your "database" or Content Management System (CMS) offers several compelling advantages, especially in a professional setting.
Run a website off a Google Sheets Database, with Hugo
The article 'Run a website off a Google Sheets Database, with Hugo' by Mark Hansen provides an excellent real-world example of this architecture. The author discusses the rationale and the pros and cons of this approach, which he calls 'heresy' in a tongue-in-cheek way.
Please read the introduction ('My Requirements') and the section 'Spreadsheet as Database? Heresy!'. Pay close attention to the list of advantages, such as the great data entry UI and built-in collaboration, and the disadvantages, like the lack of data typing.
As you can see, for many projects, the benefits of accessibility and ease-of-use far outweigh the technical drawbacks. You're effectively creating a user-friendly admin panel for your homepage without writing a single line of backend code.
Modeling Your Homepage Structure
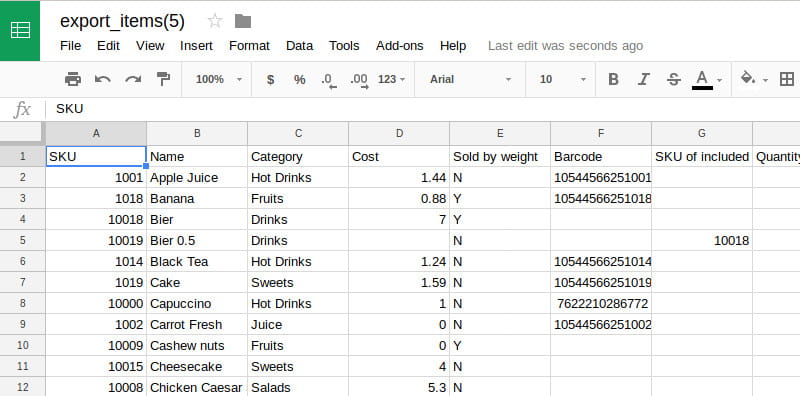
The key to success is a well-designed data model. In our case, the "model" is the structure of our Google Sheet. The principle is simple:
- Each row will represent one section of your homepage.
- Each column will define a specific attribute of that section.
Let's imagine a homepage with three sections: a hero banner, a grid of features, and a final call-to-action banner. Here's how we could model that in a Google Sheet:
id |
type |
title |
content |
image |
cta_text |
cta_link |
|---|---|---|---|---|---|---|
| hero | hero-banner | Build Websites with Vibe | The future of web dev is here. | /images/hero.jpg | Learn More | /about |
| features | feature-grid | Our Key Features | Explore what makes us unique. | |||
| cta | cta-banner | Ready to Get Started? | Sign up now for early access. | Sign Up Now | /signup |
Let's break down these columns:
id: A unique, machine-readable name for the section (e.g.,hero,features).type: This is crucial. It tells Hugo which kind of section this is. In our next lesson, we'll use this field to select the correct partial template (e.g., ahero-banner.htmlpartial or afeature-grid.htmlpartial).title,content: The main text for the section.image: The path to an associated image. Note that not all sections will need an image.cta_text,cta_link: The text and destination for any call-to-action buttons.
This structure is both flexible and scalable. To reorder the homepage, you'd just reorder the rows. To add a new section, you'd just add a new row.
From Google Sheet to Hugo Data File
Now that we've designed our sheet, how do we get this data into our Hugo project? The goal is to transform the data from your spreadsheet into a file that Hugo can natively understand, like a JSON, TOML, or YAML file, and place it inside the data directory.
In your "vibe coding" workflow, an AI tool like memex.tech is designed to handle this synchronization. You would typically configure the tool by giving it access to your Google Sheet and telling it to sync the contents to a specific file, for example, data/homepage.json.
When the sync runs, the tool reads your sheet and generates a file that looks like this:
data/homepage.json
[
  {
    "id": "hero",
    "type": "hero-banner",
    "title": "Build Websites with Vibe",
    "content": "The future of web dev is here.",
    "image": "/images/hero.jpg",
    "cta_text": "Learn More",
    "cta_link": "/about"
  },
  {
    "id": "features",
    "type": "feature-grid",
    "title": "Our Key Features",
    "content": "Explore what makes us unique.",
    "image": null,
    "cta_text": null,
    "cta_link": null
  },
  {
    "id": "cta",
    "type": "cta-banner",
    "title": "Ready to Get Started?",
    "content": "Sign up now for early access.",
    "image": null,
    "cta_text": "Sign Up Now",
    "cta_link": "/signup"
  }
]
This process of converting tabular data into structured content files is a common pattern. The article by Mark Hansen you read earlier describes a similar workflow using a Python script in a Jupyter Notebook to generate individual content files from a Google Sheet. While our approach creates a single data file for the homepage, the underlying principle of "syncing" is the same.
Test your understanding!
You want to add a new "Testimonials" section to your homepage, between the "Features" and "CTA" sections. It should display a quote from a happy customer.
- How would you modify your Google Sheet to add this new section?
- What would the new row of data look like? (You can make up the content).
Show answer
- You would insert a new row in your Google Sheet between the
featuresrow and thectarow. - The new row might look something like this:
id |
type |
title |
content |
image |
cta_text |
cta_link |
|---|---|---|---|---|---|---|
| testimonials | testimonial-slider | What Our Users Say | "This product changed my life!" - Jane Doe | /images/jane-doe.png |
An Alternative: Hugo's Built-in Remote Data Fetching
While using an AI-powered sync tool is central to your workflow, it's valuable to understand the underlying technology Hugo provides for this. Hugo can fetch data from remote sources at build time using functions like getCSV and getJSON.
This method skips the local data/homepage.json file and instead pulls the data directly from a public URL. To do this with a Google Sheet, you first need to publish it to the web as a CSV file.

In the publish dialog, you would select your specific sheet (e.g., "Homepage") and choose "Comma-separated values (.csv)" as the format. This gives you a public URL.
In the next lesson, we will see how a template could then use this URL to fetch the data. For now, let's read about this powerful feature.
The article 'Hugo and Remote Data Files' from CloudCannon explains this concept clearly. It shows how to publish a Google Sheet and use Hugo's getCSV function to consume it directly within a template.
Please read the section 'Get data from Google Sheets'. Focus on the steps to publish the sheet and look at the getCSV code example. This will give you a solid understanding of how Hugo can handle this process natively.
For your workflow, syncing to a local data/homepage.json is often preferable as it makes the data available offline and can speed up local development builds by not needing to fetch it every time. However, knowing about getCSV is an excellent tool to have in your toolkit.
Conclusion
You've now established the critical link between a user-friendly content interface (Google Sheets) and your Hugo project's data layer. You've designed a robust data model for a complex homepage and understood the sync process that makes this data available to Hugo. This decouples content management from code, allowing for faster content updates and empowering your team—a strategy that aligns perfectly with modern SEO and content marketing practices.
Key Takeaways:
- Homepages are often composed of multiple, distinct sections, making them a poor fit for single markdown files.
- Google Sheets provides an excellent, user-friendly "CMS" for managing modular homepage content.
- A good data model uses rows to represent homepage sections and columns to define their properties (
type,title,content, etc.). - The data is made available to Hugo by syncing the sheet to a structured data file (e.g.,
data/homepage.json) in your project repository. - Hugo also has a native
getCSVfunction to fetch this data directly from a public URL at build time.
Preview of the next lesson:
We have our data model and the data/homepage.json file ready. The next logical step is to build the view. In our next lesson, we will prompt an AI to create a dynamic homepage template that ranges over the data file to render different sections. This is where you'll see your Google Sheet content come to life on the web page.